File Systems, Storage, and Permissions on Quest#
Tip
Quest Storage and Data Policy contains important information on the policies governing storage limits and access.
Caution
Sensitive and restricted data cannot be stored on Quest. See Quest Data Security Guidance for more details.
Tip
If you’re not sure which directory you’re in, open a terminal and run pwd. This command will tell you the full path to the current directory.
Overview#
Quest has three storage locations:
Home:
/home/<netid>: your user home directoryProjects:
/projects/<account-name>: shared storage associated with your allocationScratch:
/scratch/<netid>: temporary storage available by request
These locations serve different purposes, have different disk quotas, and handle permissions differently.
Home |
Projects |
Scratch |
|
|---|---|---|---|
Where is it located on Quest? |
|
|
|
What should be stored here? |
Submission scripts, job log files, and local package and software installations |
Files requiring high-speed access, such as data files; files to be shared with other members of your allocation |
Files requiring short-term storage such as large datasets that need to be processed, output generated by jobs, or downloads |
Is it backed up? |
Yes; files between 24 hours and 4 weeks old can be recovered |
No |
No; files are deleted regularly |
What are the default permissions? |
Only the user has read, write, and execute permissions; access may not be shared. |
All members of the allocation will have read and write on files and directories created in the allocation directory. NOTE: If you copy/create a file or directory using a data transfer tool like Globus or |
Only the user has read, write, and execute permissions |
How much can be stored here? |
80 GB |
1 TB with a Research I allocation and 2 TB with a Research II allocation; additional storage can be purchased by the terabyte |
5 TB |
What is the file limit? |
10 million files |
50 million files |
5 million files |
How do I get access? |
Home directories are automatically created for every Quest user |
Join an existing allocation or create a new one |
|
How do I check disk space utilization? |
|
|
|
More Information |
Warning
There is no “trash” or “recycle bin” on Quest. Files that are deleted are removed immediately. Backups of files from home directories only can be recovered for up to 4 weeks, but changes to a file from the same day will be lost.
Note
For performance reasons, it is recommended to have no more than 7.5 thousand files in a single sub-directory.
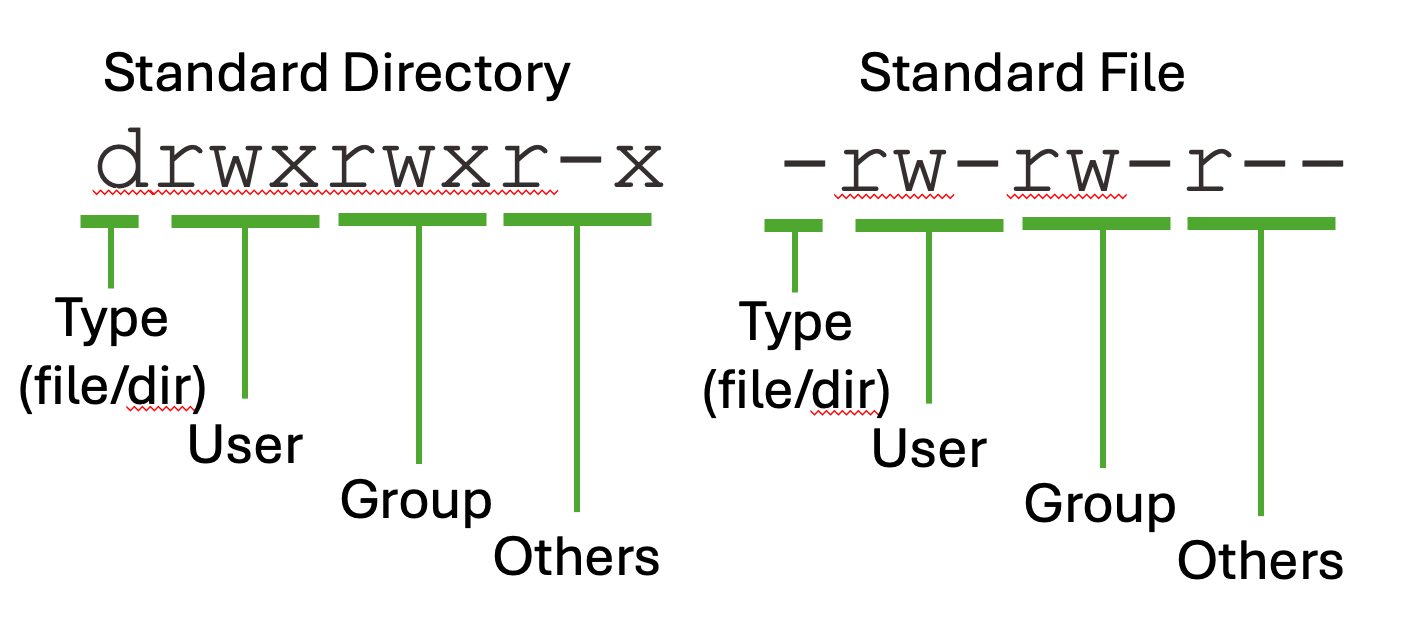
Summary of File Permissions#
Linux file permissions can be a bit confusing the first time you see them.
Permissions on Linux systems are assigned at three levels:
user (u): Your account.
group (g): A specific permissions group that your account belongs to. Your account can be part of multiple groups.
other (o): Any account that is not yours and that does not belong to a specified permissions group.
There are three basic types of permissions which can be assigned by the owner of the file or directory to each of these three access levels: read (r), write (w), and execute (x).
For a file, these permissions allow:
read: Allowed to open the file and read the contents of the file
write: Allowed to modify or delete the file
execute: Allowed to run the file as a process, if possible
For a directory, these permissions allow:
read: Allowed to list the contents of the directory
write: Allowed to create, modify, or delete files in the directory
execute: Allowed to access a file in the directory if you know the name of the file
In order to view permission details of files and folder in Linux, you should use the utility ls .
To view permission details, you must pass the -l flag.
The flags -d and -t, also used below, list the directory or directories themselves, not their contents and sort the output by modification time, respectively.
$ ls -ltd /home/quest_demo/
drwx------ 40 quest_demo quest_demo 16384 May 4 14:57 /home/quest_demo/
Below we show the standard permissions that come when you create a directory and file in your HOME folder on Quest.
$ ls -l
drwxrwxr-x 2 quest_demo quest_demo 4096 May 14 08:31 mydirectory
-rw-rw-r-- 1 quest_demo quest_demo    0 May 14 08:30 myfile.txt
Note
It is critical to note the permissions on folders higher up the directory tree. The permissions on these folders will impact user access and permissions on folders downstream. For instance, the HOME folder itself has permissions
drwx------ 40 quest_demo quest_demo 16384 May 4 14:57 /home/quest_demo/
which means that although the file and folder created above may appear to be readable/accessible by all “other” users on Quest, the permissions on the HOME folder itself blocks such access.
See also
Learn more about Linux file permissions on the Red Hat website .
Home Directories#
All Quest users have a home directory at /home/<netid>. All home
directories have a fixed quota (limit) of 80GB. Access to home directories cannot be shared with other users.
Your home directory is a good place to store submission scripts, job log files, and local package and software installations.
Home directories are backed up nightly. If you inadvertently delete a file from your home directory, immediately contact quest-help@northwestern.edu as it may be possible to restore the last backup, which is usually from the day before. As long as the file or directory in question was not created and deleted within 24 hours, files and directories can be recovered for up to 4 weeks.
Check Home Space Utilization#
Tip
Because of their size, home directories often fill up. Use the command below to get information about which files are taking up space in your home directory.
You can check how much space you’re using in your home directory
with homedu:
$ homedu

Beginning detailed disk usage report for /home/<netid>.
Please be patient - this can be a time-consuming operation.

GPFS quota for /home/<netid>

24.22 GB used in 240098 files (30.28% of 80 GB quota)
Home Directory Expiration#
If you leave the University, your NetID will expire. Home directories associated with expired NetIDs are deleted and cannot be restored.
Before leaving the university, and well ahead of your NetID expiration, we recommend moving the files in your home directory. Solutions include:
Copy all of the files you need from your home directory to a storage location other than Quest that you will maintain access to after your NetID expires.
Move files that your colleagues need access to on Quest into a shared projects directory.
If you need help backing up or copying your data to locations accessible by your colleagues, please email quest-help@northwestern.edu .
Projects Space#
The projects volume consists of high-speed storage to support fast reading and writing of files. Large data files, files that need to be accessed quickly, and files that need to be shared with collaborators should be stored in a projects directory.
The size of your projects directory is determined by your allocation type. Research I allocations have a 1 TB quota on the projects space, and Research II allocations have a 2 TB quota. Researchers requiring additional storage may purchase it by the terabyte .
Check Projects Space Utilization#
Check how much space is used in your projects directory with the checkproject command:
$ checkproject <account-name>

====================================
Reporting for project <account-name>
------------------------------------
1 GB in 4623 files (0% of 1000 GB quota)
Allocation Type: Allocation I
Expiration Date: 2026-12-01
Status: ACTIVE
Compute and storage allocation - when status is ACTIVE, this allocation has compute node access and can submit jobs
------------------------------------
====================================
Projects Directory Expiration#
The checkproject command can also be used to check when your General Access allocation will expired by noting the “Expiration Date” field.
Storage resources for priority access allocations expire at different times. Please contact quest-help@northwestern.edu for details regarding the expiration of your resources.
Projects Directory Permissions#
In the projects directories anyone belonging to an allocation may be able to read, write, and execute files that belong to other users of that same allocation. However, there are situations where files in a projects directory may have more restrictive permissions. For example, if you copy data from your home directory into your projects space it will inherit the permissions of the directory it is being copied into as expected, but if you move data from your home directory into your projects space, the data retains the original permissions and so the ownership and group ownership will belong to you; no one else will be able to read your files in projects space unless you change the file permissions or the group ownership of your files is changed.
When a file is created, it has read (r) and write (w) permissions for the user and the group:
$ cd /projects/<pXXXXX>/
$ touch myfile.txt
$ ls -l myfile.txt
-rw-rw-r-- 1 <netid> <pXXXXX> 0 May 24 14:58 myfile.txt
In the code above, touch creates the file myfile.txt.
myfile.txt can be modified (the write (w) permission), by anyone in
your allocation. If you would like to leave the file as being able to be
read (r) by anyone in the allocation but want to remove the ability for
it to be modified by anyone in the allocation, you can use
the chmod command to remove the w permission for the group.
$ chmod g-w myfile.txt
$ ls -l myfile.txt
-rw-r--r-- 1 <netid> <pXXXXX> 0 May 24 14:58 myfile.txt
In chmod g-w myfile.txt, g stands for group, - indicates to remove a permission, and w is the write permission.
Scratch Space#
The scratch volume provides high-speed, temporary storage for actively used research data at no cost to the user.
Some scratch storage use cases include:
Storing temporary files created while running jobs
Downloading/staging data for processing soon to be performed
Large data transfers
Short-term storage for large datasets
Scratch directories are available to any Quest users currently in an
active allocation: request scratch storage .
Access to Quest scratch space will typically be granted within one week
of completing the application. Once you have been approved, you will be
allocated a directory with your NetID: /scratch/<netid>. You
scratch directories can be accessed from all Quest nodes including login
nodes, compute nodes, and the Quest Analytics Nodes.
Quest scratch space is not backed up and files stored there are deleted regularly. It is not appropriate for long-term storage or as the sole location for research data that cannot be regenerated.
File Modification Dates#
When downloading data or transferring data to scratch, please carefully note the last modified date of the file. Under certain download or transfer conditions, the data will retain its original “last modified” date and not receive a new “last modified” date.
For example, if we download a file with wget it may retain its original last modified date:
$ date
Mon Oct 31 11:54:57 CDT 2022
$ wget https://github.com/pytorch/pytorch/releases/download/v1.12.0/pytorch-v1.12.0.tar.gz
$ ls -lt pytorch-v1.12.0.tar.gz
-rw-rw-r-- 1 <netid> <netid> 206507948 Jun 28 11:51 pytorch-v1.12.0.tar.gz
In this situation, under the default scratch space retention period of 30 days, this
file would be deleted within the day. Although you are not allowed
to use touch to continually update the last modification dates of
files in an effort to save them from deletion, you may use touch once to
ensure that a file’s initial modification date reflects the time the
file first lands in scratch.
$ touch pytorch-v1.12.0.tar.gz
$ ls -lt pytorch-v1.12.0.tar.gz
-rw-rw-r-- 1 <netid> <netid> 206507948 Oct 31 11:59 pytorch-v1.12.0.tar.gz
Please also note a similar effect when using mv (move) versus cp (copy) in Linux.
$ pwd
/scratch/<netid>
$ ls -lt /projects/<account-name>/<netid>/test_230320.zip
-rw-r--r-- 1 <netid> <account-name> 2203 Mar 24  2020 /projects/<account-name>/<netid>/test_230320.zip
$ cp /projects/<account-name>/<netid>/test_230320.zip .
$ ls -l test_230320.zip
-rw-r--r-- 1 <netid> <netid> 2203 Jun  2 09:40 test_230320.zip
$ rm test_230320.zip
$ mv /projects/<account-name>/<netid>/test_230320.zip .
$ ls -l test_230320.zip
-rw-r--r-- 1 <netid> <account-name> 2203 Mar 24  2020 test_230320.zip
Global Scratch Settings#
To ensure scratch space availability for everyone, global scratch limits
may be adjusted by Northwestern IT if storage utilization is over a
critical threshold. When a change is required, scratch space users will
receive notice. The current deletion period can be viewed
through the checkscratch command or in Quest’s Message Of The Day
(MOTD), which is displayed at the top of your terminal when you log in to
Quest via SSH.
During normal operation conditions, the global scratch settings are given in the table below. These limits cannot be adjusted for individual users.
Policy |
Setting |
|---|---|
Storage quota per user |
5 TB |
File retention period |
30 days after last edit |
Maximum number of files per user |
5,000,000 |
Check Scratch Space Utilization#
In this section, you will learn how you can check your scratch space utilization and determine which files will be deleted in the coming “X” number of days.
Determine how much space you are using in scratch#
The scratchdu command is helpful to find how much space is currently being used in your scratch directory.
$ scratchdu

Beginning detailed disk usage report for /scratch/<netid>.
Please be patient - this can be a time-consuming operation.


GPFS quota for /scratch/<netid>

0 GB used in 7953 files (0% of 5120 GB quota)


16M     /scratch/<netid>
2.3M    /scratch/<netid>/my_env
4.0K    /scratch/<netid>/262199
4.0K    /scratch/<netid>/test_folder
4.3M    /scratch/<netid>/test_env
4.0K    /scratch/<netid>/testing_again
9.0M    /scratch/<netid>/test_envs

Note that totals may differ from the quota due to rounding and
due to file system activity during report generation.
Determine files stage for deletion#
You can use the find utility to determine which files will be deleted in the next “X” days.
The following is an example of using the find command to list every file in your /scratch folder that has a last modified and last accessed date greater than 28 days ago and save the output to a file called files_to_be_deleted_in_the_next_two_days.out. In our case, it is best to think of this command as determining which of your files will be deleted sometime in the next two days.
$ find /scratch/<netid> -mtime +28 -atime +28 -fprint files_to_be_deleted_in_the_next_two_days.out
$ head -n3 files_to_be_deleted_in_the_next_two_days.out
This user has no files which will be deleted sometime in the next two days. If we expand the range to files that will be deleted sometime in the next 25 days, you will see that there are files which match this query.
$ find /scratch/<netid> -type f -mtime +5 -atime +5 -fprint files_to_be_deleted_in_the_next_twenty_five_days.out
$ head -n 3 files_to_be_deleted_in_the_next_twenty_five_days.out
/scratch/<netid>/new_lmod/test_ssd/modules_spack_2025/lvm2/2.03.14-gcc-8.5.0
/scratch/<netid>/new_lmod/test_ssd/modules_spack_2025/libxrandr/1.5.4-gcc-12.4.0
/scratch/<netid>/new_lmod/test_ssd/modules_spack_2025/randrproto/1.5.0-gcc-12.4.0
Scratch Space Permissions#
Only the user can write to their scratch directory. However, the user can allow other users to read/execute their files.
There are two methods which will provide others in your allocation with read/execute permissions to files in your scratch directory. The first method will make it so that all current and future files/folder in scratch will have read or read/execute permissions for members of your allocation. The second method would make it so that this will only occur for the current files and folders. Both methods are described below
Navigate to the scratch directory:
cd /scratch.Use the
chgrpcommand to change thegroupof your scratch directory to<account-name>:chgrp <pXXXXX> <netid>.Now, you can either:
- Change the group permissions for all current and future files/folder:
chmod -R g+rxs <netid>. - Change the group permissions for all current files/folder:
chmod -R g+rx <netid>.
- Change the group permissions for all current and future files/folder:
Here is an example for NetID abc123 and account p00000:
# Navigate to the scratch directory
$ cd /scratch

# Use the chgrp command to rescursively change the group to <account-name>
$ chgrp -R p00000 abc123

# Allow the group to have read (r) and execute (x) permissions and set the setgid (s) bit functionality which will force any new files created within a folder to have its group set to the same group that is set on the parent directory.
$ chmod -R g+rxs abc123

# Verify that the group setting and permissions were updated correctly
$ ls -ld /scratch/abc123/
drwxr-x--- 3 abc123 p00000 4096 May 26 12:46 /scratch/abc123/
You can check if a folder has the setgid functionality in place by using the stat command and see if the numeric value 2 proceeds the owner, group, others permissions.
$ stat -c "%a %U:%G %n" ./no-setgid-bit/
755 <owner>:<group> ./no-setgid-bit/

$ stat -c "%a %U:%G %n" ./yes-setgid-bit/
2775 <owner>:<group> ./yes-setgid-bit/