Analytics Nodes Usage Tips#
This page provides a high-level overview of some of the common use cases for the Quest Analytics Nodes. For a general overview of the system, please see the Quest Analytics Nodes page.
Transferring and Accessing Files#
All of the Quest file systems are accessible from the Quest Analytics Nodes. You can transfer files using the methods to transfer files to Quest more generally. Users of the Analytics Nodes can also upload files smaller than 500MB using the RStudio, SAS Studio, or Jupyter interfaces; details for each system are below.
Using RStudio#
Connect
Connect to https://rstudio.quest.northwestern.edu from the GlobalProtect VPN and sign in with your NetID and password.
Managing Files#
In addition to transferring files using the normal methods for Quest, RStudio users can also transfer files smaller than 500MB using the Files tab in RStudio. There is an upload button that will allow you to select files from your computer to transfer.

When you connect to RStudio, you will initially be in your home
directory. This is /home/<netid> on Quest.
To access a projects directory, click on the button with three small dots
on the right in the Files tab. Then enter the full path to your project
folder (ex. /projects/<allocation-name>).

To transfer files larger than 500MB to Quest, or to download files, please use another transfer method.
Installing Packages#
Users may install packages using the Packages tab in RStudio or the install.packages function in R. Some packages that require code to be compiled may need to be installed by connecting to a Quest login node, loading the R module used on the Analytics Nodes, and installing the package there. See Using R and RStudio on Quest for more details on package installation.
Packages that require access to software libraries outside of R may not be able to be installed for use on the Quest Analytics Nodes.
Using SAS Studio#
Connect
Connect to https://sasstudio.quest.northwestern.edu from the GlobalProtect VPN and sign in with your NetID and password.
Managing Files#
In addition to transferring files using the normal methods for Quest, SAS Studio users can also transfer files smaller than 500MB using the SAS Studio interface. See the upload icon in the Server Files and Folders window in the upper left of the session.
When you first connect to SAS Studio, you will be in your Quest home
directory (/home/<netid>). To access your projects directory
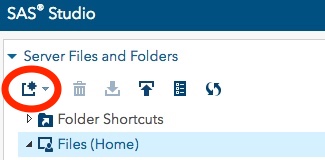
(/projects/<allocation-name>), create a new folder shortcut. To do this,
click on the icon in the upper left in the Server Files and Folder
window that looks like a rectangle with an * on it.
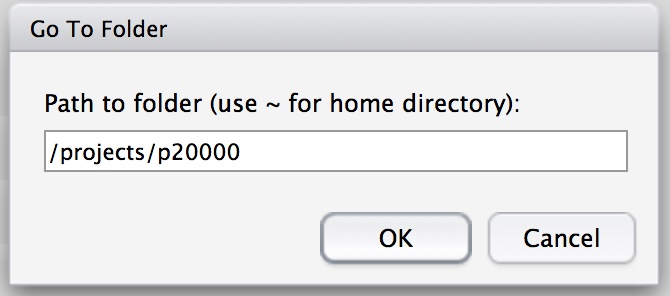
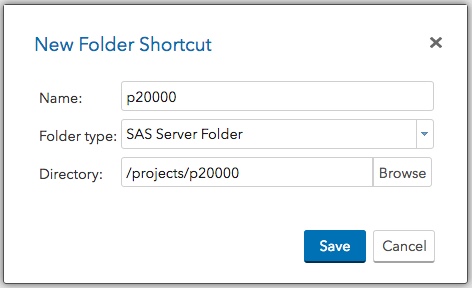
From the Menu, choose Folder Shortcut. Then give the shortcut a name and enter the path to your projects folder. For example, if your allocation ID was p200000
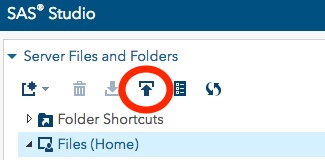
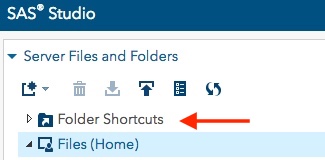
When you click Save, the folder is now accessible from the Folder Shortcuts menu in Server Files and Folders:
You can access any of your files on Quest in your scripts by specifying the full path to the file.
To transfer files larger than 500MB to Quest, or to download files, please use another transfer method.
Using Jupyter Notebook or Lab#
Connect
Connect to https://jupyterhub.quest.northwestern.edu from the GlobalProtect VPN and sign in with your NetID and password.
Inactivity
Jupyter notebook servers are automatically killed after 18 hours of inactivity.
Accessing JupyterLab Instead of Notebook#
The default behavior for JupyterHub will be to launch a Jupyter Notebook instance. The URL for the notebook will end as follows:
/home/<netid>/tree?
To instead run JupyterLab after logging into JupyterHub, you can change the URL to
/home/<netid>/lab
which will trigger the creation of a JupyterLab instance.
Managing Files#
In addition to transferring files using the normal methods for Quest, Jupyter users can also transfer files smaller than 500MB using the the Jupyter web interface. There is an Upload button that will allow you to select files from your computer to transfer.

When you connect to Jupyter, you will initially be in your home
directory. This is /home/<netid> on Quest. You cannot navigate to a directory
“outside” of your home directory (e.g., to a projects directory) via the
Jupyter interface. However, you can connect to the Quest login nodes and use the terminal to
create a symlink to a projects directory within your home directory,
allowing you to navigate there. For example:
$ ln -s /projects/<projectID> ~/<projectID>
This will create a symlink <projectID> in your home directory, and when you click on
it in the Jupyter interface you will be taken to the projects directory
itself.
To transfer files larger than 500MB to Quest, or to download files, please use another transfer method.
Environments and Packages#
The default kernel/environment contains a limited number of packages: numpy, pandas, matplotlib, scipy, scikit-learn, scikit-image, and scipy.
Tip
If you need other packages (or versions of packages) installed, you can create a conda environment and add it to your list of available environments. To access a virtual environment from within Jupyter, please review Accessing Mamba/Conda Environments in Jupyter.