Using Git with RStudio#
Installation#
To use git and GitHub with R/RStudio, you first need to set up all of the components. Then you need to link them together. There are a lot of things that can go wrong along the way. Northwestern researchers can get help via our free consultation service .
Looking to learn git? Check out our Git Resource Guide.
Note: if you are not using a current operating system you may run into installation problems. In particular, current versions of RStudio require up to date operating systems.
1. Set up a GitHub account#
If you don’t already have one, create a GitHub account. If you do have an account, make sure you know your username, password, and the associated email address.
2. Install git#
Git shows up as an application in Windows; you should be able to search for it or see it listed in your applications. If you don’t have it, download and install git. During installation, you will be asked a series of questions. Keep the default options, except perhaps for the editor. If you do not regularly use the command line, you may want to change the default editor to Notepad or another text editor that you are familiar with.
When you are done, you should see three “Git” programs installed. Open “Git Bash”” and make sure it runs.
Git may already be installed on your Mac. To check, open the Terminal (Applications > Utilities > Terminal) and type git --version. If it is installed, you will see the version number; otherwise you will get an error.
If you do not have git installed, or it is before version 2.17, you will want to install git. Follow these instructions to install git via Homebrew, which is a program to manage software installations like this on a Mac. You may need to install homebrew first (instructions for that are provided).
After you’ve installed git, try git --version in the Terminal again to make sure it is installed and the version is updated (current version should be >= 2.50).
Install git using the appropriate package manager for your Linux distribution.
3. Update R/RStudio#
The version of R will not affect git, but RStudio and the usethis package that provides some utility functions for working with git repositories require a recent version of R.
The version of RStudio does matter, as it is what is providing the interface for using git. Download and install the latest version of RStudio Desktop (free) - this will install it or update your previous installation.
4. Install the usethis R package#
Install the usethis package for R:
install.packages("usethis")
Connect RStudio and Git#
If you haven’t restarted RStudio since installing git, do that first.
Mac: First, from the Terminal in RStudio (in the same part of RStudio as the R Console, but a separate tab), type which git to get the path to git. Then, under the Tools menu, open Global Options. Go to the Git/SVN section. Enter the path to git you got from the Terminal in the “Git executable” box.
Windows: From RStudio, under the Tools menu, open Global Options. Go to the Git/SVN section. Find the git program in your Program Files by using the “Browse…” button to set it as the “Git executable”.
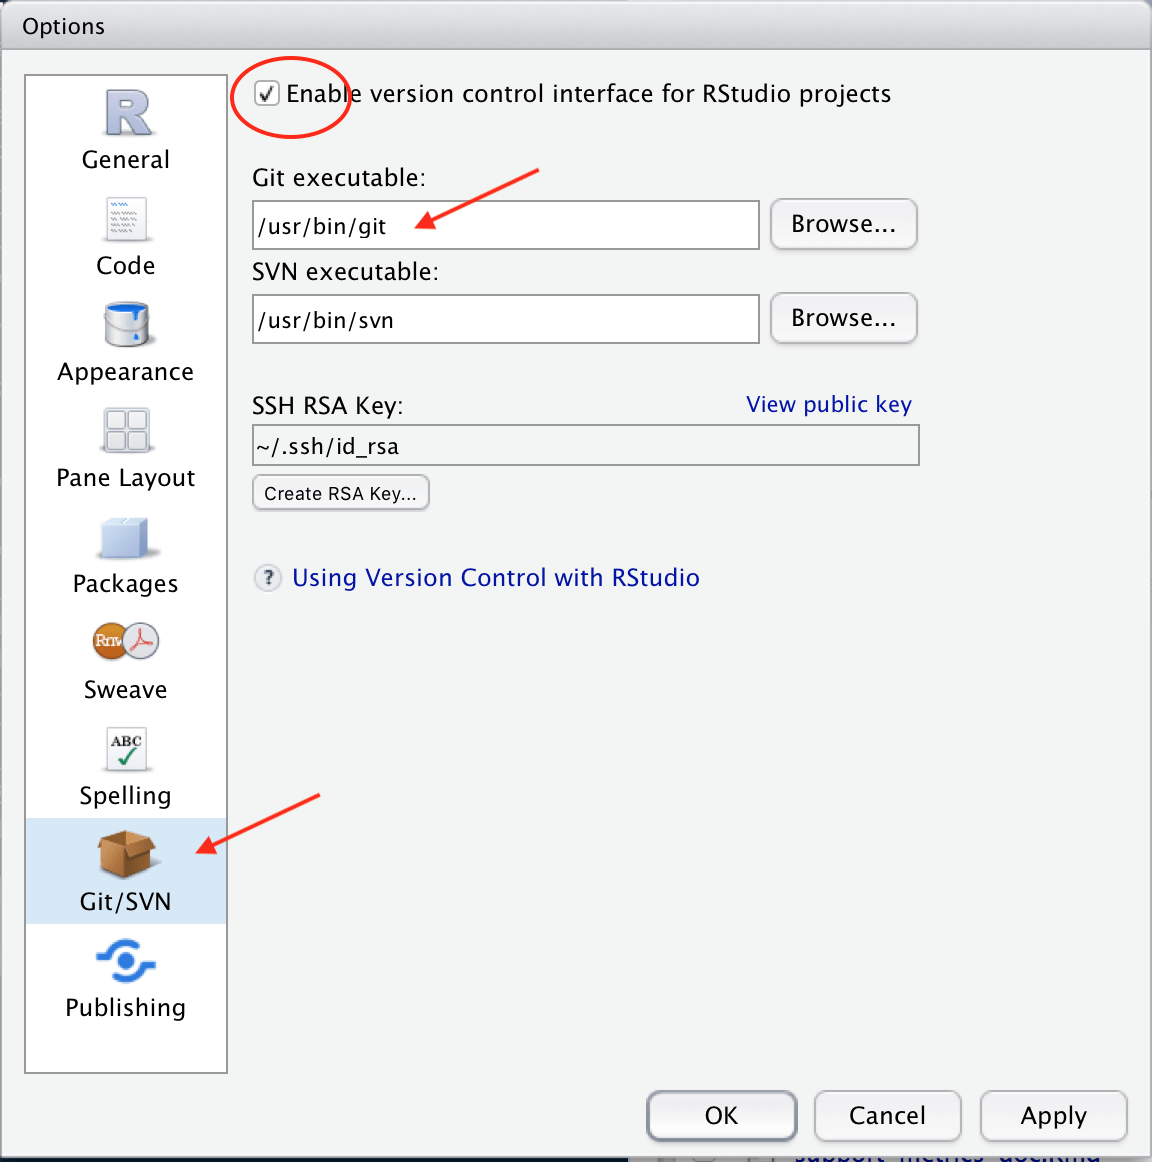
Click OK and return to RStudio. You may need to close and then reopen RStudio.
Configure Git#
You want git to know who you are so it can associate your changes with you. In either the Terminal (Mac) or Git Bash (Windows), type git config -l (that last letter is a lowercase L) to view the existing configuration settings. You want to have at least user.name and user.email set. To set these, run the following commands with your name and email substituted in instead. You must use the email associated with your GitHub account.
To set or change your user name and email for git:
$ git config --global user.name "John Doe"
$ git config --global user.email johndoe@example.com
You can also do this via the usethis package in R :
usethis::use_git_config(user.name="Jane Doe", user.email="jane@example.org")
Linking to GitHub#
When it’s time to send your files to GitHub, GitHub needs to know who you are and that you have authorization to write to your repositories. This authorization can be established using either a personal access token (recommended) or a SSH key. Follow these instructions to set up a personal access token via the usethis package.
If you want to set up SSH, follow these instructions .
You can use git with R/RStudio without GitHub, but you do need a service (or other centralized shared location) to host your repository if you want to work with others on your code. Bitbucket and GitLab are two alternative services. They work in similar ways, although the specifics of the security and authentication may be different.
Setting up a Project/Repo#
A key to getting R and GitHub working together well is to set things up in the right order.
These instructions assume that you want both a local git repository (copy of the files on your computer) and a remote git repository on GitHub. The instructions all create an (or use an existing) RStudio Project to make working with the git repository easier. The usethis package is used to automate the more complicated steps (it’s awesome).
Choose your instructions based on what components of an RStudio project or git repository (AKA repo) you may already have created.
I am starting from…
If you’re just getting ready to start a new project and do not have a git repo, an RStudio project, or R files created, start by creating a new repository on GitHub:
Create a new repository on GitHub
Add a README file (so that there’s at least one file in the repo)
Add a .gitignore file (there’s an R version)
Follow the instructions in the next tab for Starting from an Existing GitHub Repository
This option assumes you do not have a local copy of the code yet on your computer, but there are files in a GitHub repository. This is a common situation when you’re looking to work with a repository that someone else created, or if you just created a new repository.
Create a new RStudio Project . In RStudio: File menu > New Project > Version Control > Git
Copy the URL for the repository on GitHub into the dialog box in RStudio
It’s good practice to keep the name of the directory the same as the name of the repository (this is the default)
When the RStudio project opens, you should see the files in the Files tab and the Git tab should be visible in RStudio
You’re all set up. Proceed with creating new files and editing existing ones. Use the Git Pane to add and commit files. You can also interact with your git repo via the Terminal in RStudio.
If you’re started writing R files that you now want to put under version control with git, first make sure the files are part of an RStudio Project and then set up a local git repo.
Organize all of the files for the repository together in a folder/directory on your computer (if they aren’t already)
Move any files not related to the project/repo elsewhere.
If the directory is already an RStudio Project , open it. Otherwise create a new project in the directory. In RStudio, File menu > New Project > Existing Directory.
Use the
usethis::use_git()function to initialize the git repository and (optionally) add and commit files. The function also creates a.gitignorefile.Use the Git pane in RStudio to add and commit files as needed.
Follow the instructions in the next tap for starting from a Local Git Repo Only to create a remote repository on GitHub and link it to the local repository. You must make at least one commit locally first before going on to this next step.
If your local git repo (directory) is already an RStudio Project, make sure it is open in RStudio. Otherwise create a new project in the directory. In RStudio, File menu > New Project > Existing Directory.
In the R Console, use the
usethis::use_github()function to create a new repository on GitHub and push the local repository to GitHub.You’re all set up. You should be able to open the repository on the GitHub website and pull from and push to the remote repository from RStudio.