Quest OnDemand#
Quest OnDemand is a web portal that provides a user-friendly access point for Quest. It allows users to submit jobs and manage, view, edit, and create files. In addition, it enables users to run Graphical User Interfaces (or GUIs) like MATLAB, RStudio, and Jupyter without installing specialized software. Knowledge of the command line or Linux is not needed.
Prefer Videos?
Try the Using Quest OnDemand video series.
Logging in to Quest OnDemand#
To connect to Quest OnDemand, users must:
Have an active Quest allocation
Be on the Northwestern network; off-campus users must use the Northwestern VPN to connect
Go to https://ondemand.quest.northwestern.edu and sign in with your NetID and NetID password
After you have logged in, you will see a landing page with a dashboard. The navigation bar will look something like the image below.

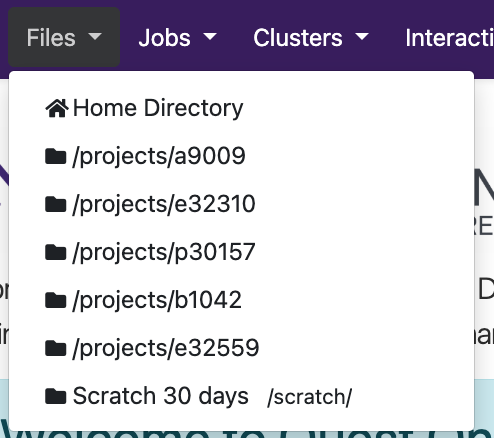
Managing Files with the File Explorer#
Access the Quest file system through the “Files” menu. Under “Files”, there are shortcuts to your home directory, projects directories, and scratch space (if you have one). Files can be viewed, edited, renamed, deleted, and created. Files can also be moved and/or copied between folders on Quest. When transferring large files or large sets of files we recommend using Globus instead.
After navigating to your desired location using the File Explorer, use the Upload and Download buttons to transfer files between Quest and your computer.
Note
The maximum file download and upload size is 10.7 GB. However, it is recommended to use this for files less than 2 GB.

Creating and Submitting Batch Jobs#
Jobs can be monitored, created, edited, and scheduled using the tools under the “Jobs” menu. The Jobs menu has two options, Job Composer and Active Jobs.
Job Composer#

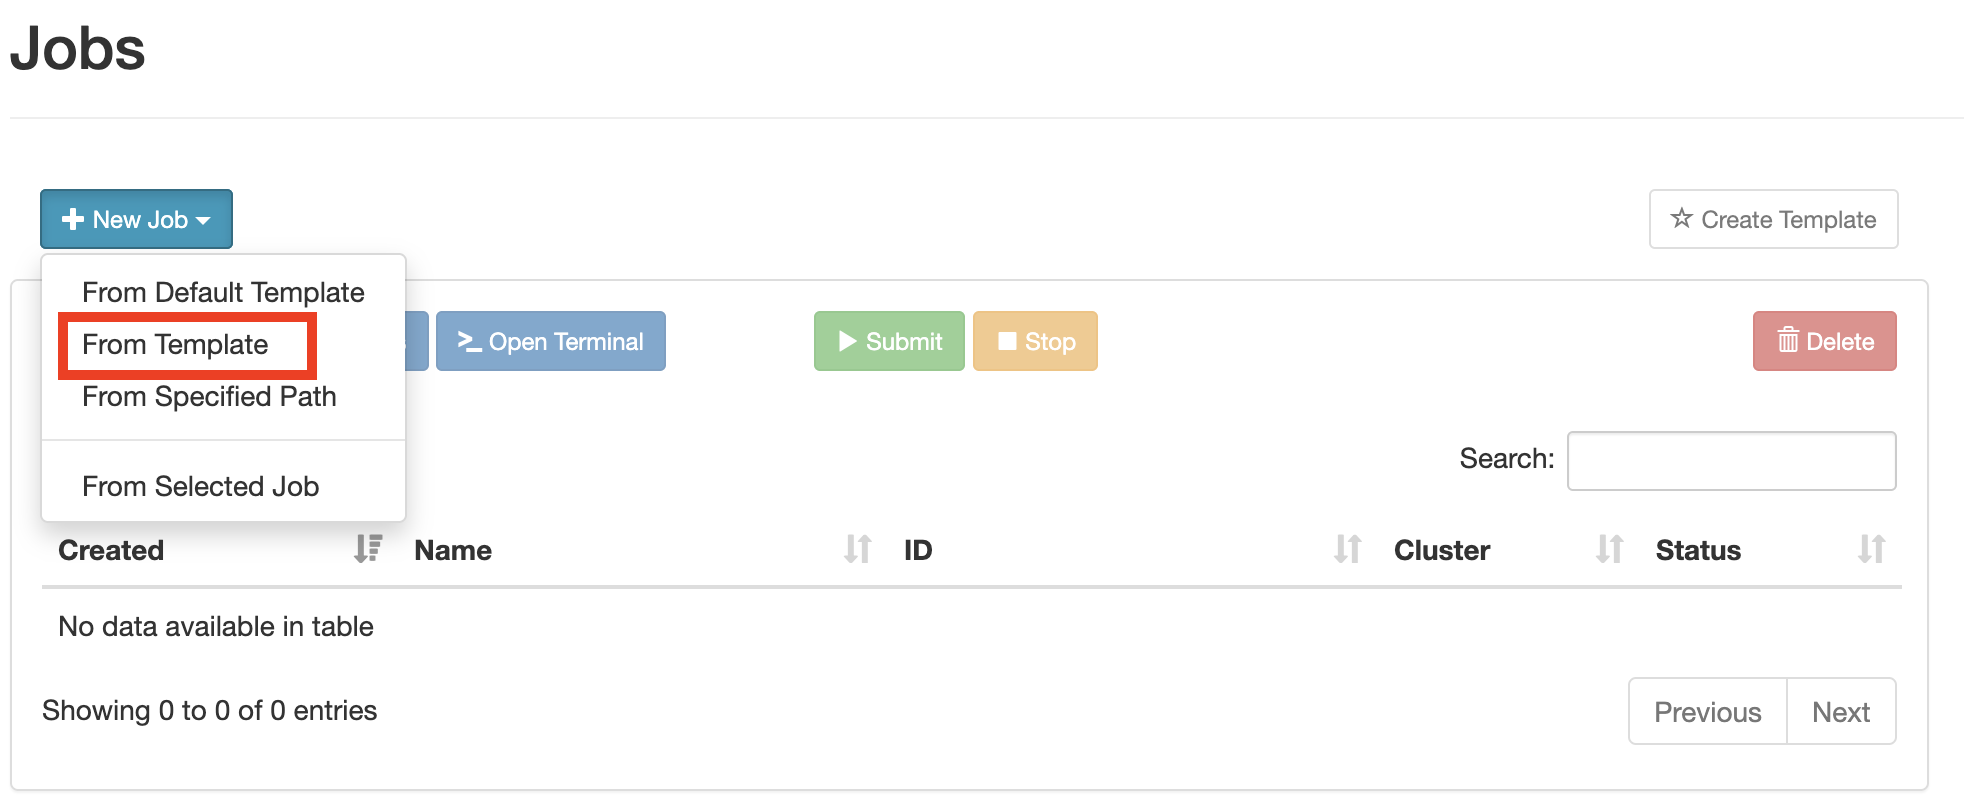
The Job Composer allows you to edit a job submission script in your web browser, or set options using a GUI for some job types. Although there are 4 methods listed for creating a job, the option “From Default Template” can be ignored. To that end, there are three ways to use the Job Composer, which can be accessed from the + New Job button:
From Template: work from an RCDS supplied template, or create one of your own
From Specified Path: for when you already have a job submission script created on Quest
From Selected Job: useful for repeating a past job, possibly with modifications
From Template#
“From Template” will allow you to start a new job submission process using either an example job submission template that has been provided by RCDS or that you have created yourself (more on that later). Available templates are listed in the Template section:
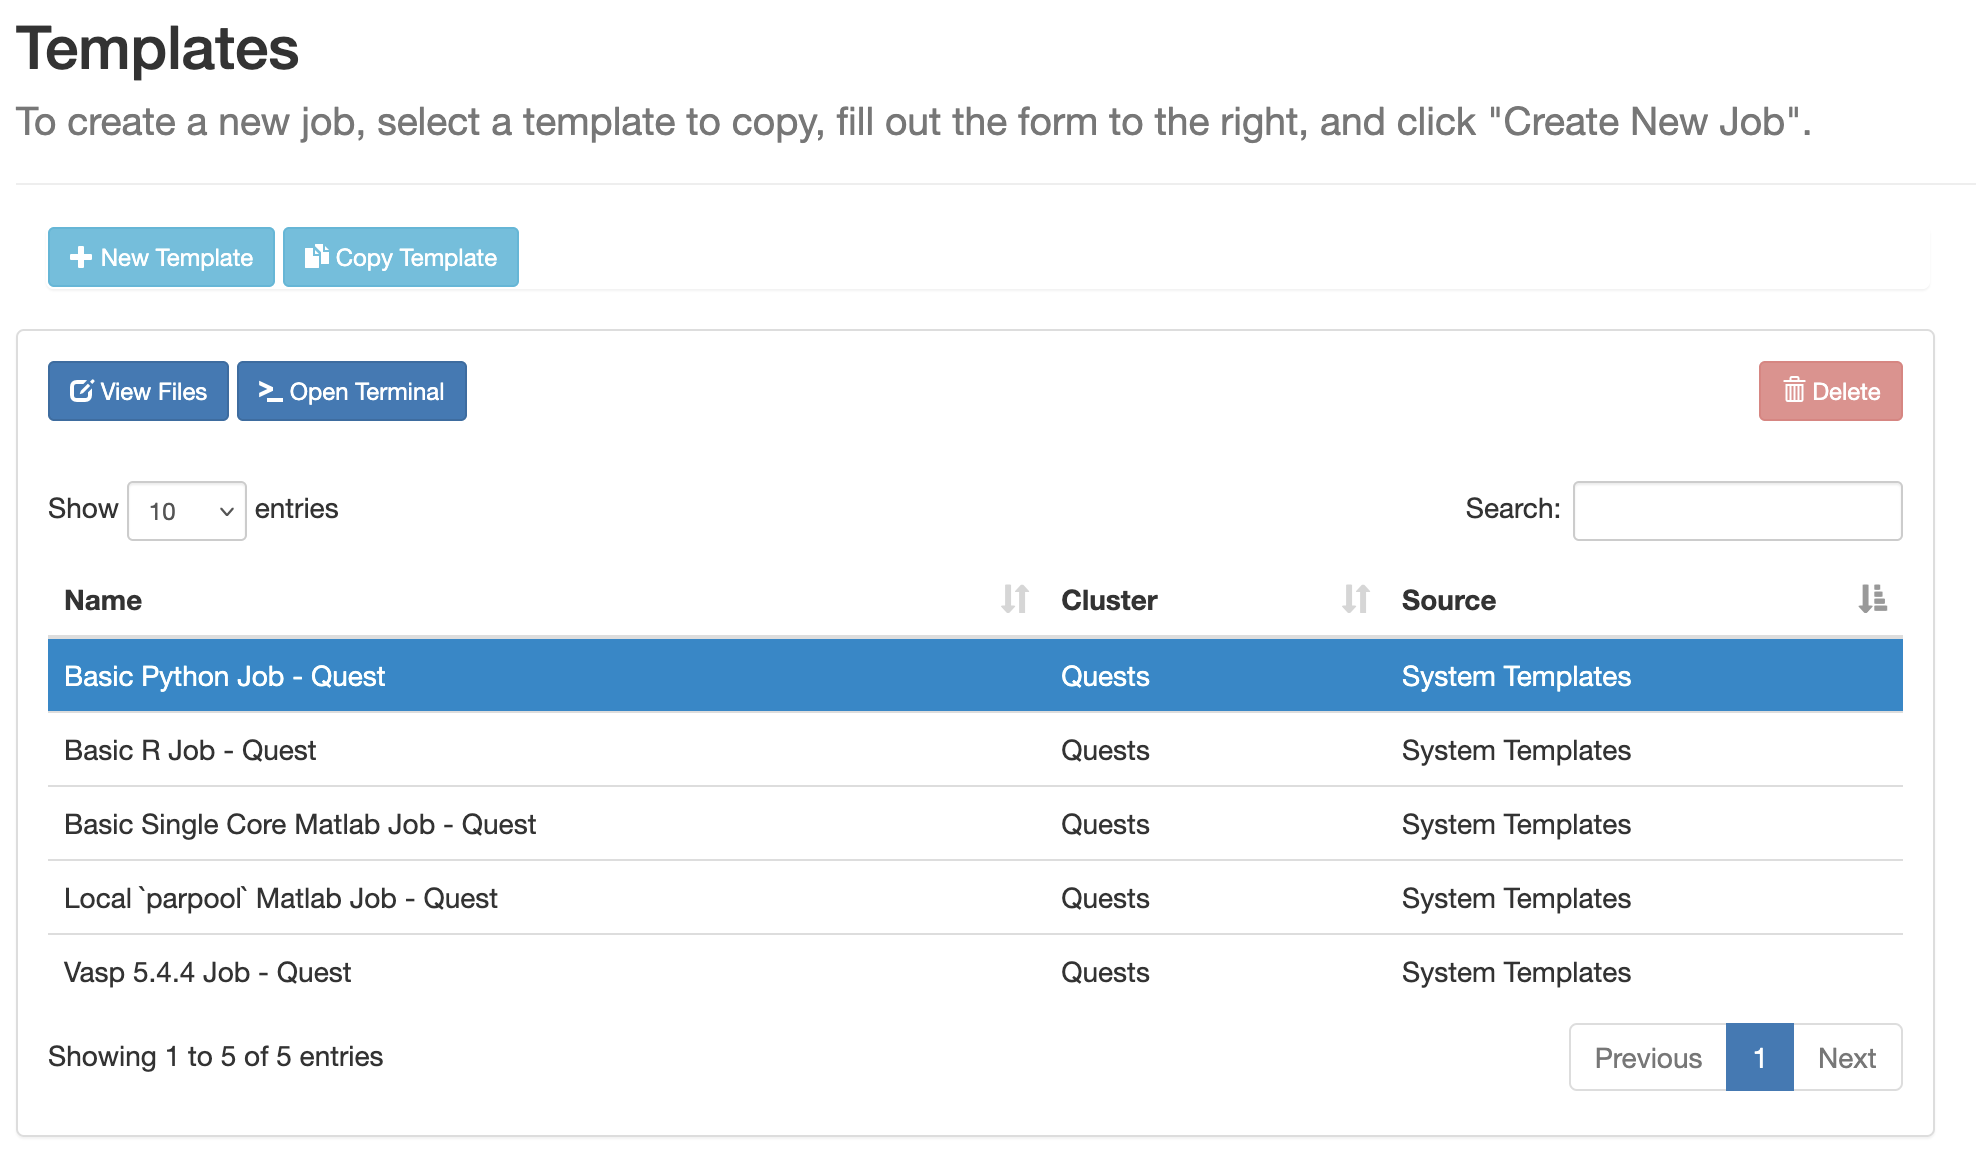
Selecting one of the templates will open a preview window on the right hand side of the screen that lists information about the job described by the template. To start the process of submitting a job, click the Create New Job button.
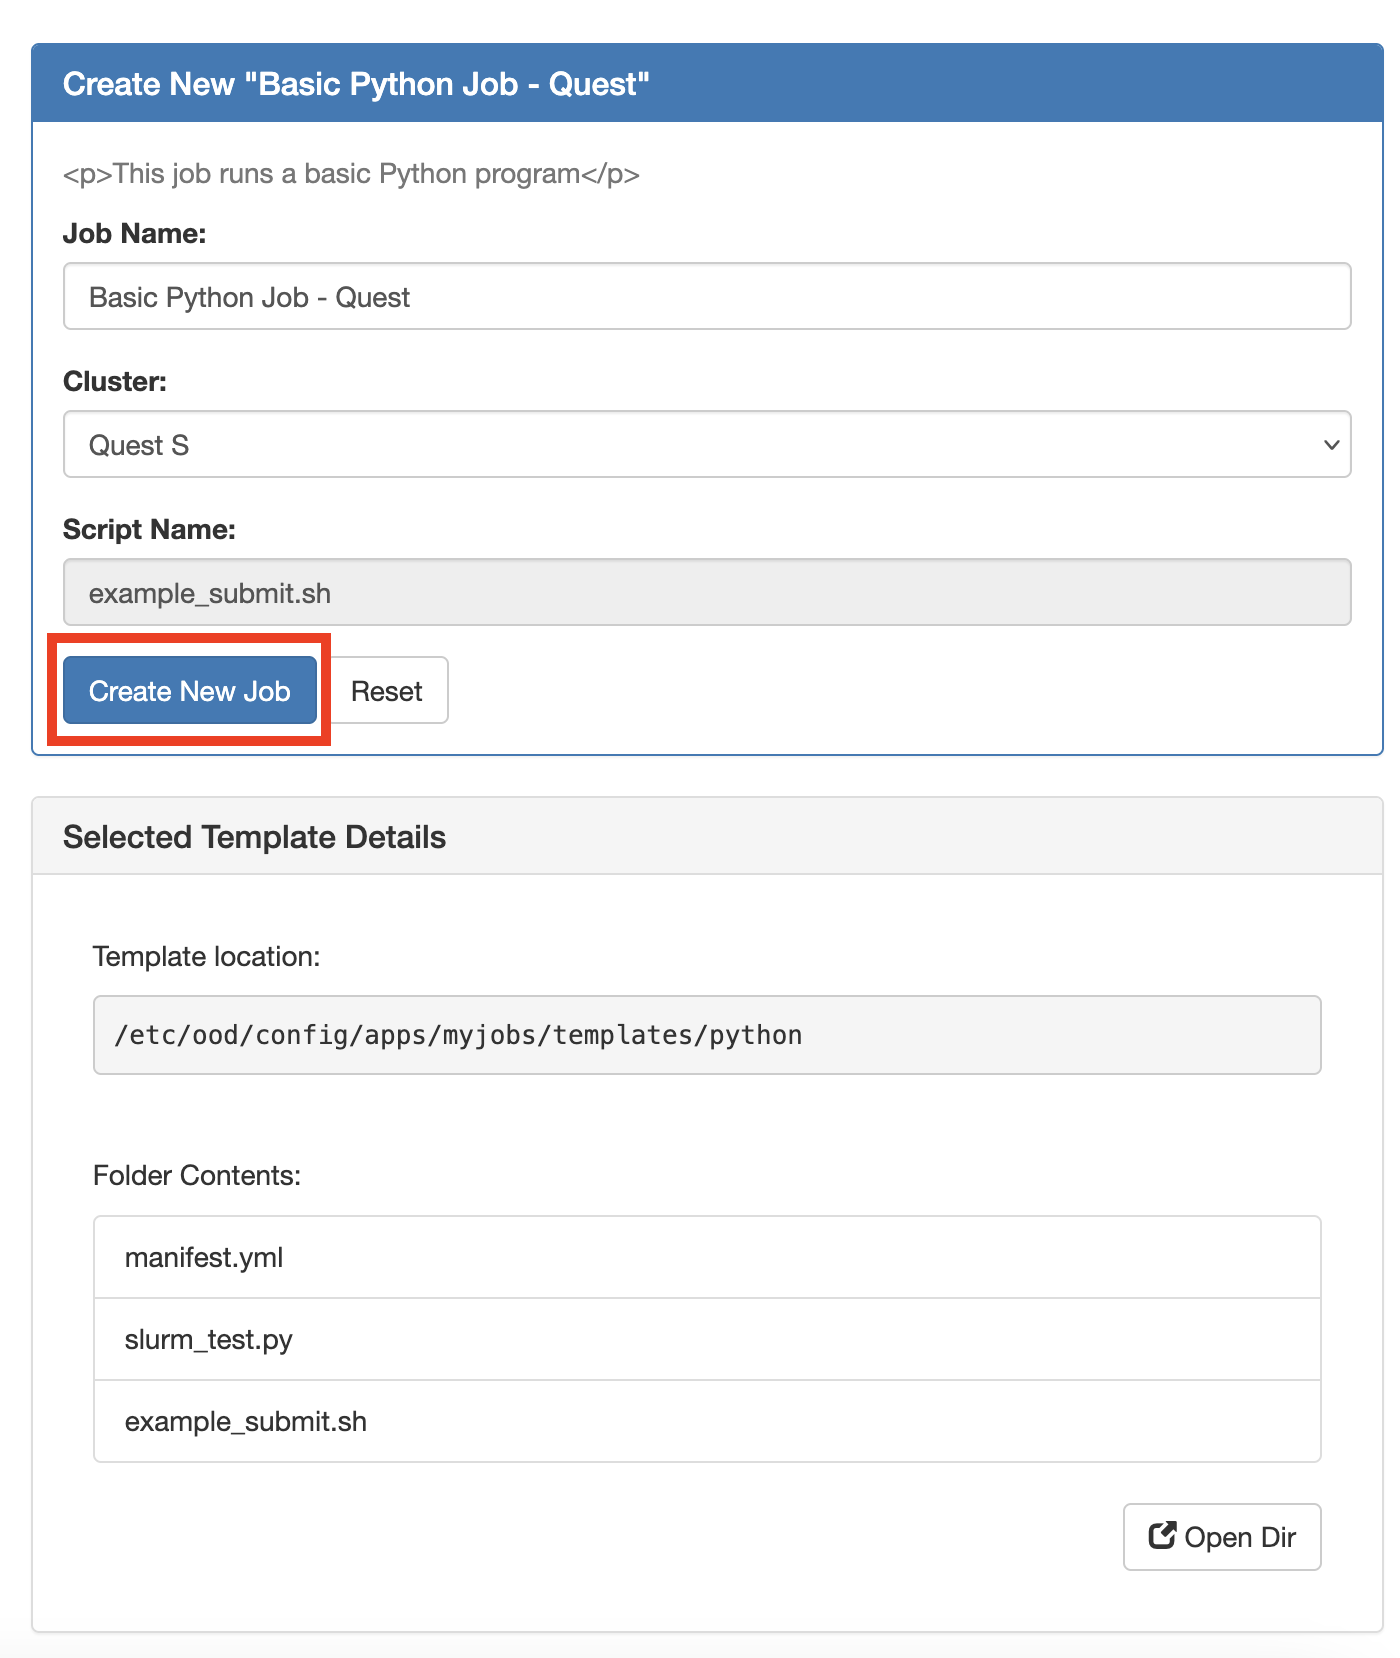
After clicking the Create New Job button, the template files will be copied to an “ondemand” directory in your home directory where you can edit them in the browser before actually submitting the job. The job will be added to you Job Composer queue.

The job submission script still needs to be filled out with details that are specific to you and your job, such as the partition, the allocation, the wall time, etc. For more information on setting the values of a Slurm job submission script, please see the Slurm section of the documentation. To edit the submission script, click the Open Editor button in the bottom left corner of the job submission preview.
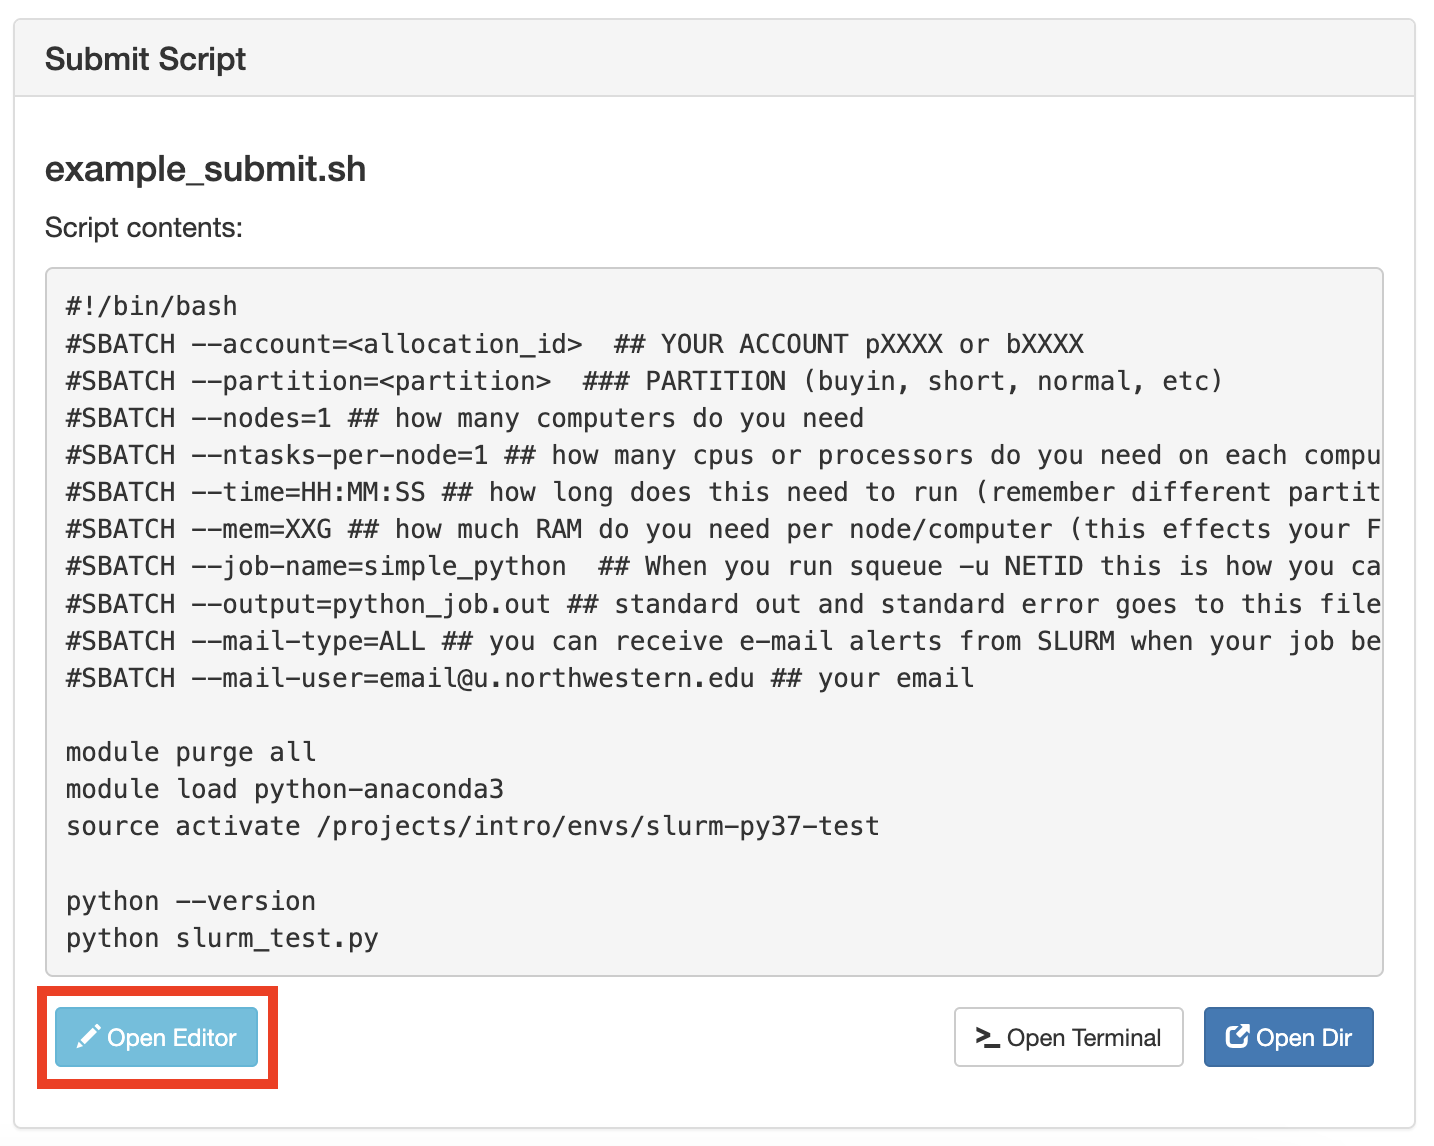
You can edit other files in the template, such as code files, by clicking their names. This will open the file in a new browser tab where you can edit it.
Once you have successfully edited the files with the details specific to you, you can now submit the job by selecting the green submit button which will submit the job and provide it with a Slurm job ID and and job status.
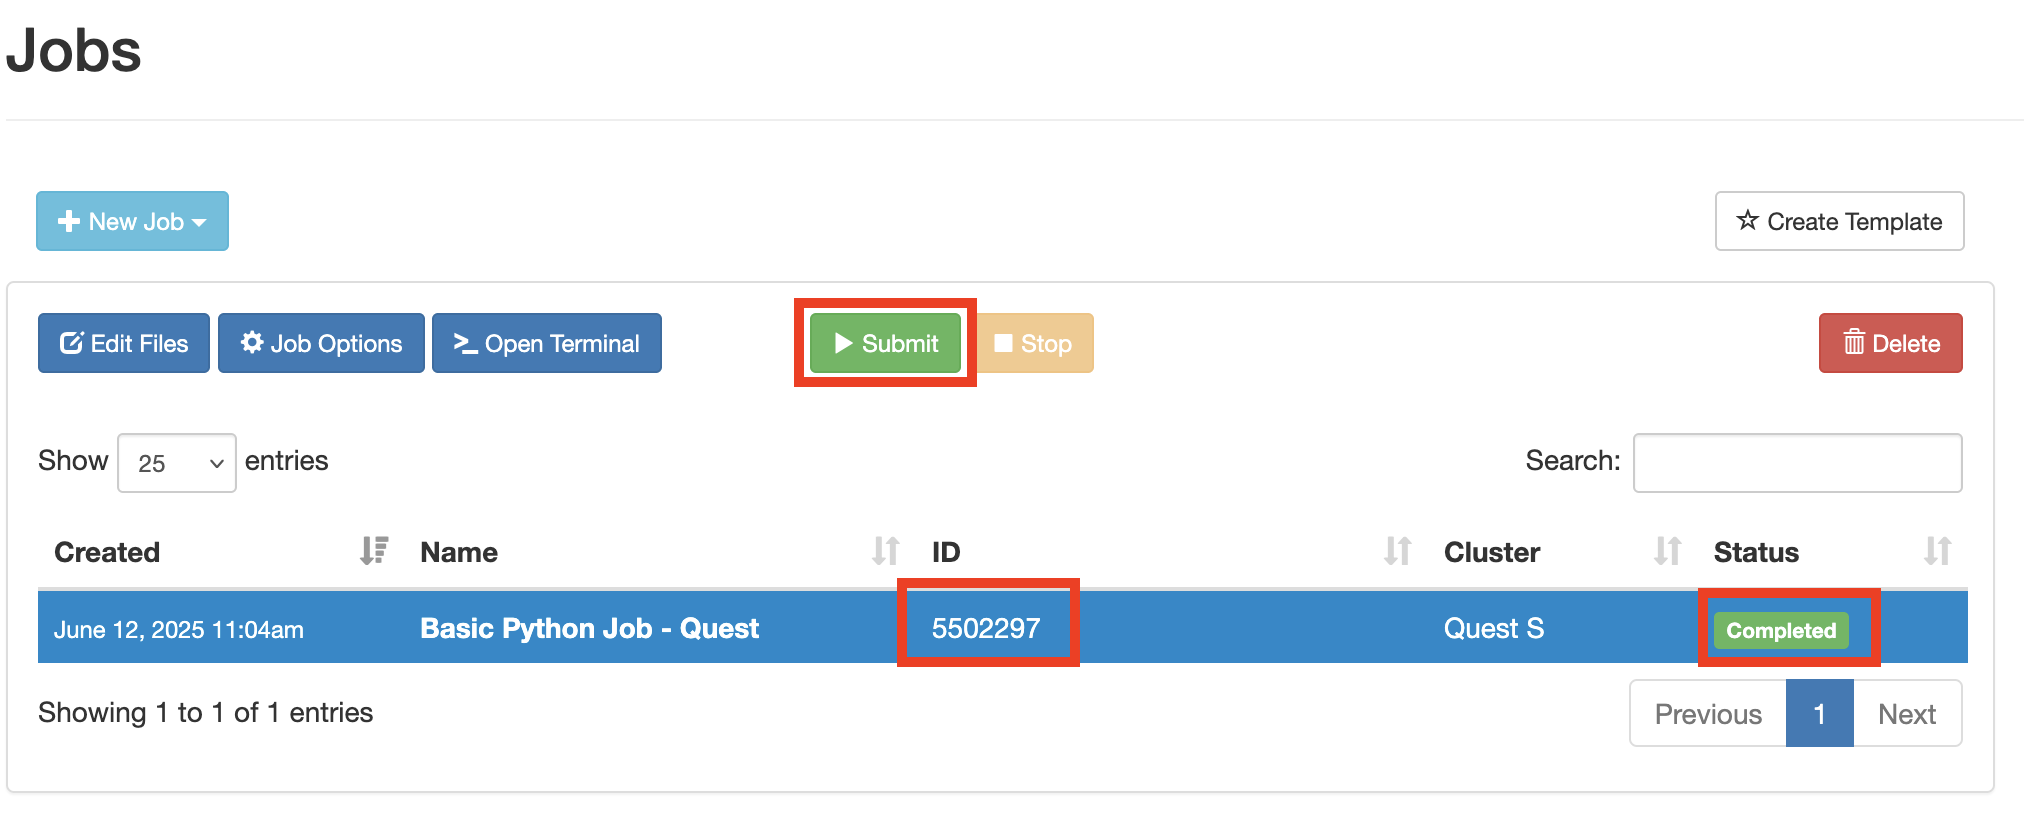
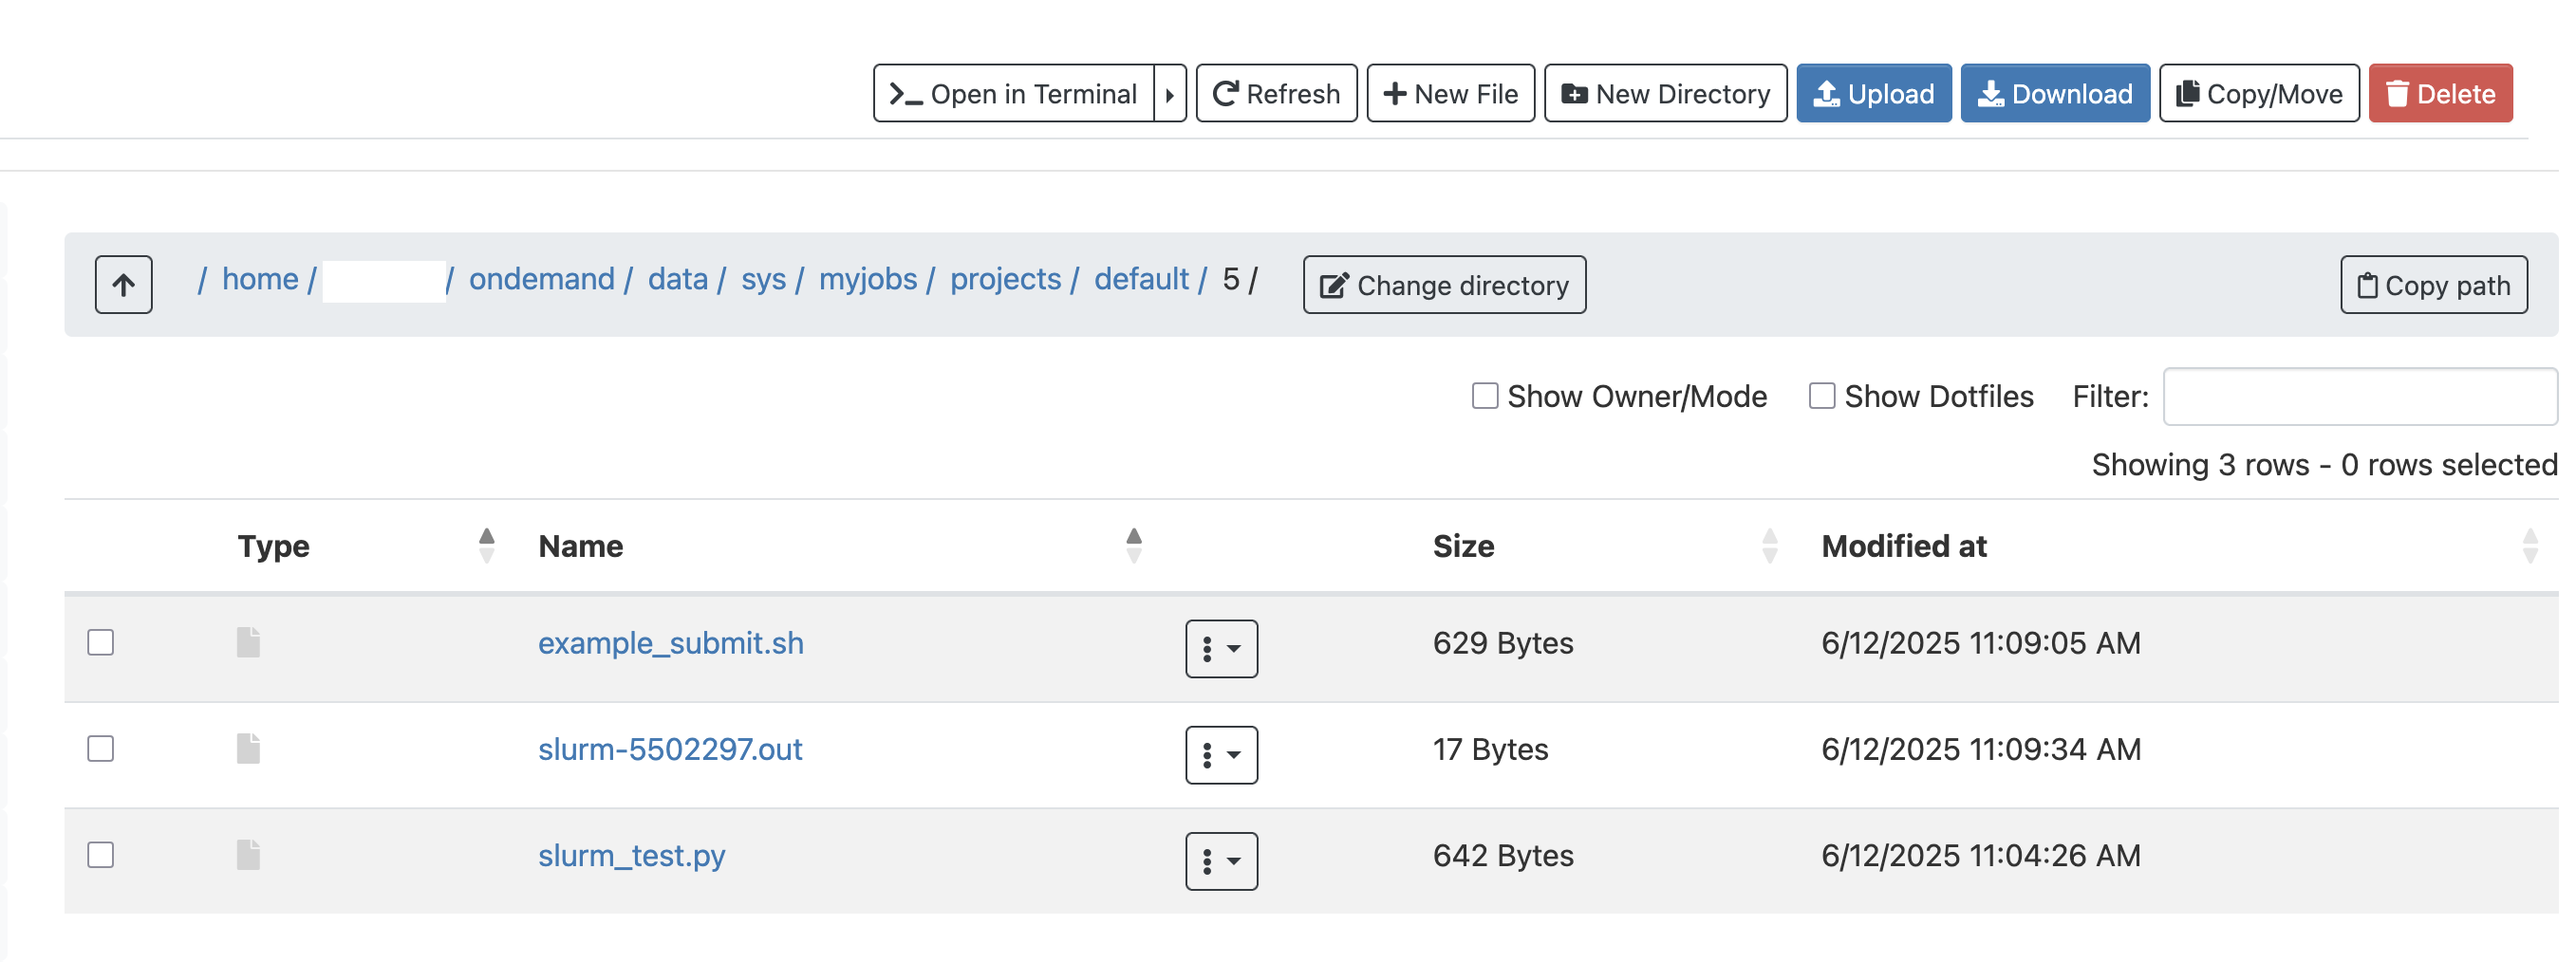
To view files related to this job, including the Slurm log file, in the Quest OnDemand File Explorer, select the job and then click the “Edit Files” button.
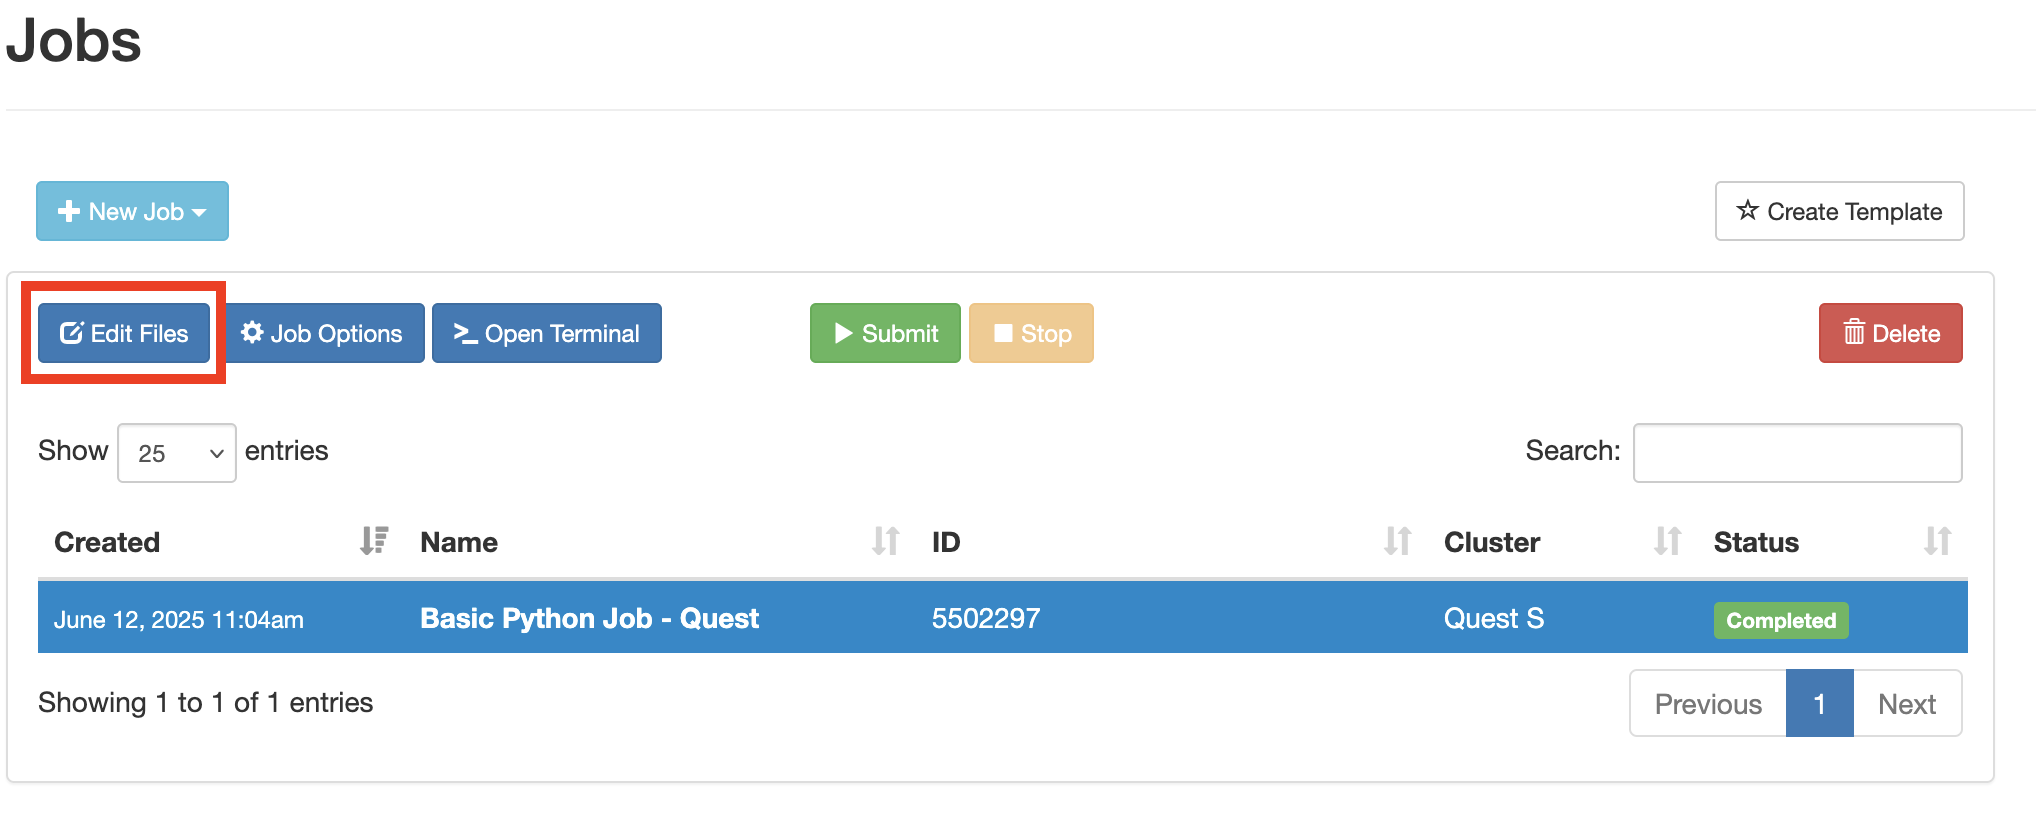
This action will open up the job submission directory in the Quest OnDemand File Explorer application.
From Specified Path#
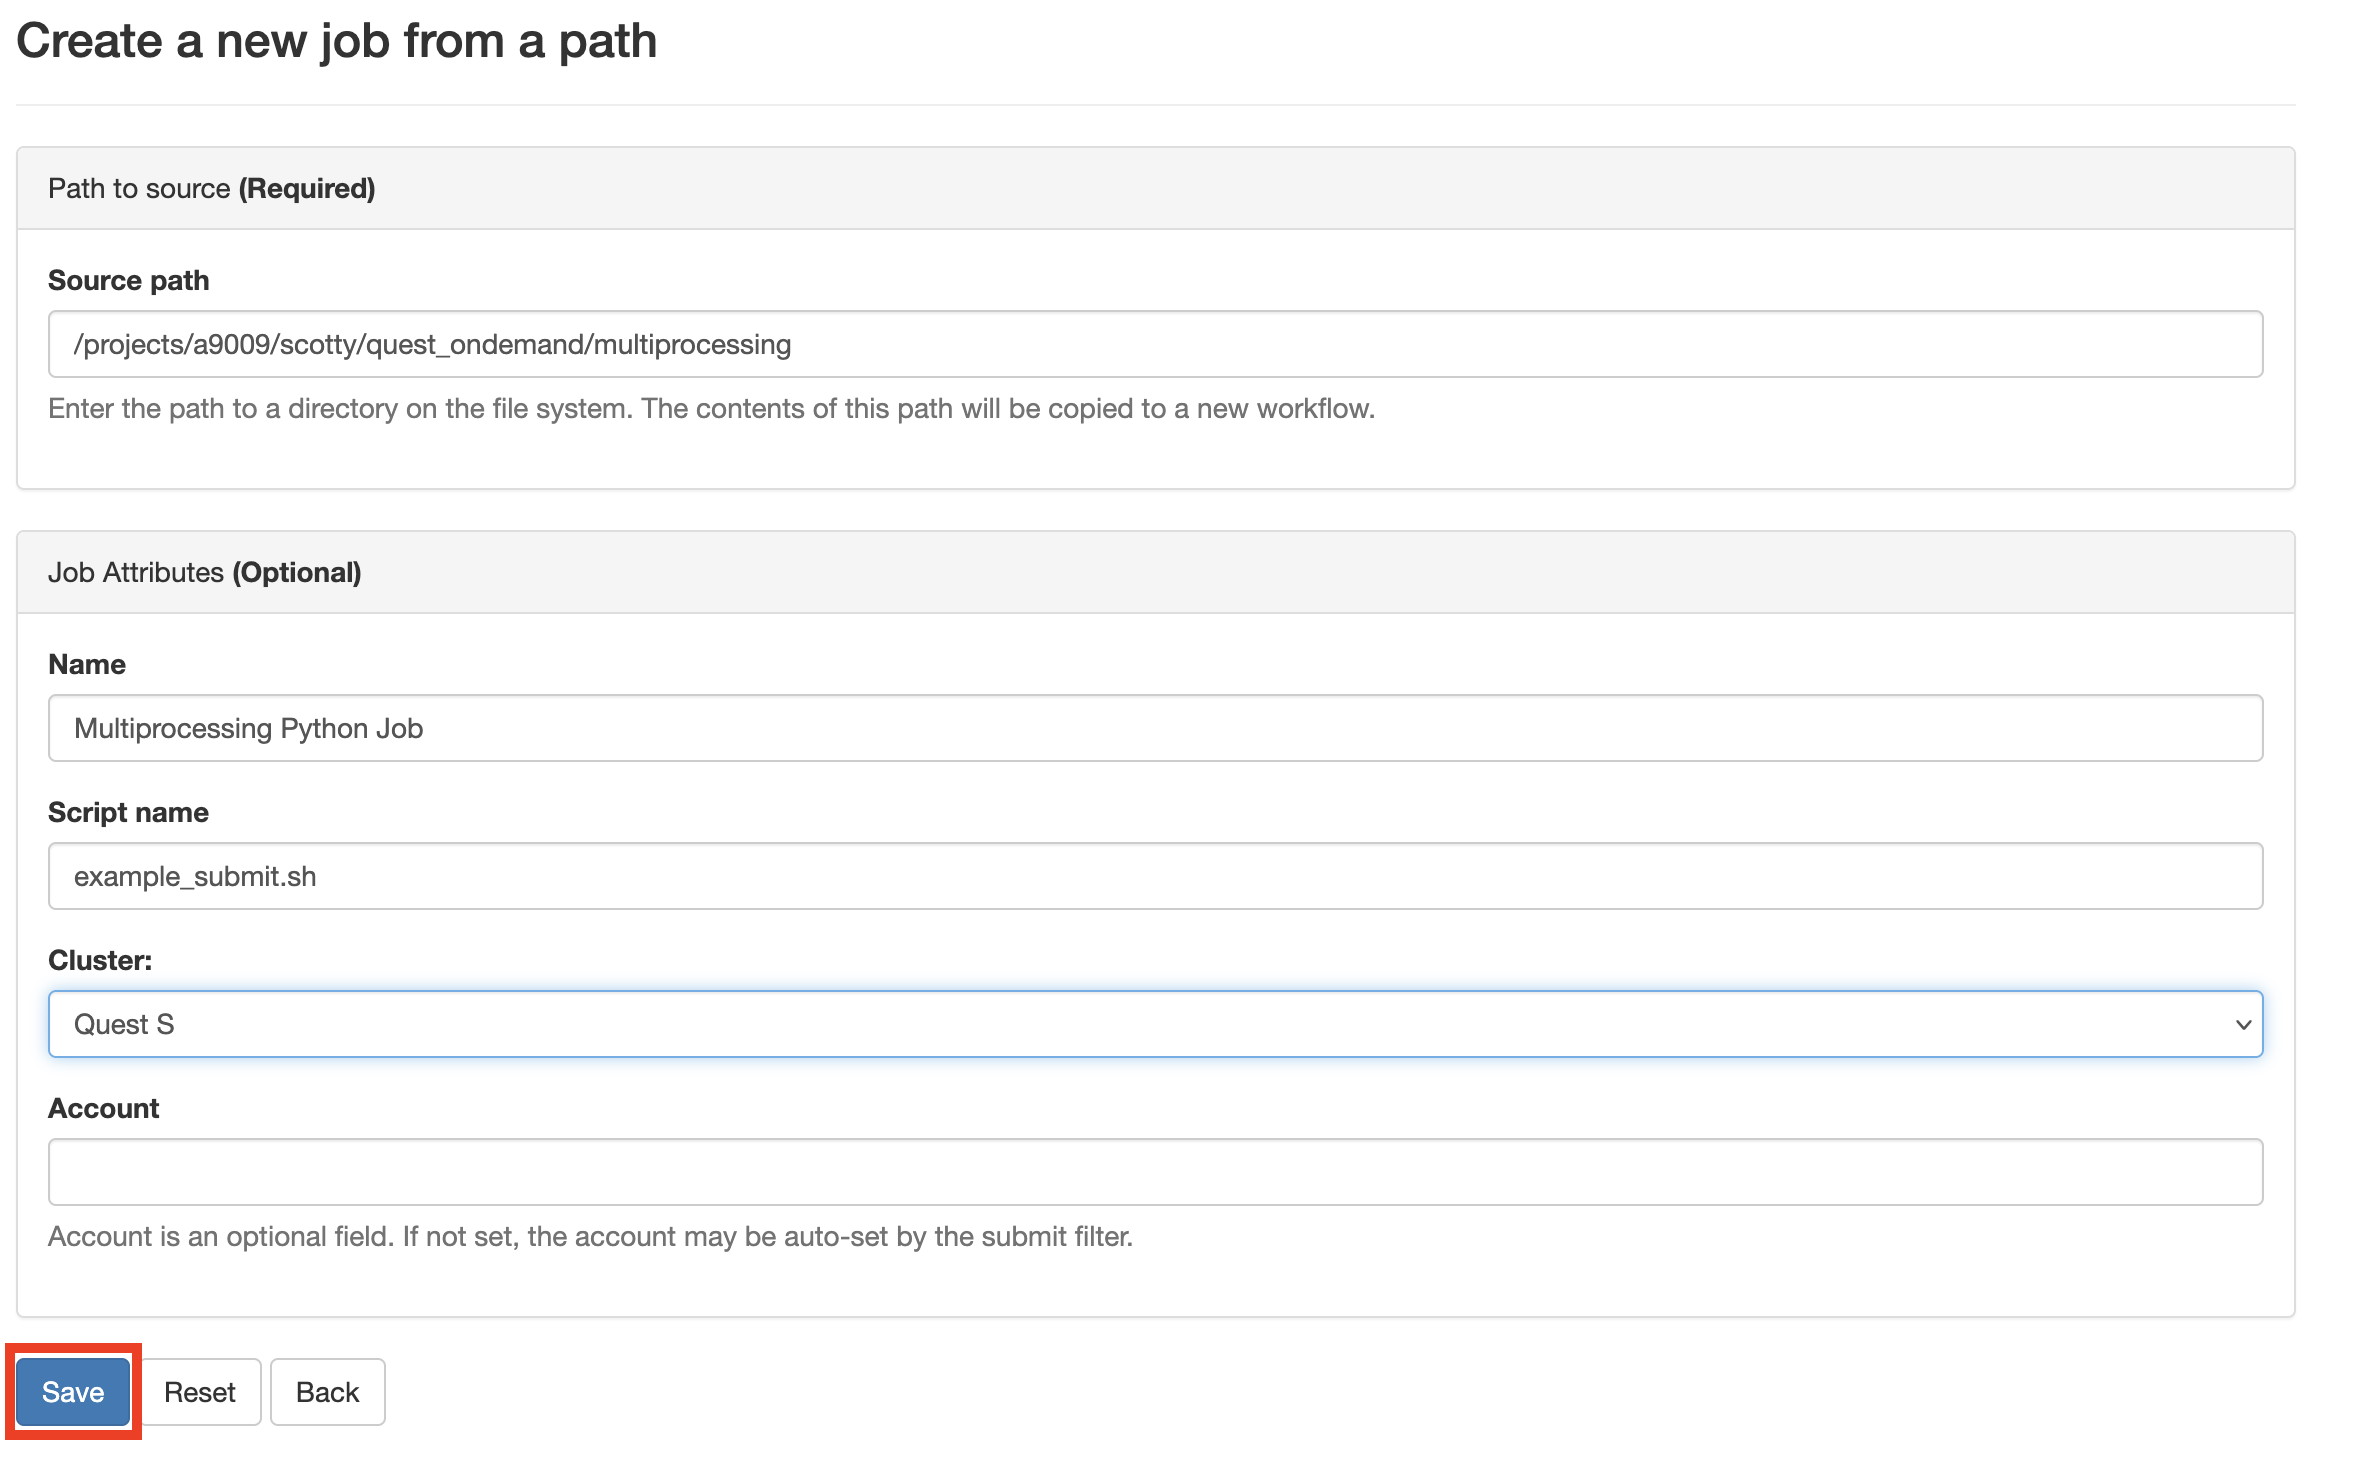
If you already have a folder containing a job submission and supporting files, and would like to import it into the Job Composer interface so that you can submit and manage the job from there, then use the From Specified Path option.

You must fill this form with the following information in order to import this existing job into the Job Composer interface.
The full path to the folder containing the submission script and any files needed to run the job
A name for the job which will determine the Job Name as it appears in the Job Composer interface
The filename of the submission script
The cluster name: Always Quest S
Below you can find an example of what filling out this form might look like. After filling out the form, click Save and the job will be added to the Job Composer interface.
Once the job is listed in the Job Composer, you can edit any files and then submit the job as in the From Template option.
From Selected Job#
Use From Selected Job to start a new job from a copy of a previous job that is already in your list of jobs in the Job Composer.
To use this option, first select the job you want to copy from the list of jobs in the Job Composer so that the row is highlighted in blue. Then choose “From Selected Job” from the + New Job menu.
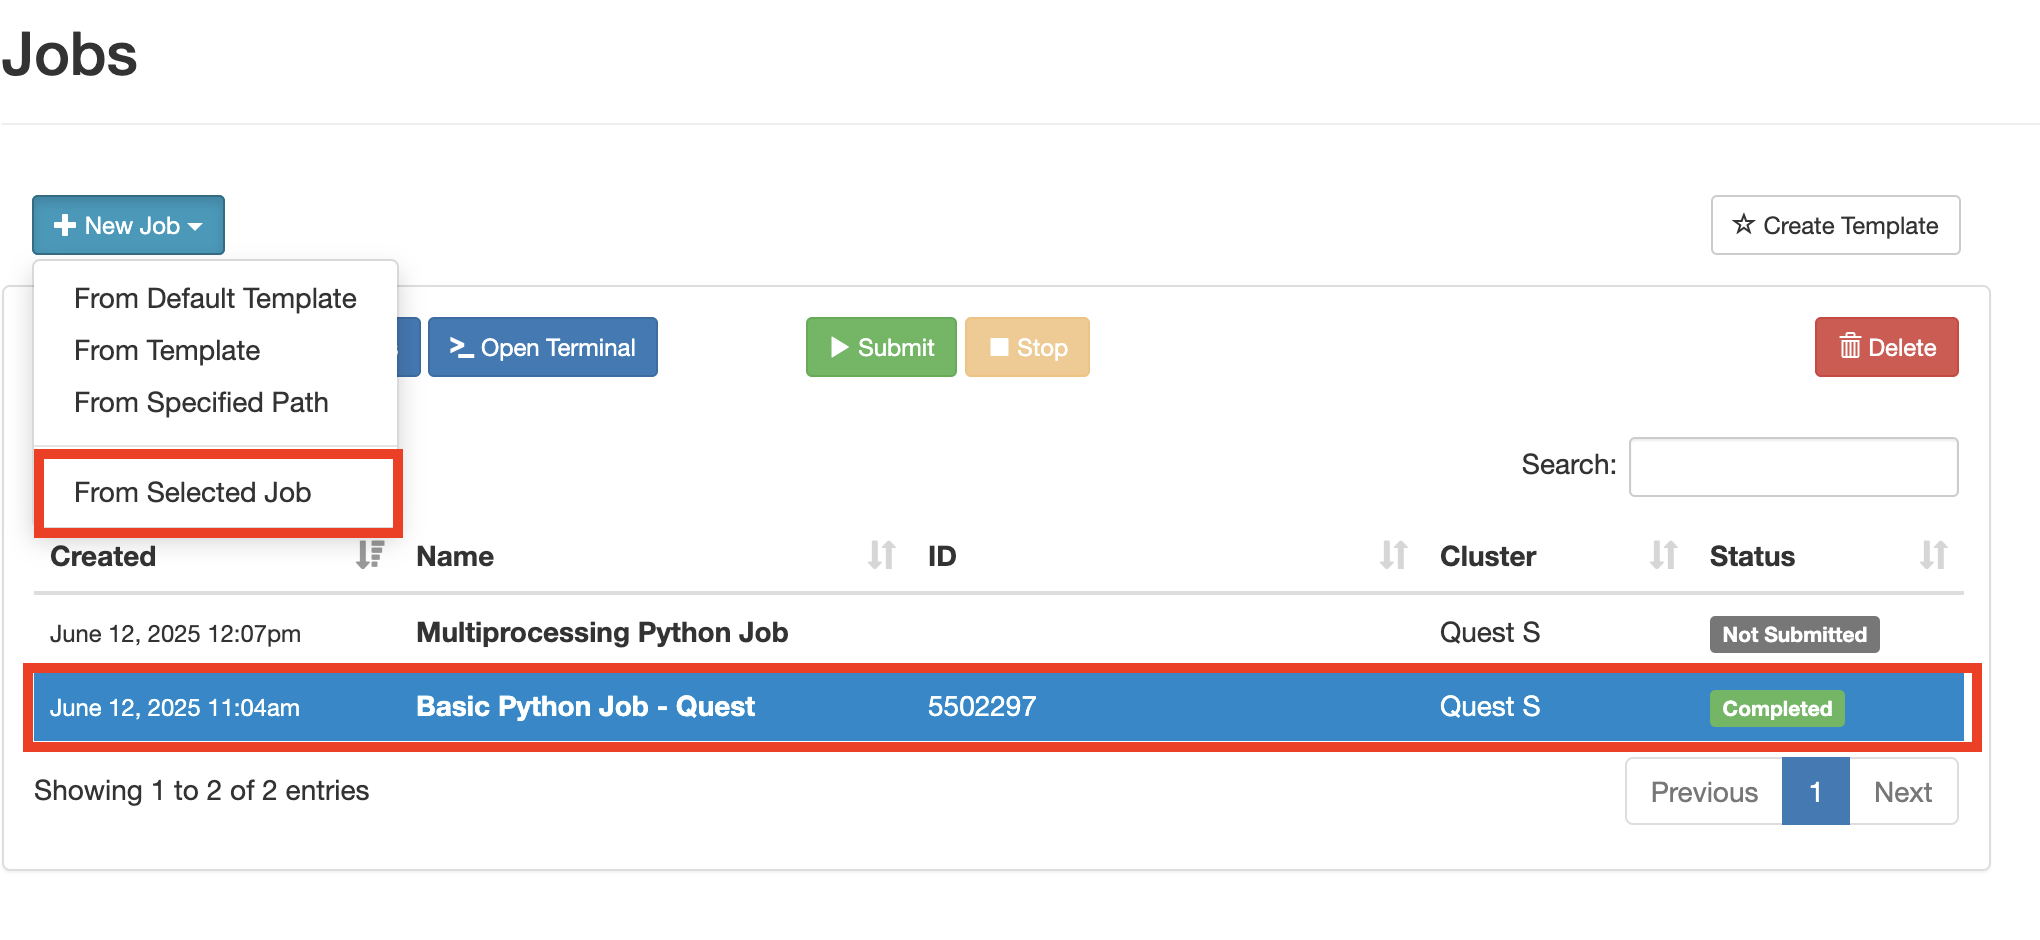
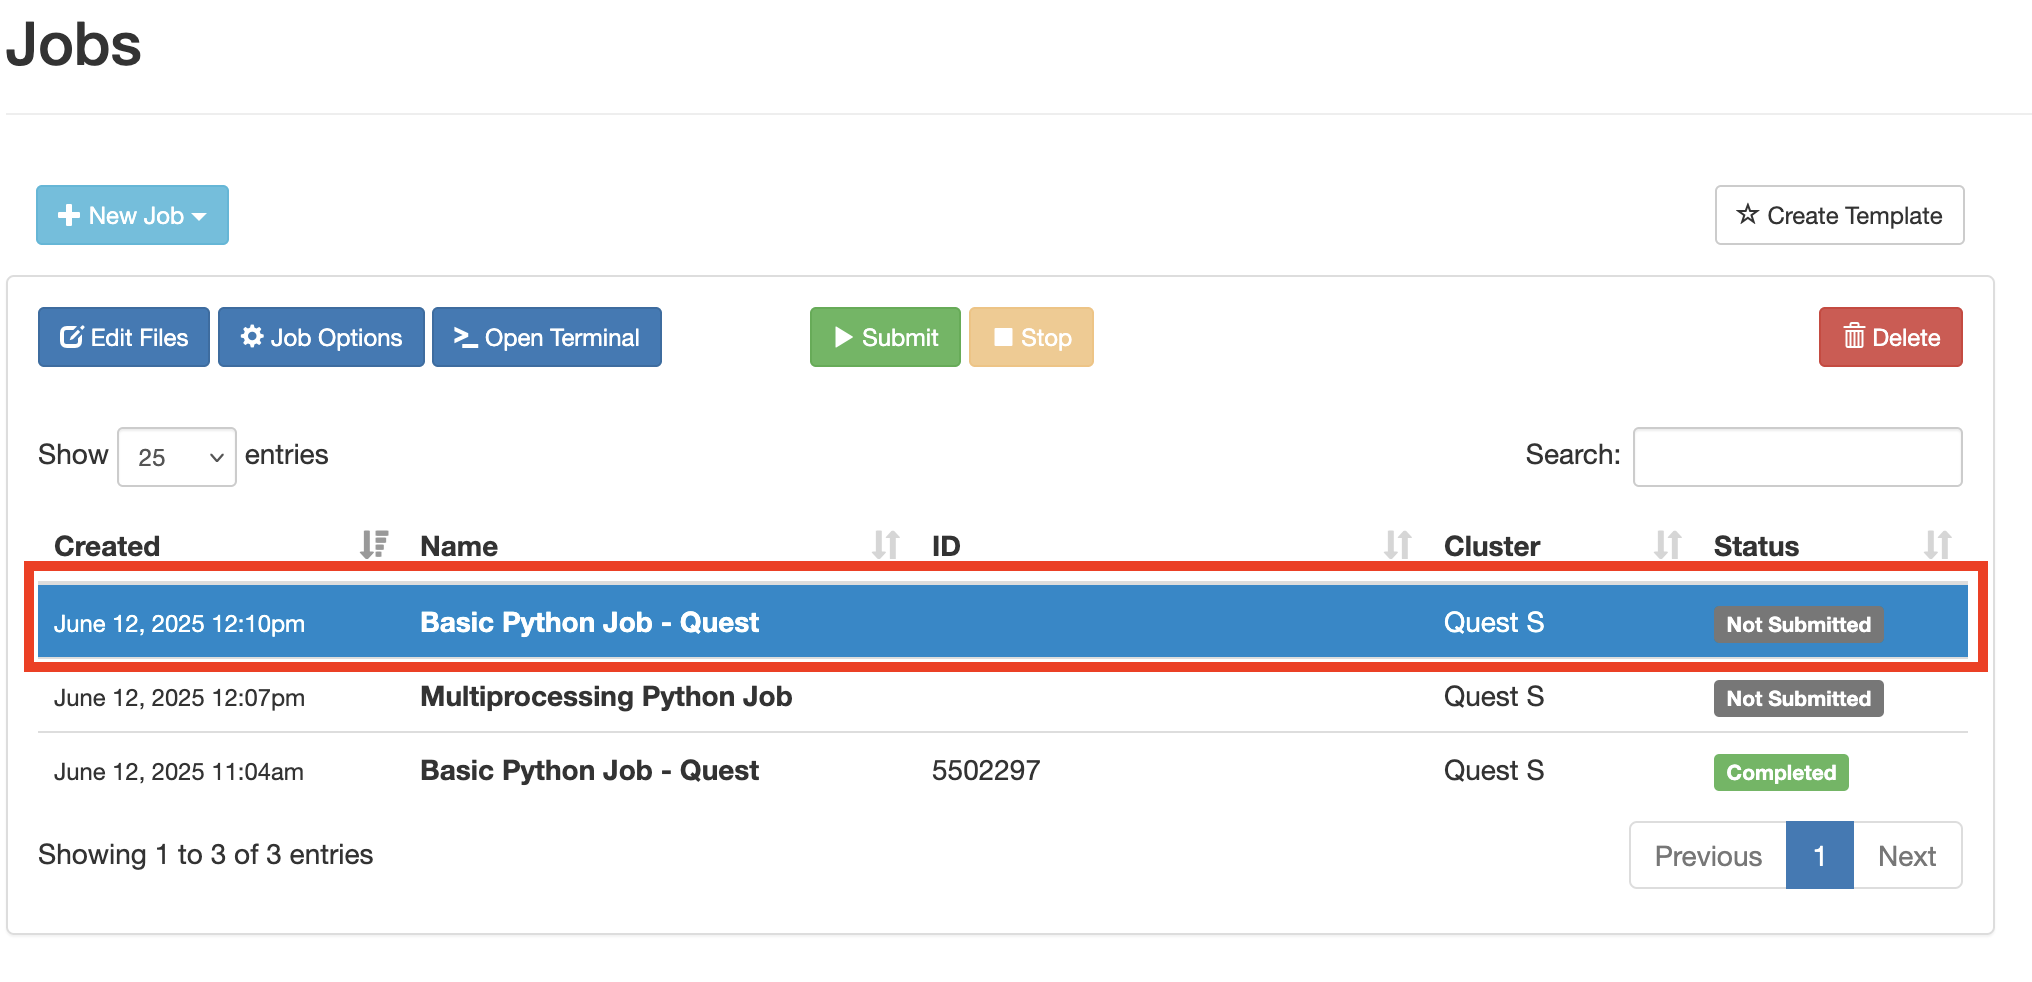
A copy of the job should then appear in the Job Composer list.
Once the copy of the job is listed in the Job Composer, you can edit any files and then submit the job as in the From Template option.
Active Jobs#
Active Jobs provides a list of your active jobs. Running and pending jobs can be cancelled from the active jobs list by clicking delete.
Using Interactive Applications#
Quest OnDemand interactive applications allow users to run IDEs and GUIs including MATLAB, Abaqus, Lumerical, Jupyter, Mathematica, RStudio, GNOME desktop, Stata, and others on Quest compute resources. Quest OnDemand simplifies the process compared to running interactive jobs with GUIs from the command line. If there are any interactive applications that you would like to have added please contact quest-help@northwestern.edu .
Accessing Available Interactive Applications#
There are two different ways to access the available interactive applications on Quest OnDemand.
From the Landing Page#
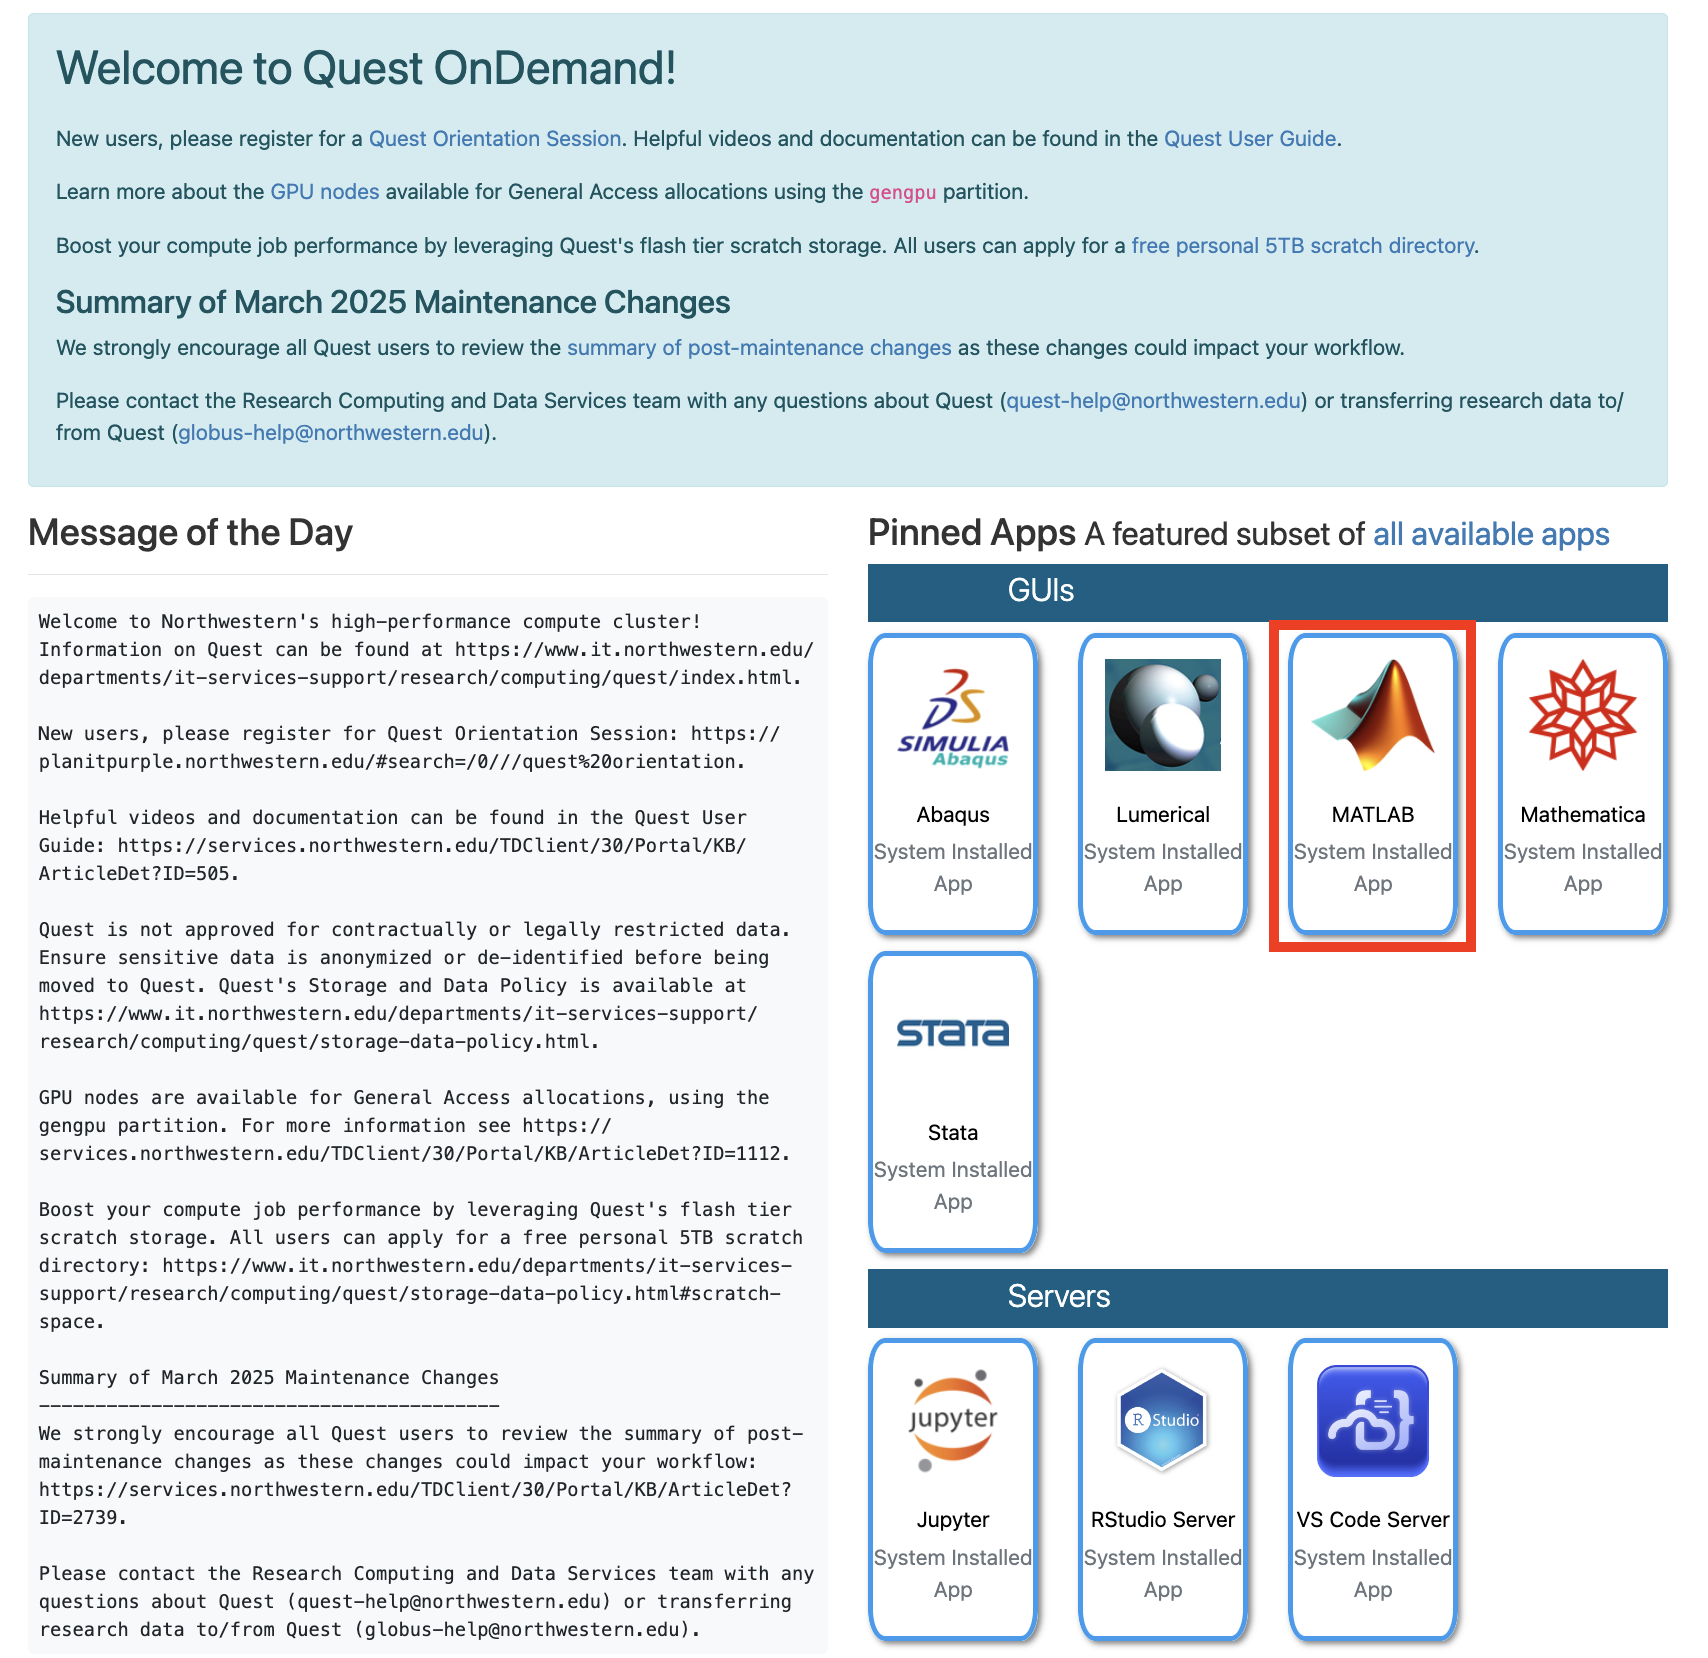
Several interactive applications can be accessed directly from the main landing page you see when logging into Quest OnDemand. Simply click on the icon for the application you want to use under “Pinned Apps”
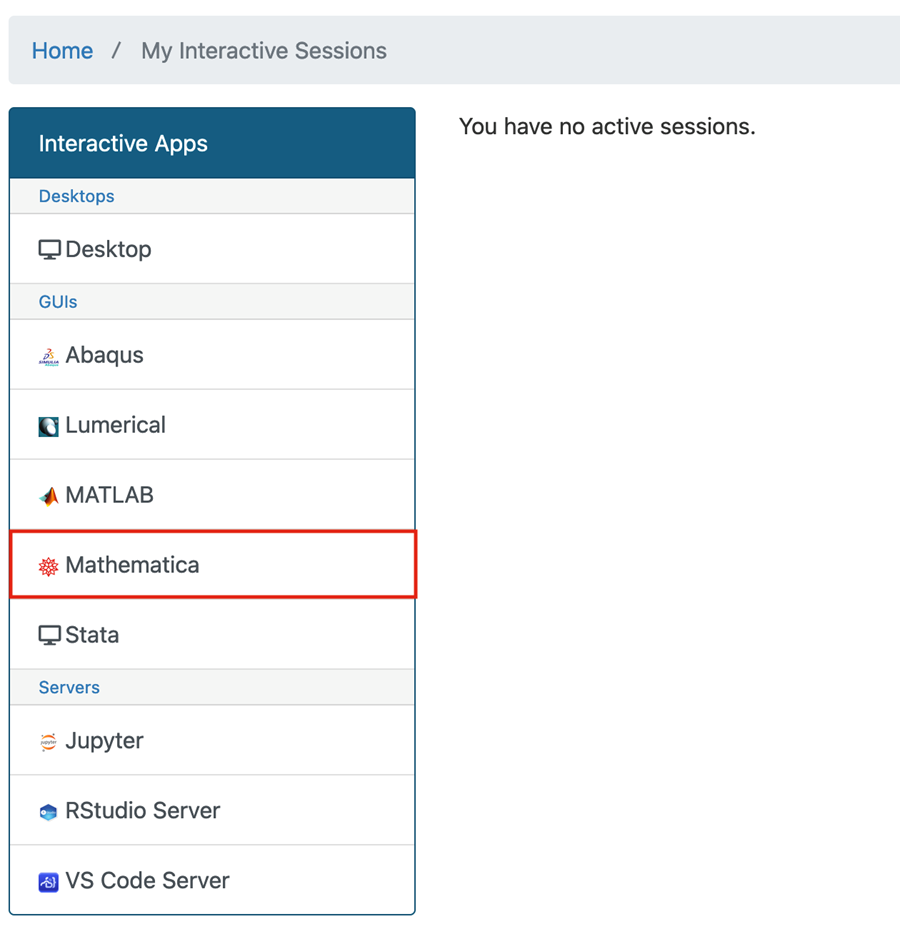
From “My Interactive Sessions”#
To see the full selection of applications, select the “My Interactive Sessions” tab from the navigation bar.

This will take you to a page which has both information about any active sessions and a list of all available interactive applications.
After selecting an interactive application (in this example Mathematica), you will be presented with a web form asking you questions about the resources required to run the job.
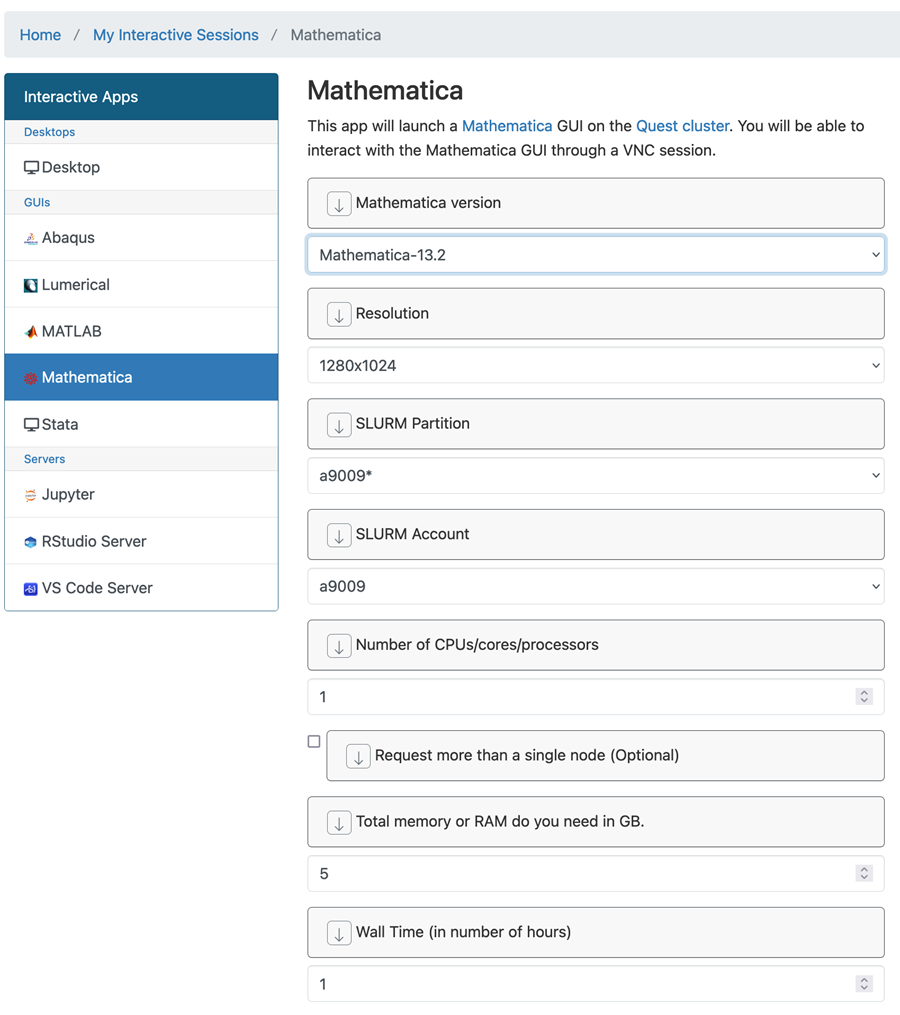
The options required to start an interactive job are the same as the Slurm options.
Fields/input boxes to specify some options, such as GPU types, will only be shown if other applicable values are selected. For example, the GPU field will only be shown if the partition is set to a GPU partition, such as “gengpu”.
Video Tutorials
Video tutorials are available that demonstrate running several common interactive applications with Quest OnDemand: