Preparing an Amazon S3 bucket for Globus transfers.#
To use Globus with Amazon S3, you need to:
Create an Amazon S3 bucket if you don’t have one already.
Download an AWS IAM access key that has permission to read from and write to S3.
Use the following instructions to complete these tasks.
Creating an Amazon S3 bucket#
For general information on AWS S3, please Using Amazon S3 Storage .
If you don’t already have a cloud account, see Cloud Computing Services for information on setting up an AWS account under Northwestern’s organization.
Once you have an AWS account, to create an Amazon S3 bucket,
Log in to the AWS Management console at https://aws.northwestern.edu and log in with your Northwestern NetID.
Select the role associated with your AWS account and click the blue Sign In button.
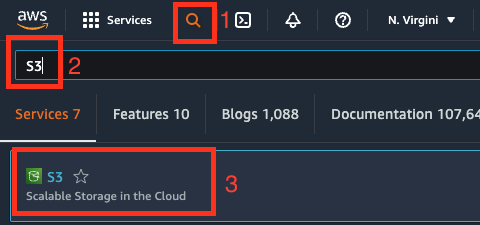
Navigate to S3 settings by clicking the magnifying glass in the upper left hand corner of the screen.
Type S3 into the search box
Select S3 (Scalable Storage in the cloud)
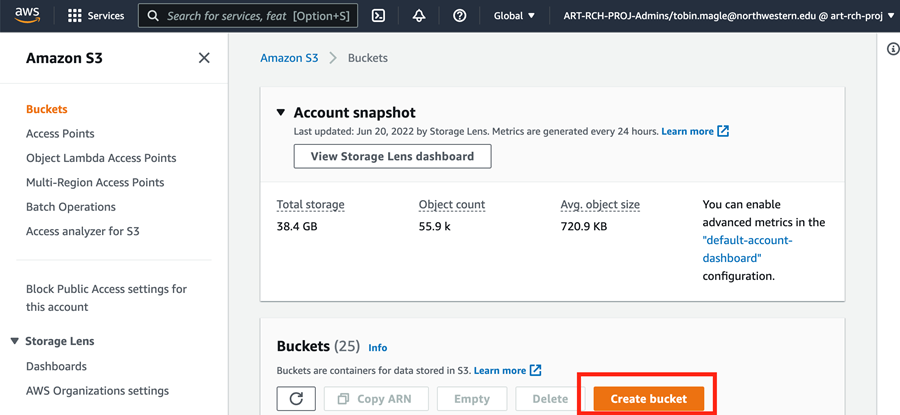
By default, you will see:
A navigation pane on the left, with the Buckets option selected.
An Account snapshot on the right that shows how much storage is being used among all S3 buckets you have access to.
The Buckets section below that, which lists the buckets you have access to, if any, with additional information about each bucket.
Then, click the orange Create bucket button in the Buckets section on the lower right of the screen.
On the Create Bucket screen you will need to give your bucket a name and choose a region.
Bucket name: The name must be globally unique and contain only alphanumeric characters and dashes
Region: If you use other AWS resources, pick the same region as you use for other work. Otherwise, pick the region that is the most geographically near to where you do your work.
Most users should keep the rest of the options on this screen as defaults. By default, S3 buckets have the following properties:
Object Ownership: All objects stored in this bucket are owned by the account/role you logged in with, even if it is written to this bucket by another account.
Public access: Public access to buckets and objects are blocked. Access is granted on a case by case basis to those who need it. This setting is recommended for content that you don’t want freely available on the web.
Bucket versioning: This feature is disabled to save space. Select Enable if you have a need to keep previous versions of files that are being changed in this bucket. Keep in mind you will pay storage costs for each version.
Encryption: Encrypting objects stored in the bucket is disabled.
Object lock: This feature is disabled. Enabling this feature will prevent objects from being deleted or overwritten.
If you need help deciding if you need to modify these defaults, email globus-help@northwestern.edu .
When you have entered the required information, click the orange Create Bucket button at the bottom right of the screen.
You should see a green banner at the top of the screen that says Successfully created bucket
<bucketname>. The webpage will return to the Buckets page.
Next, grant read/write permissions to this bucket using the instructions below.
Identity and Access Management (IAM) in AWS#
Amazon Web Services (AWS) provides an Identity and Access Management (IAM) service that allows you to securely control access to AWS resources.
To provide access to the Northwestern Amazon S3 collection, you must generate an IAM access key, which requires an IAM user with appropriate permissions.
The instructions below walk you through this process using the AWS Management Console.
To use the AWS IAM service:
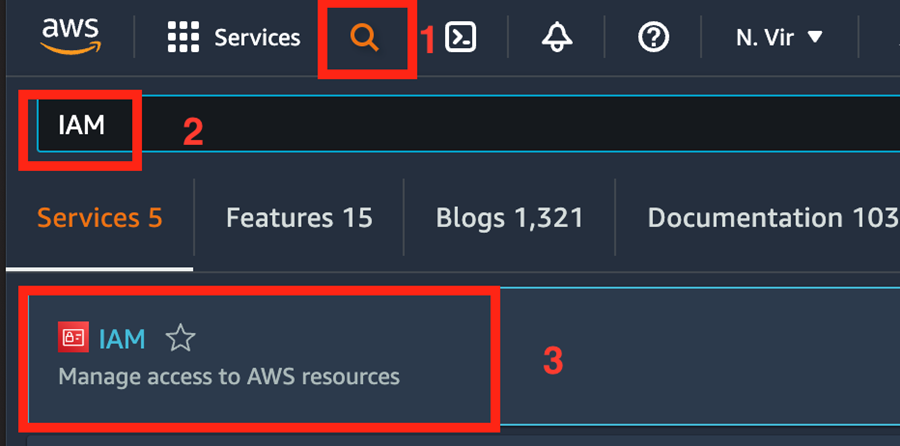
Click the magnifying glass in the upper left hand corner of the screen.
Type “IAM” into the search box
Select IAM (Manage access to AWS resources)
You will see a view of the IAM dashboard that summarizes how many groups, users, roles, policies and identity providers you have access to on the right. On the left, you will see a sidebar with different aspects of IAM. We will be using the Users option in the next section.
Creating an IAM user#
To generate an access key you must first create an IAM user. To create an IAM user,
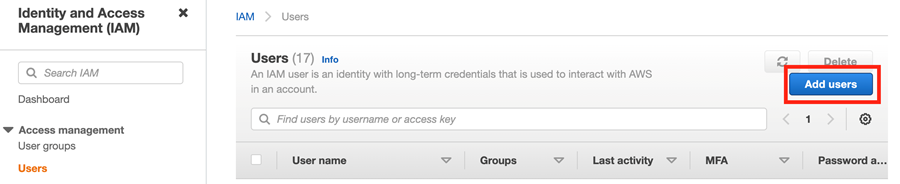
Click Users in the left navigation and then click the blue Add users button on the right.
You will see the Add user screen that asks you to provide user details and select AWS access type.
Make up a user name. It can be useful to include “globus” in the name so that you remember what the user is for.
The user does NOT need to be able to access the AWS Management Console.
Click Next
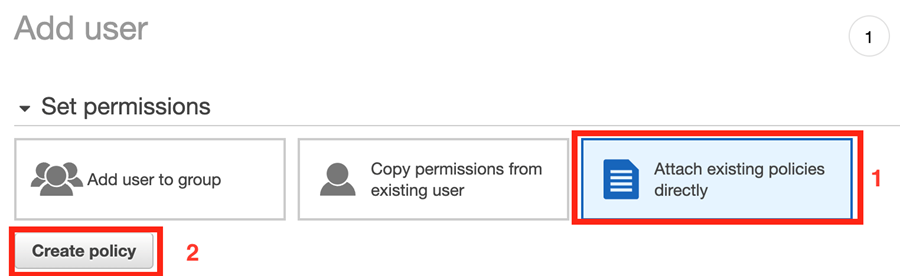
Select the “Attach policies directly” tab.
The next step depends on whether you’re granting access to all S3 buckets in the account, or select ones.
Create IAM permissions#
Next, you must specify whether the IAM user you created will have access to all of the S3 buckets in the account you’re using or to specific S3 buckets. To do this, you will first create a policy, then apply it to the new user you just created.
Policy: Access to all S3 buckets#
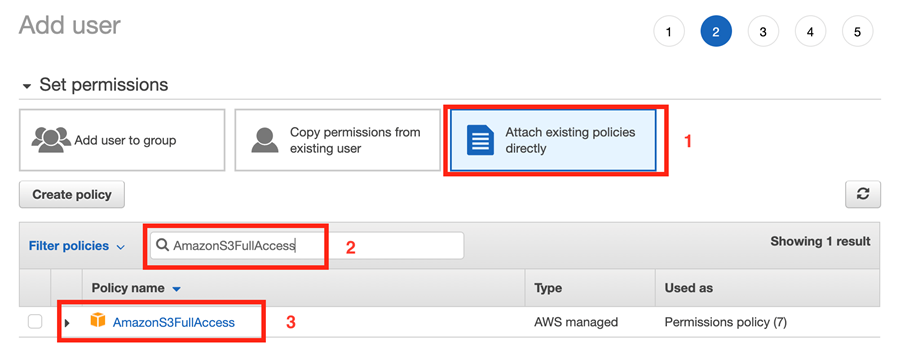
If you want to provide full access to all S3 buckets in your account, you can use an existing S3 policy.
Then search for AmazonS3FullAccess in the filter policies search box.
Then click the checkbox to the left of the policy name.
Policy: Access to a specific S3 bucket#
To allow access to a specific S3 bucket only, you must create a custom user policy. To create a user policy:
Click the “Create Policy” button. This will open a new tab with the Policy editor.
Then you will specify the permissions (policies) with either JSON (recommended) or via the Visual Editor.
JSON Template#
Choose the JSON option at the top of the Policy editor.
Copy and paste the JSON below into the editor, then change
YOUR-BUCKET-NAME-HEREin the Resource lines to match your bucket name:
{
    "Version": "2012-10-17",
    "Statement": [
        {
            "Sid": "AllBuckets",
            "Effect": "Allow",
            "Action": [
                "s3:ListAllMyBuckets",
                "s3:GetBucketLocation"
            ],
            "Resource": "*"
        },
        {
            "Sid": "Bucket",
            "Effect": "Allow",
            "Action": [
                "s3:ListBucket",
                "s3:ListBucketMultipartUploads"
            ],
            "Resource": "arn:aws:s3:::YOUR-BUCKET-NAME-HERE"
        },
        {
            "Sid": "Objects",
            "Effect": "Allow",
            "Action": [
                "s3:GetObject",
                "s3:PutObject",
                "s3:DeleteObject",
                "s3:ListMultipartUploadParts",
                "s3:AbortMultipartUpload"
            ],
            "Resource": "arn:aws:s3:::YOUR-BUCKET-NAME-HERE/*"
        }
    ]
}
This policy allows the user to see (list) all of the S3 buckets, but only read and write the contents of the specified bucket.
Click Next, and then enter a policy name on the next page. Something similar to “globus-BUCKETNAME-access” is recommended. Click “Create policy”.
Visual Editor#
If you want a different set of permissions on the bucket than what the JSON above specifies, for example to read but not delete the contents of the bucket, you can search for an appropriate set of actions and policies with the Visual Editor. This generally requires an advanced understanding of how AWS and S3 permissions work and interact with Globus.
Apply the IAM policy to your user#
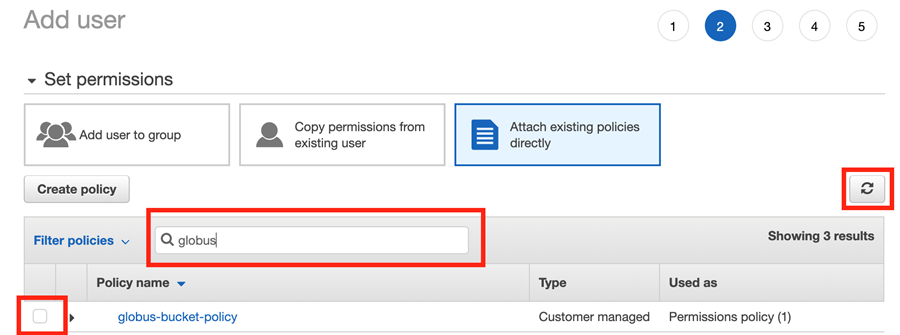
Once your policy is created, return to the “Add User” screen.
Refresh the policies window so it registers the new policy you created.
Search for the policy name you created (e.g. “globus-BUCKETNAME-access”).
Check the box to the left of the policy to apply it to your IAM user.
Then you can enter tags if needed. Then click “Next: Review”
The review page gives you an opportunity to review the permissions you have given to this user. When you are satisfied, click “Create User”.
Download credentials#
You will be prompted to download a CSV file containing the user’s credentials (access key ID and secret access key). Either download the file or copy and paste the credentials from this page. The credentials will only be displayed one time so make sure to save them from this page.
We recommend storing this information in a password manager or AWS Secrets Manager .
These credentials will be used to Access Your Files on AWS S3 with Globus .