Archiving Data in Amazon S3 Glacier Deep Archive#
As datasets become larger and more complex, keeping all of your data on one storage system becomes infeasible due to cost and space restrictions. While keeping data that you are actively using close at hand is important, data from inactive projects that isn’t accessed frequently, but needs to be kept due to data retention requirements, could be moved to more cost effective storage systems. This tutorial will show you how use Amazon S3 Glacier Deep Archive for this purpose.
Using Glacier Deep Archive involves four tasks:
Estimating costs - Calculating how much you are likely to spend when archiving your data and accessing archived data
Preparing data for archiving - Documenting and packaging your data for usability and cost efficiency
Archiving - Moving your data into Amazon S3 Glacier Deep Archive
Retrieving - Accessing your data in Amazon Glacier Deep Archive for later use
If you are already familiar with Amazon S3 storage, see the sections linked above for step by step instructions for how to complete the tasks. If you’re new to Amazon S3 storage, read on for information about how archiving in Amazon S3 Glacier Deep Archive works as a first step.
Other S3 storage classes
Amazon S3 has other storage classes that may be useful to you for other circumstances. These other storage classes have different pricing structures and workflows. See Amazon S3 Storage Classes for more information. If you’re not sure what storage class is right for your use case Request a Cloud Consultation .
What is Amazon S3 Glacier Deep Archive?#
Amazon Web Service (AWS) provides several types of storage. The most cost effective type is Amazon S3, which stands for Simple Storage Service. Amazon S3 stores files (aka objects) in structures called buckets. Within a bucket, objects are assigned to a storage class. This tutorial addresses the following 2 storage classes:
S3 Standard is the most accessible and costly storage class. S3 Standard is appropriate for files that you are actively working with.
S3 Glacier Deep Archive is the least accessible but least costly storage class. It is appropriate for data that must be retained but that will be accessed less than once per year (approximately).

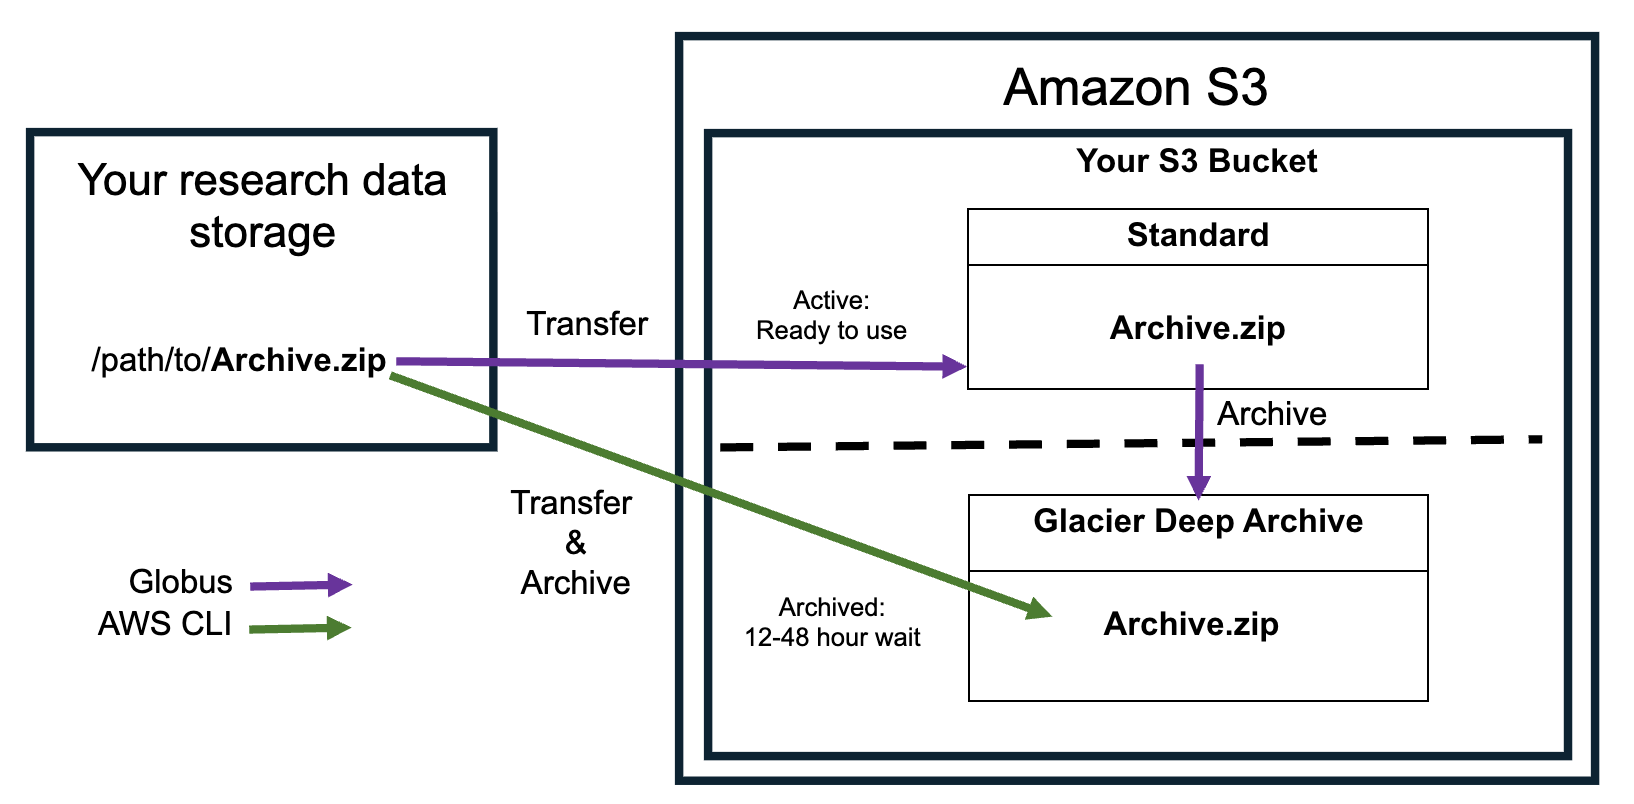
To archive data in S3 Glacier Deep Archive, the files must be transferred to Amazon S3. Depending on the method of transfer you choose, the data may be either briefly stored in the S3 Standard storage class and transitioned to S3 Glacier Deep Archive or transferred directly into S3 Glacier Deep Archive. See the Transferring Data to S3 section for more information.
The process of accessing data archived in Glacier Deep Archive is called retrieval. The first step in this process is submitting a restore request for the files you want to retrieve. Restoring files creates a temporary copy in S3 Standard. The original file will remain in S3 Glacier Deep Archive. The length and cost of the restoration process varies by the retrieval tier you choose:
Standard retrieval takes 12 hours, higher cost
Bulk retrieval takes 48 hours, lower cost
After the file is restored, you must download the files before the temporary copy expires. If you don’t, the file will have to be restored again. See the Retrieving Data section for more information.
Each of these processes incur costs from Amazon S3. Before you decide to archive your data, estimate how much it will cost to decide if it is a cost efficient storage solution for your data.
Estimating Costs#
Unlike systems like RDSS that have a fixed cost for a set quota, public cloud platforms like AWS charge for past usage. Before deciding to archive your data, you should estimate the one-time and monthly costs you will incur for storing and retrieving the data. Charges are based on the size of your data, how many files you have, and how often you expect to access the data (if at all).
See the following sections to determine your data size and file number to calculate an accurate cost estimate.
Attention
AWS costs may change. The examples below use recent figures, but check the AWS S3 Pricing documentation for current rates, especially if you are archiving a lot of data.
Determining Data Size and File Count#
Storage costs depend on both:
Size: how much space your data takes up on a storage system, measured in MB, GB, TB, etc.
Number of files: how many individual files you are storing.
How to calculate these numbers depends on where the data are stored. For data stored on:
Research Data Storage Service (RDSS) : contact rdss-help@northwestern.edu with a request for this information and the share and directory your data is stored in. We can use a tool called Starfish to give you the numbers of files and folders.
FSMResFiles: contact fsmhelp@northwestern.edu with a request for this information and the directory your data is stored in. FSM IT can use a tool called Starfish to compute this information.
Quest: see the space utilization sections on the Quest File Systems page for instructions.
Other platforms: use the operating system-specific commands below to count files and sizes. The instructions will work for data stored directly on your computer’s file system, synced OneDrive/SharePoint files, mounted external hard drives, and mounted remote drives like RDSS/FSMResFiles. These numbers will be pre-calculated for folders stored on your computer. For mounted drives, they may take some time to calculate.
To find information about the size of your data on Windows:
Open Windows File Explorer and navigate to the folder with your data.
Right click on the folder you want information about. Select Properties.
The line
Size:will show you the amount of space your data uses.The line
Contains:will show you how many files there are.
To find information about the size of your data on Mac:
Open a Finder window and navigate to the folder with your data.
Control click on the folder and select Get Info.
Look at the line that says
Size:. The size will be listed in bytes, as well as a more human readable figure in KB, MB, or GB in parentheses. The number of files will be listed before the word “items”.
Example output for a folder with 655 KB of data and 13 files:
Size: 623,336 bytes (655 KB on disk) for 13 items
To calculate the total amount of storage the files in a directory use on Linux, run the following command:
du -sh /path/to/directory
To find the number of files in a directory and its subdirectories, run the following command:
find /path/to/directory -type f | wc -l
Archival Costs#
Archiving data in S3 Glacier Deep Archive incurs one-time costs for moving data into this storage class and recurring costs for storing the data in this storage class. These costs vary by the size of and number of files in your data and the workflow you use to get your files into S3 Glacier Deep Archive.
Data Transfer Costs#
There are multiple ways to get your data into S3 Glacier Deep Archive. Some tools, like the AWS Command Line Interface (CLI) allow you to transfer data directly into S3 Glacier Deep Archive, whereas other tools, like Globus, are only able to transfer files to the S3 Standard Storage class, and then you need move them to S3 Glacier Deep Archive. The data transfer method you choose will affect the cost.
Getting data into S3 Glacier Deep Archive incurs the following costs:
Uploading files into any S3 storage class costs $5.00 per 1,000,000 files.
Transitioning files between storage classes also costs $5.00 per 1,000,000 files.
Temporarily storing data in S3 Standard (optional) costs $0.80/TB/day.
Example: How workflow affects cost
Let’s assume you want to archive 10,000,000 files that are 1 MB each (10 TB total).
Uploading these files directly into S3 Glacier Deep Archive would cost approximately:
$50 to upload the files
Total: $50
Uploading files into S3 Standard then transferring them to S3 Glacier Deep Archive would cost approximately:
$50 to upload the files into S3 Standard
$8 to temporarily store the data in S3 Standard for one day
$50 to transfer the files to S3 Glacier Deep Archive
Total: $108
This example shows that uploading directly to S3 Glacier Deep Archive decreases the per file costs and eliminates the cost of transferring data between S3 tiers.
Example: How the number of files affects costs
Again, assume you want to archive 10,000,000 files that are 1 MB each (10 TB total). The example above showed that it costs:
$50 to upload them directly to S3 Glacier Deep Archive
or
$108 to upload and temporarily store the data in S3 Standard for one day and move them to S3 Glacier Deep Archive
Instead, if you bundle these files into .tar files that have 1,000 files each, so that you have 10,000 .tar files that are each 1 GB, it will cost approximately:
$0.05 to upload the 10,000
.tarfiles directly to S3 Glacier Deep Archive
or
$8.10 to upload and temporarily store the data in S3 Standard for one day and move the files to S3 Glacier Deep Archive
Reducing the number of files can have a larger effect on the upload cost than changing the workflow to directly upload files to S3 Glacier Deep Archive. While it costs more to temporarily store data in S3 Standard, the temporary storage costs might be worth it if you are able to use tools like Globus that can manage your data transfer for you but that can only connect to S3 Standard. See Transferring Data to S3 for more information on the pros and cons of different transfer methods.
Data Storage Costs#
Once your data is in S3 Glacier Deep Archive, you will be charged monthly for the storage space you are using for both data and metadata. The metadata costs are per file, so reducing the number of files can help keep costs down here as well.
Storing data in S3 Glacier Deep Archive incurs the following costs:
Storing the data costs ~$12/TB/year
Storing metadata costs ~$2.28 per 1,000,000 files
Example: Storing many small files
Again, let’s assume you want to archive 10,000,000 files that are 1 MB each (10 TB total). Storing this data in S3 Glacier Deep Archive would cost:
$120 to store the data for a year
$25.80 to store the file metadata for a year
Total: $145.80 per year
Instead, if you bundle these files into .tar files that have 1,000 files each, so that you have 10,000 .tar files that are each 1 GB, it would cost approximately:
$120 to store the data for a year (no change)
$0.03 to store the file metadata for a year
Total: $120.03 per year, making the cost of storing the metadata negligible
If you have many small files, compressing files together to reduce the number of files uploaded into S3 can reduce both the initial upload cost and the ongoing storage costs. See the Packaging your Data section for more information on how to reduce the number of files.
S3 Glacier Deep Archive 180 day Minimum Storage Duration
Once a file enters the S3 Glacier Deep Archive Storage Class, you will be charged for 180 days of storage for that file even if it is deleted, overwritten, or retrieved before 180 days.
Retrieval Costs#
When you request retrieval of data that is stored in S3 Glacier Deep Archive, you must specify the files you want to retrieve, the retrieval speed (Bulk or Standard) and how long you would like the files to be temporarily stored in S3 Standard for download. All of these options affect cost and cannot be changed once you specify them.
Retrieving data from S3 Glacier Deep Archive incurs the following one time costs:
Restoring the data from S3 Glacier Deep Archive costs has both per TB and per file costs that vary by the retrieval speed you choose. See the table below for details.
Temporarily storing files in S3 Standard costs ~$0.80/TB/day.
Downloading data costs $0.40 per 1,000,000 files.
Retrieval speed |
time to retrieval |
per TB |
per 1,000 files |
|---|---|---|---|
Standard |
12 hours |
$20 |
$0.10 |
Bulk |
48 hours |
$2.50 |
$0.025 |
Additionally, the original file is kept in S3 Glacier Deep Archive, so you will continue to pay the cost of storing it there until you delete it.
Example: Retrieving files
Retrieving 10,000 files that are 1 GB each (10 TB total) would incur a one time cost of approximately:
$25.25 to retrieve all of these files within 48 hours (bulk retrieval)
$25 for the size of the data
$0.25 for the number of files
or
$201 to retrieve them within 12 hours (standard retrieval)
$200 for the size of the data
$1 for the number of files
$8.00 to store the data in S3 Standard for 1 day
< $0.01 to download the files from S3 Standard
Total: $33.25 for bulk retrieval or $209.00 for standard retrieval.
The majority of the retrieval cost comes from the per TB retrieval cost, especially if you choose the standard retrieval speed. Only retrieving files that you truly need is the best way to control retrieval costs.
Controlling Costs#
Storing data in Amazon S3 Glacier Deep Archiving incurs both per file (uploading, downloading, metadata) and per TB (data storage, retrieval) costs. You can control costs without changing the scope of the data you’d like to archive using the following approaches:
Only archive what you need: Not everything that you produce during the course of the research project needs to be archived. Carefully consider whether certain files will be useful in the future or could be re-generated. For example, consider archiving only raw data and code if you can use the code to easily regenerate processed datasets and results from the raw data.
Bundle small files together: To reduce the per file costs for archiving, bundle files together in a
.tarfile to reduce the total number of files. See the Preparing Your Data section for more information.Compress your data: To reduce the cost of storing and retrieving data, compress your files file to reduce the size of your data. See the Preparing Your Data section for more information.
Reduce the number of retrievals: Only archive data that you don’t expect to need often (less than once per year). If you expect to need it more often than that, consider a different storage platform or S3 storage class .
Keep your retrievals small: The biggest cost of retrieving files is based on the size of the data. To make sure you can pull back the minimal amount of data:
Keep good records of what is in your archive somewhere outside of the archive.
Bundle related files together so that you can reduce the total number of files retrieved.
Time your retrievals appropriately: When you retrieve data from S3 Glacier Deep Archive, the files are copied temporarily in the S3 Standard storage class. To minimize the time that the files have to be on S3 Standard, request retrieval 12-48 hours before you’re ready to download the files. Also, make sure you can download the files within the restore time you choose when retrieving the files. If you do not, you will have to re-request the retrieval and incur the same costs.
All of these processes will save costs, but the trade-off is that can be a significant amount of work. Email rdss-help@northwestern.edu if you need help deciding how to prepare your data for cost control.
Resources#
See the Amazon S3 storage pricing page for current prices and further details.
See the AWS Pricing Calculator to estimate costs.
If you need help estimating costs, request a cloud computing consultation .
Preparing Data for Archiving#
Once your data is in S3 Glacier Deep Archive, you will only be able to see the file metadata (name, size, etc.). Spend some time organizing and documenting your data to make finding the files you need easier in the event that you need to retrieve part of your archive. These steps will also allow you to package your data efficiently for cost savings.
Organizing#
Good data organization practices not only help while you’re actively working with the files but also can save money when archiving them. Reorganizing your data for archival purposes will make archiving and retrieving data much easier.
Consider these data organization tips when archiving your data:
Put all the archivable data in one place: Instead of uploading your archivable files from multiple locations (different folders or storage locations), put everything in one folder per archive job. Then, you only have to worry about one data transfer step when you go to archive the files.
Group the data by useful categories: Within this main folder, create subfolders that will allow you to group your data functionally–for example, by type of experiment. The goal is to group things that you might retrieve together to make the retrieval process easier.
Use descriptive file names: Once files are archived, you will only be able to see their names, not their contents. Make sure you can identify what files you need by their names so you don’t accidentally retrieve files you don’t need.
Documenting#
Once you make all of these decisions, document your decisions for your colleagues and future self. Make a README file that can be stored both with and outside of the archive.
Important things to record include:
Who to contact with questions about the data
How to access the data archive
What research projects and papers the data is associated with
What is stored in each folder or bundled (
.taror.zip) fileWhat your file names mean
Abbreviations or other shorthand you use
Anything else you can see being useful when you can’t access your data directly
Packaging Your Data#
Some S3 costs are charged per file (see Estimating Costs). One way to cut down on these costs is to bundle your files using file archives (.tar files) or compressed files (.zip or .gz files) that have the added bonus of reducing the size of the data.
Follow these tips for packaging your data:
Aim for bundles the are in the GB range: This makes the per file fees cost effective relative to the overall storage cost and ensures you don’t have to retrieve TBs of data to get back a small subset of files.
Pack files that you think you would retrieve together in the same bundle: This strategy will make partial data retrievals more cost effective.
Decide whether to compress your files: Compressing large amounts of data is computationally intensive and takes time. Whether compressing files is worth it depends on your data type. Space savings will vary depending on the type of file that you are archiving and the compression algorithm you are using.
Try compressing a sample of files to see if compression is worth it. Generally, compression saves a lot of space for repetitive files like text files but doesn’t save much space for file formats that are already compressed like
.jpegfiles.Test uncompressing your files to make sure the files are still usable. Some compression algorithms are “lossy” and may lower the resolution of images and video.
Combining Files#
If you want to package your files without compression, create a .tar file.
To create a .tar file on a Windows computer:
Open a File Explorer Window and navigate to your files.
Select the files/folders by right-clicking on the file(s) or folder(s) you want to archive.
From the context menu, select Compress to and then choose tar file.
Provide a name for your new
.tarfile and pressEnter.
To create a .tar file on a Mac, in the Terminal program, navigate to the directory containing the folder(s) or files you want to compress. Then run :
tar -cvf archive.tar archive_folder
The
-coption creates the archive.The
-foption allows you to name the resulting tar file, in this casearchive.tar.The
-voption will list the files it is adding to the terminal output.archive_folder: Folders you want to compress. You can list multiple folder or file names separated by spaces.
You can use the -z option to compress and archive at the same time using gzip.
To create a .tar file on a Linux computer, navigate to the directory containing the folder(s) or files you want to compress in the shell. Then run :
tar -cvf archive.tar archive_folder
The
-coption creates the archive.The
-voption will list the files it is adding to the terminal output.The
-foption allows you to name the resulting tar file, in this casearchive.tar.archive_folder: Folders you want to compress. You can list multiple folder or file names separated by spaces.
You can use the -z option to compress and archive at the same time using gzip.
Compressing Files#
If you also want to compress your files, create a .zip file instead of a .tar file.
To compress files on a Windows computer, use the Zip and unzip files instructions provided by Microsoft.
To compress files on a Mac, use the Zip and unzip files and folders on Mac instructions provided by Apple.
To compress a file on a Linux computer, use the zip command:
zip archive_name.zip archive_folder
archive_name.zip: The name of the zip file to create.archive_folder: Folders you want to compress. You can list multiple folder or file names separated by spaces.
This command will put the specified files into a .zip file and leave the originals where they are.
Adding the -m option will move the files into the .zip and remove them from the original location.
zip -m archive_name.zip archive_folder
Archiving Data#
Now that your data is neatly packaged, start archiving your data in Amazon S3 Glacier Deep Archive by:
Request a Northwestern AWS Account if you don’t have one already.
Create an Amazon S3 bucket for this archival process. We recommend using one bucket per archive or dedicated bucket for all archived files.
Transferring Data to S3#
Once you have credentials you can use to access an S3 bucket, you can move your data into S3. We recommend using either Globus or the AWS Command Line Interface (CLI). Here are some things to consider when choosing which option to use.
Globus
You can use it from a web interface.
Automatically handles file integrity checks and retries any failed transfers. Handles any network connection issues automatically.
Can only access the Amazon S3 Standard storage class. Data must then be moved to the S3 Glacier Deep Archive storage class by creating a lifecycle rule for the S3 bucket in the AWS console.
You will be charged the S3 Standard Storage rate for the amount of time the files are in the S3 Standard storage class. This process can be automated to control costs.
You will also be charged $0.05 per 1,000 files to transition the files between S3 Standard and S3 Glacier Deep Archive.
AWS CLI
You use it from the command line. It must be installed to use it. It can be installed on your computer, or accessed as a module on Quest.
You must maintain a connection to the internet throughout the entire transfer, which requires that your computer also be awake during the entire transfer; this can be prohibitive for large transfers. You must manually resolve any file transfer issues.
Can transfer files directly into the Amazon S3 Glacier Deep Archive storage class, which eliminates the cost of temporarily storing your data in the S3 Standard storage class.
See the sections below for detailed instructions.
Globus#
To use Globus to move data into Amazon S3 Glacier Deep Archive:
Transfer the data into the S3 Standard storage class using Globus.
The lifecycle rule will move the data to the S3 Glacier Deep Archive Storage class.
See the sections below for instructions.
Creating a Lifecycle Rule#
Transfers made via Globus land in the S3 Standard storage class. To minimize cost, move objects to an S3 bucket that has an S3 Lifecycle rule that automatically transitions the files to the S3 Glacier Deep Archive storage class after a set period of time.
To create a lifecycle rule:
Log in to the AWS Console .
Navigate to the Amazon S3 console .
Click on the bucket you will use to archive your files.
On the S3 bucket detail page, click on the Management tab and then click Create lifecycle rule.
Fill out the following information on the Lifecycle rule configuration section on the page that opens.
Lifecycle rule name: Give the rule a descriptive name (e.g., deep-archive)
Choose a rule scope: This decision will determine the files in the bucket that the rule will apply to.
If this bucket will be used solely for archiving, Select Apply to all objects in the bucket.
Alternatively, you can select Limit the scope of this rule using one or more filters by specifying a Prefix, or a file path to archive or a Object tags that will archive any object with that tag.
Object size: Fill this in only if you want to archive objects above/below certain sizes. Otherwise, leave the boxes unchecked.
Under Lifecycle rule actions:
Select Transition current versions of objects between storage classes. A box will appear that informs you that there is a per transaction request ($0.05 per 1,000 files). Check I acknowledge that this lifecycle rule will incur a transition cost per request to acknowledge these charges.
Leave the rest unchecked.
In the Transition current versions of objects between storage classes section:
In the Choose storage class transitions dropdown, choose Glacier Deep Archive.
In the Days after object creation box, specify a number. AWS will only change the storage class after the defined days have passed after the file was uploaded to S3. Make sure that this time is long enough that you can validate that the files are what you want to archive, but not too long, because you will be charged S3 standard storage rates during this time.
Review the settings and ensure that you click the checkboxes for any acknowledgment requests then click Create rule. The Lifecycle rule will appear under Lifecycle configuration in the Management tab of the bucket.
Lifecycle rules for archiving may not be generalizable to other use cases
These instructions are specifically for uploading data to an empty S3 bucket and archiving a single version right away. See Managing the Lifecycle of Objects in the S3 documentation for general information on setting up and using Lifecycle rules.
Transferring Data into S3 Standard#
After you’ve created your bucket, set up an access key with the correct permissions to transfer files using Globus; see Granting Access to an Amazon S3 bucket Using Access Keys. You will need the secret and access key to grant Globus permissions to the bucket.
In the Globus File Manager, find and authenticate into the storage system your data is stored on (the source) in the left hand pane. See Globus Collections for finding and authenticating into source collections.
In the right pane, search for and choose Northwestern Amazon S3 (Standard) as the destination.
If you are logging in for the first time, Globus will prompt you to register your AWS credential. Use the secret and access key from Granting Access to an Amazon S3 bucket Using Access Keys. After registering, you won’t need to re-authenticate for this collection.
You will see a folder for each bucket that the credentials you used have access to. Select the bucket you would like to transfer into. If applicable, choose a subfolder to transfer the data into.
In the left hand source pane, select the files/folders you would like to archive from their source location.
Click Start to transfer the files to S3. You can track transfer progress under Activity.
Moving the Data into S3 Glacier Deep Archive#
The lifecycle rule that you created in the Create a lifecycle rule section will automatically move your data into the S3 Glacier Deep Archive storage class after the amount of time specified in the lifecycle rule. Verify the transfer after the appropriate time has lapsed by viewing the files in the AWS Console.
AWS CLI#
To transfer data into Amazon S3 Glacier Deep Archive using the AWS CLI, follow these instructions.
Install the AWS CLI Software#
To use the AWS CLI, first follow AWS’s instructions on Installing or updating to the latest version of the AWS CLI .
Configure the AWS CLI using SSO#
We recommend authenticating into the AWS CLI using your Northwestern NetID. Follow the instructions in the “Configuring the AWS CLI for NetID Authentication” section of the Use NetID Authentication with AWS Northwestern IT help article.
Then, verify your access to S3 by starting a terminal or command prompt and running:
aws s3 ls
You should see a list of your accessible S3 buckets. If permissions are correct, you will be able to upload, download, and list objects in S3.
Upload Your Data#
To upload the contents of a folder directly to S3 Glacier Deep Archive storage class, run the following command:
aws s3 cp /path/to/folder/ s3://my-archive-bucket/your-folder/ --recursive --storage-class DEEP_ARCHIVE
This command uploads all files inside /path/to/folder to the S3 bucket, preserving subdirectory structure and applying the S3 Glacier Deep Archive storage class to every object.
Replace the following:
/path/to/folder: Full path to your local foldermy-archive-bucket: Your target S3 bucket’s nameyour-folder/: (Optional) Destination folder or key prefix in the bucket
The flags included in the command do the following:
recursive: transfers everything in the specified folderstorage-class DEEP_ARCHIVE: flag ensures all files are immediately placed into the S3 Glacier Deep Archive class.
To archive a single file, add the file name to the path provided above (eg: /path/to/folder/file.txt) and remove the recursive flag from the command.
Verify That Your Upload Was Successful#
After the upload is complete, use the following command to confirm that the files were uploaded to S3:
aws s3api list-objects-v2 --bucket my-archive-bucket --query "Contents[].[Key, Size, LastModified, StorageClass]" --output text
Replacing the following my-archive-bucket with the name of your bucket.
The output will have a table with a row for each file in the bucket and the following columns
The name of the file: should match the name on your computer
The size of the file in bytes: should match the size on your computer
When the file was last modified: should match the time you uploaded it
The storage class of the object: should be
DEEP_ARCHIVE
Once a file has been uploaded, you should be able to see it in the S3 console or by using the AWS CLI to query the object metadata.
Retrieving Data#
While you can see file metadata such as the names and sizes of files stored in S3 Glacier Deep Archive, their contents are not immediately accessible. To view their contents, you must first retrieve the files.
To retrieve data from Amazon S3 Glacier Deep Archive:
Retrieve or Restore
The terminology around accessing data stored in the S3 Glacier Deep Archive Storage class can be confusing and can seem inconsistent. Here are some key terms and how we use them in this documentation.
Retrieval refers to the overall process that starts with a restore request and ends when you are able to download the data.
Restore request initiates the retrieval process by requesting that a copy of a file in S3 Glacier Deep Archive be placed in S3 Standard temporarily to allow access.
Retrieval option refers to the speed that you want to use to restore the data (Bulk or Standard).
Restore duration is how long you want the copy of the data to stay in S3 Standard to allow you to download it.
If you have questions, email rdss-help@northwestern.edu and a data management specialist will walk you through it.
Submitting a Restore Request#
Restoring a file makes of copy of that file in the S3 Standard storage class so you can access it. The original file stays in S3 Glacier Deep Archive until you delete it. To request that a file be restored, you must specify
What files you want to restore
Retrieval option: how fast you want the files to be accessible
Restore duration: how long you would like to hold the files in S3 for download
Files to Restore#
You will need to specify the name of the bucket that contains the file(s) you want to restore, as well as the path to the file in the bucket. You can browse the files stored in your S3 bucket in the Amazon S3 Console to get the exact path; however, you cannot open the files without retrieving them.
Retrieval Options#
There are two retrieval options for the S3 Glacier Deep Archive storage class: Standard or Bulk.
Retrieval Option |
Retrieval Fee per GB |
Typical time to complete |
Notes |
|---|---|---|---|
Bulk |
$0.0025 |
~48 hours |
Lowest cost, best for large non-urgent restores |
Standard |
$0.01 |
~12 hours |
Faster, higher cost (~4x more expensive) |
Restore Duration#
The restore duration is how long the restored copy of the file(s) should remain in the S3 Standard storage class before being automatically deleted. Restored copies incur temporary storage costs (S3 Standard rates) in addition to retrieval charges, so keep the restore duration period as limited as possible.
Restore durations cannot be extended. If you fail to transfer or download your files from the S3 Standard storage class before they are deleted, you must re-initiate another restore request, which restarts the retrieval wait time and charges. Make sure you will be able to transfer the restored copies out of S3 Standard storage within the restore duration period.
Initiating the Restore Process#
Use the following instructions to initiate the restore process:
To restore a file from S3 Glacier Deep Archive using the Amazon S3 Console:
Go to the Amazon S3 console .
Choose the S3 bucket containing the file(s) you want to retrieve in the General Purpose Buckets panel.
You will see a list of files and folder stored in the bucket in the Objects panel. Click the checkbox to the left of the file(s) you want to restore.
Select Actions > Initiate restore to start the restore process. In the dialog box, specify:
Number of days you want the file accessible.
Retrieval option (Bulk or Standard).
Click Initiate Restore to submit your request.
To restore a file from S3 Glacier Deep Archive using the AWS CLI, run the following command:
aws s3api restore-object --bucket my-archive-bucket \
--key path/to/myfile.txt \
--restore-request '{"Days":XX,"GlacierJobParameters":{"Tier":"RETRIEVALTIER"}}'
The parameters above specify the following :
--bucket my-archive-bucket: The files to restore are in a bucket calledmy-archive-bucket. Replacemy-archive-bucketwith the name of your archival S3 bucket.--key path/to/myfile.txt: The file to restore is calledmyfile.txtand is stored in a folder calledpath/to/myfile.txt. Replacepath/to/myfile.txtwith the path to your file in S3.--restore-request: Restore speed and how long the files will stay in S3 Standard"Days":XX: The restore duration; the files will stay in S3 standard for XX days. ReplaceXXwith the number of days you want the restored copy to stay in S3 Standard storage."GlacierJobParameters":{"Tier":"RETRIEVALTIER"}: ReplaceRETRIEVALTIERwith the retrieval option you want (StandardorBulk).Standard: The files will be retrieved within ~12 hours.Bulk: The files will be retrieved within ~48 hours at a lower cost.
After executing the command above, your request will be submitted. Your data will be retrieved within 12-48 hours depending on the retrieval speed you selected.
Time your restore request appropriately
The retrieval process has two time sensitive steps:
Restoring a file can take up to 12-48 hours depending on the restore speed selected. Large files may take longer to be fully restored.
As part of your request, you will specify the restore duration, or the amount of time your files will remain in S3 Standard Storage. When time is up, this copy will be automatically deleted.
Make sure that you time your request such that you
Download the files as soon as they have been restored. For example, you might want to avoid the process completing on a weekend or when you are out of the office.
Allow enough time to download your files. If you can’t download the data within the restore duration specified in the request, you will have to restore the files again, incurring the same charges. If you restored a lot of files, it may take a while to transfer them to another data storage platform.
Checking Restore Progress#
You can check on the status of your restore request while you are waiting. Choose one of the following options for instructions.
To check the progress of a restore request using the Amazon S3 Console:
Log in to the AWS console and go to the S3 console . Open the bucket you used for archiving.
Click on the file that you requested to be archived.
The Properties panel will open.
Under Properties > Restore status, you will see a section labeled one of the following:
Restoration in progress means AWS is still processing the request.
Restoration complete means the temporary copy is ready and can be downloaded until the listed expiration date.
To check the progress of a restore request via AWS CLI, run the following command:
aws s3api head-object --bucket my-archive-bucket --key path/to/myfile.txt
Replacing
my-archive-bucketwith the name of the bucket your archived file is inpath/to/myfile.txtwith the path and name of the file you requested to be retrieved.
In the output, look for the Restore field:
ongoing-request="true"indicates that the files are still being restoredexpiry-date="..."indicates that restore complete and available until that date
Downloading the Files#
You can download the restored files in a number of ways. See the following instructions to download the files through the Amazon S3 Console, AWS CLI, or Globus.
Downloading files directly from the AWS console via a web browser is only recommended for a small number of files of a few gigabytes or less. Larger files often do not transfer reliably with this method. If you are downloading many files or larger files, choose a different data transfer method.
To download a restored file using the AWS S3 Console:
Log in to the AWS console and go to the S3 console .
Navigate to the bucket containing the restored files.
Select the checkbox to the left of the files you would like to download.
Click the Actions button and select Download as.
A dialog box will appear asking you to select the location of the download on your computer.
For larger files and many files, the AWS CLI is a good method for downloading files from S3.
Download a Single File
To download a file, run the following command:
aws s3 cp s3://my-archive-bucket/your-folder/file1.txt /local/path/file1.txt
Replacing:
my-archive-bucketwith the name of the bucket/your-folder/file1.txtwith the path to the file in the bucket/local/path/file1.txtwith the path you would like to store the file on your computer
Download an Entire Folder
To download all files in a folder, run the following command:
aws s3 cp s3://my-archive-bucket/your-folder/ /local/path/ --recursive
Replacing:
my-archive-bucketwith the name of the bucket/your-folder/with the path to the folder in the bucket/local/path/with the path you would like to store the contents of the folder on your computer
The --recursive flag ensures that every file inside that S3 folder is copied.
See the Globus guide for instructions on transferring files using Globus.