
Importing and Exporting Data#
Role: Data Engineer · Researcher / Data Analyst (egress download only)
Task |
Data Engineer |
Researcher / Data Analyst |
|---|---|---|
Import data via SFTP |
✓ |
— |
Import data via Globus |
✓ |
— |
Import data via allowlisted web portal |
✓ |
— |
Stage files for egress review |
✓ |
✓ |
Review and approve egress |
✓ |
— |
Download approved egress files |
✓ |
✓ |
All data movement into and out of the SDE must comply with Northwestern and NIST SP 800-171 standards and the DUA governing your project. Only Data Engineers can import data into the SDE. Researchers and Data Analysts who need data imported should contact their project Data Engineer.
Data can only leave the SDE after a Data Engineer reviews it for compliance and logs the egress. Researchers and Data Analysts can stage files for review but cannot download data directly from within the SDE.
Warning
Do not attempt to transfer data using methods not described on this page. Unauthorized transfer methods violate the SDE Acceptable Use Policy and may breach your project DUA.
Data Ingress#
Only data consistent with the DUA governing your project may be imported into the SDE. All ingress methods require IT configuration before they can be used. Ingress options are discussed during SDE onboarding. If you need an additional method or have a new ingress request, submit a support request so that it can be reviewed and configured.
The SDE supports three approved ingress methods:
Method |
Best for |
Requires IT setup |
|---|---|---|
Large or recurring transfers from a data provider’s server |
Yes — firewall rules and key exchange |
|
Transfers from Northwestern systems or other Globus endpoints |
Yes — private collection provisioning |
|
One-time downloads from a web interface (SharePoint, Dropbox, etc.) |
Yes — URL and IP allowlisting |
If your data cannot be transferred via any of these methods, contact Northwestern IT to discuss alternatives before attempting any transfer.
SFTP Transfer#
Role: Data Engineer
SFTP (Secure File Transfer Protocol) allows your data provider to push files directly to a VM in the Ingress Project over an encrypted connection. Because SDE VMs have no general internet access, Northwestern IT must open a specific firewall port and allowlist your data provider’s IP address before any transfer can occur. This is required by the NIST SP 800-171 network controls governing the SDE.
Note
SFTP is best suited for large datasets, recurring transfers, or providers who cannot use Globus or a web portal. The setup involves coordination between you, your data provider, and Northwestern IT.
What you need to collect from your data provider#
Before submitting a setup request to Northwestern IT, gather the following information from your data provider. You will need to include all of it in your request.
Information needed |
What to ask your provider |
|---|---|
Static IP address(es) |
What is the static IP address or IP range your SFTP server will connect from? |
SFTP port |
What port does your SFTP server use? |
Authentication method |
Do you use SSH key authentication, password authentication, or both? |
Public SSH key (if key-based) |
Can you provide your public SSH key so we can authorize your connection? |
Expected transfer schedule |
Will transfers be one-time, recurring, or on-demand? |
Approximate data volume |
What is the expected size of each transfer? |
Important
Your data provider must use a static IP address. Dynamic or shared IPs cannot be allowlisted. If your provider cannot provide a static IP, SFTP is not a viable option and you should consider Globus instead.
Key-based authentication#
The SDE uses SSH key-based authentication for SFTP connections. Password-based authentication is not permitted, as it does not meet NIST SP 800-171 access control requirements.
How this works:
Your data provider generates an SSH key pair (a private key they keep, and a public key they share with you).
Northwestern IT places the provider’s public key on the Ingress VM to authorize their connection.
When your provider connects, their private key is verified against the public key without any password being transmitted.
Ask your provider to send you their public key (typically a file ending in .pub). Include it in your IT setup request. Never ask for or accept their private key.
Submitting the setup request#
Once you have the information above, submit an ingress setup request to Northwestern IT. Include:
All information from the table above
Your data provider’s public SSH key (if using key-based auth)
The name of your SDE environment and project
Northwestern IT will configure the firewall rules, open the necessary port. You will need to generate the public key in the VM. You will be notified when the connection is ready to test.
Verify the connection#
Once IT confirms setup is complete:
Coordinate a test transfer with your data provider.
Ask them to push a small test file.
Verify it arrives in the expected location on the Ingress VM, then move it to the appropriate bucket in the Data Lake Project following your standard ingress workflow.
Common errors#
Error |
Plain-English meaning |
What to do |
|---|---|---|
Connection refused |
The firewall port is not open or the IP is not allowlisted |
Confirm the provider is connecting from the correct IP and contact IT to verify firewall rules |
Permission denied (public key) |
The public key is not installed or does not match |
Ask your provider to re-send their public key and submit an update request to IT |
Connection timeout |
The provider is hitting the wrong IP address or port |
Confirm with IT the correct hostname and port to give your provider |
Globus Transfer#
Globus is a secure, high-performance data transfer service used across research institutions. The SDE uses Globus to allow Data Engineers to bring data in from other Northwestern Globus collections or from collections at other institutions and data providers.
How the SDE Globus setup works#
Upon request, Northwestern IT provisions a private Globus collection scoped to your SDE environment. This collection:
Is accessible only to users within your specific SDE environment (authenticated via your Northwestern Google account).
Is isolated from other SDE environments — users in one enclave cannot access another enclave’s collection.
Deposits incoming data into a storage bucket in the Ingress Project.
Only Data Engineers can transfer data using this collection. Researcher/Data Analysts do not have access to the Ingress Project or the Globus collection.
Note
Globus is the preferred method for transferring data from other Northwestern systems, including Quest, RDSS, FSMResFiles, Northwestern OneDrive/SharePoint, and Amazon S3. See the Northwestern Globus documentation for the full list of available collections.
Requesting Globus setup#
Globus must be requested and configured before first use. Submit a Globus ingress request to Northwestern IT. Include:
The name of your SDE environment
The source collection you plan to transfer from (e.g., Quest, RDSS, an external institution’s collection)
Whether the transfer is one-time or recurring
IT will provision your private collection and notify you when it is ready.
Transferring data#
Once your collection is provisioned:
Note
Globus transfers are initiated and managed through the Globus web application, not the Google Cloud Console. The Console is used only to verify that data arrived in the Ingress Project bucket after the transfer completes.
Log in to Globus
Go to app.globus.org .
Select Northwestern University as your organization and sign in with your Northwestern credentials.
Find your SDE collection
In the File Manager, search for your SDE environment’s private collection by name. Northwestern IT will provide the exact collection name when setup is complete.
Your collection will only be visible to users within your SDE environment.
Set up the transfer
In the left panel, navigate to your source collection (where the data is coming from).
In the right panel, select your SDE private collection as the destination.
Navigate to the correct destination folder within the Ingress bucket.
Select the files or folders to transfer and click Start.
Verify the transfer
Globus will send an email notification when the transfer completes.
Log in to the Google Cloud Console, navigate to the Ingress Project, and confirm the files appear in the Ingress bucket under Cloud Storage > Buckets .
Verify the transfer#
Check the Globus notification email for any listed skipped files or warnings.
Open the transfer’s detail page in Globus Activity and confirm the file count and total size match, with no errors in the Events log.
Confirm the file count in the Ingress bucket via Cloud Storage > Buckets in the Ingress Project.
Spot-check a few file sizes against the source to rule out truncation or corruption.
Confirm no partial or .globus-* temp files remain.
Once verified: log the ingestion per your project’s intake process, move the data to the appropriate bucket in the Data Lake Project, and clean up temporary files from the Ingress bucket.
If any check fails, do not move the data forward — see Common errors or the Globus troubleshooting guide .
Common errors#
Error |
Plain-English meaning |
What to do |
|---|---|---|
Collection not found |
The SDE collection has not been provisioned yet or the name is wrong |
Confirm with IT that setup is complete and get the exact collection name |
Permission denied |
Your account is not authorized for this collection |
Contact IT to verify your account is linked to the correct SDE environment |
Transfer failed or stalled |
A network or endpoint issue interrupted the transfer |
Globus will automatically retry; if it continues to fail, check the Globus troubleshooting guide |
Allowlisted Web Portal#
If your data source provides a web-based download interface (such as SharePoint, Dropbox, REDCap, or a data repository portal), you can access it from a VM in the Ingress Project once the URL and IP addresses are allowlisted by Northwestern IT.
SDE VMs have no general internet access. IT must explicitly permit each external URL and its associated IP addresses before you can reach it from the Ingress VM. This ensures that only reviewed and approved external connections are permitted, consistent with NIST SP 800-171 network controls.
What you need to collect before requesting#
Before submitting a request, gather the following from your data source:
Information needed |
How to find it |
|---|---|
Full URL(s) of the portal |
The exact web address(es) you need to access to download data |
IP address(es) of the portal |
Ask your data provider: “What are the IP addresses for |
Whether the portal redirects to additional domains |
Browse the portal on your local machine and note any additional domains the download process involves (e.g., CDN or authentication redirects) |
Important
Web portals frequently redirect through multiple domains during login and download flows. If you provide only the main URL and the download involves redirects to other domains, the transfer will fail mid-process. Browse the full download flow on your local machine first and note every domain involved. When in doubt, contact IT early — they can assist in identifying the full set of addresses that need to be allowlisted.
Submitting the allowlist request#
Submit an ingress setup request to Northwestern IT. Include:
The full URL(s) of the portal
The IP address(es) associated with the portal
Any additional domains involved in the login or download flow
The name of your SDE environment
IT will review the request and add the approved URLs and IP addresses to the allowlist. You will be notified when the configuration is complete.
Accessing the portal and downloading data#
Once IT confirms the allowlist is in place:
Note
This procedure uses the VM in the Ingress Project, accessed via SSH-in-browser or the VM desktop. You cannot access web portals from your local machine and then move the data in — the portal must be accessed from within the SDE.
Start the Ingress Project VM
Log in to the Google Cloud Console and select the Ingress Project.
Go to Compute Engine > VM Instances and start the VM.
Access the portal and download data
Open SSH-in-browser on the Ingress VM.
Open a web browser from the VM desktop (if using VM Desktop) and navigate to the allowlisted URL, or use a command-line download tool such as
wgetorcurlfrom the SSH-in-browser terminal.Log in to the portal and download the files. Files will be saved to local VM storage.
Move data to the Ingress bucket
Once the download is complete, transfer the files from local VM storage to the Ingress Project storage bucket:
gcloud storage cp /path/to/downloaded/file gs://INGRESS_BUCKET_NAME/
Placeholder |
What to substitute |
|---|---|
|
The path to the file on the VM (use |
|
The name of the Ingress Project storage bucket |
Expected output:
Copying file:///path/to/downloaded/file to gs://INGRESS_BUCKET_NAME/file
  Completed files 1/1
Verify
Confirm the file appears in the bucket:
gcloud storage ls gs://INGRESS_BUCKET_NAME/
Verify the data#
Data entering the VM is scanned with Crowdstrike, log the ingestion, and move the data to the appropriate bucket in the Data Lake Project.
Remove the local copy from the VM and the staging copy from the Ingress bucket after the data has been moved.
Common errors#
Error |
Plain-English meaning |
What to do |
|---|---|---|
Page does not load / connection timeout |
The URL or IP is not yet allowlisted |
Confirm IT has completed the configuration and that you are using the exact URL from your request |
Login succeeds but download fails |
The download redirects to a domain that is not allowlisted |
Note the domain in the error or browser, and submit an updated request to IT to add the additional address |
|
Your account does not have write access to the Ingress bucket |
Contact IT to verify your IAM permissions on the Ingress Project |
Data Egress#
Role: Data Engineer · Researcher / Data Analyst
Data can only leave the SDE after a Data Engineer reviews it for compliance with the project DUA and logs the egress. Files containing PII or other restricted information as defined by your DUA may not be exported.
Warning
Exporting data that has not been reviewed and approved by a Data Engineer is a policy violation and may breach your project DUA. Use only the procedures described on this page.
The SDE supports three approved egress methods:
Method |
Best for |
Requires IT setup |
|---|---|---|
Downloading files to your managed endpoint via the Console |
No — buckets are managed by the Data Engineer |
|
Pushing approved files to a recipient’s SFTP server |
Yes — firewall rules and key exchange |
|
Transferring approved files to a Northwestern or external Globus collection |
Yes — separate egress collection provisioning |
The egress workflow involves both roles and must follow this sequence in order:
Step |
Who does it |
Where |
|---|---|---|
1. Copy file(s) to Egress Dataprep bucket in the Data Lake and notify Data Engineer |
Researcher / Data Analyst or Data Engineer |
VM (SSH-in-browser) |
2. Review the file for compliance with the DUA |
Data Engineer |
Data Ops VM (SSH-in-browser) |
3. Submit an IT ticket to log the egress event |
Data Engineer |
|
4. Copy the approved file from the Data Lake to the Egress Project bucket |
Data Engineer |
Data Ops VM (SSH-in-browser) |
5. Notify the researcher the file is ready and provide the bucket name |
Data Engineer |
|
6. Download the file from the Egress Project bucket to your managed endpoint |
Researcher / Data Analyst or Data Engineer |
Google Cloud Console |
7. Delete the data from the egress bucket within 3 days of download |
Data Engineer |
Google Cloud Console |
Attention
Data must be moved from the Data Lake to the Egress Project bucket by the Data Engineer before a download is possible. Steps 1 through 5 must be complete before attempting to download.
Stage a file for egress review#
Role: Researcher / Data Analyst · Data Engineer
Move the file you want to export to the Egress Dataprep bucket in the Data Lake Project. This signals to the Data Engineer that the file is ready for compliance review.
Note
These commands run on the VM. Make sure your VM is running and you have a terminal open via SSH-in-browser before proceeding.
Copy the file to the Egress Dataprep bucket
gcloud storage cp gs://SOURCE_BUCKET/FILE_NAME gs://EGRESS_DATAPREP_BUCKET/
Placeholder |
What to substitute |
|---|---|
|
The bucket where your file currently lives |
|
The name of the file you want to stage for egress |
|
The name of the Egress Dataprep bucket in the Data Lake Project (your Data Engineer can provide this name) |
Expected output:
Copying gs://SOURCE_BUCKET/FILE_NAME to gs://EGRESS_DATAPREP_BUCKET/FILE_NAME
  Completed files 1/1
Verify
gcloud storage ls gs://EGRESS_DATAPREP_BUCKET/
Confirm your file appears in the listing.
Important
After moving the file, notify your project Data Engineer that a file is ready for egress review. Include the file name and a brief description of its contents.
The Data Engineer will review the file, submit a compliance ticket to IT, and then move the approved file to the Egress Project bucket. You will not be able to download the file until the Data Engineer completes those steps and notifies you that the file is ready.
Review and approve egress#
Role: Data Engineer
Files staged by Researchers or Data Analysts appear in the Egress Dataprep bucket in the Data Lake Project. Use the VM in the Data Ops Project to review each file for compliance with the project DUA.
Review checklist:
Does the file contain PII or other information restricted by the DUA?
Has aggregation or de-identification been applied correctly?
Is the egress request consistent with the project’s approved use?
Warning
Do not approve files that contain restricted information. If you are unsure whether a file is safe to export, consult your institution’s data governance contact before proceeding.
You must maintain a log of all approved egress requests. The log must include at minimum:
Date of egress
File name and description
Who requested the egress
Your review decision and rationale
Submit an IT ticket to log the egress event#
Once you have reviewed and approved the file, submit an egress notification ticket to Northwestern IT before moving the data to the Egress Project. This ticket does not require approval — it is a required compliance log of the egress event.
The ticket should include:
File name and a brief description of the contents
Requesting user’s name
Date of your review
The egress method being used (bucket download, SFTP, or Globus)
Confirmation that the file complies with the project DUA
Important
Do not proceed to move the file until the ticket has been submitted. The ticket is the official record that this egress occurred and may be required for compliance audits.
Place approved files in the egress bucket#
Role: Data Engineer
The Egress Project contains dedicated egress buckets. Buckets are persistent, and they do not need to be recreated for each request. Only the data inside them must be deleted within 3 days of download.
Each egress bucket is scoped to a specific researcher. Access must be granted individually and users should not add multiple researchers to the same bucket, as each researcher should only be able to see their own approved files.
Create or confirm the egress bucket
If this is the first egress request for this researcher, create a new bucket in the Egress Project. Name it clearly so it is identifiable by researcher or workspace, for example: test-egress-WORKSPACENAME.
If the researcher already has a bucket from a previous request, you can reuse it — confirm it is empty before adding new files.
Grant access to the specific researcher
Add the researcher to the bucket with Storage Object Viewer access. Use their Northwestern email address. Do not add any other users to this bucket.
Important
Access must be granted to the specific requesting researcher only. Each researcher should only have visibility into their own egress bucket. If multiple researchers in the same environment have egress requests, each must have their own separate bucket.
Once the bucket is ready and access is confirmed, copy the approved file into it.
Note
These commands run on the VM in the Data Ops Project. Make sure your VM is running and you have a terminal open via SSH-in-browser before proceeding.
Copy the approved file to the egress bucket
gcloud storage cp gs://EGRESS_DATAPREP_BUCKET/FILE_NAME gs://EGRESS_BUCKET/
Placeholder |
What to substitute |
|---|---|
|
The Egress Dataprep bucket in the Data Lake Project |
|
The approved file name |
|
The researcher’s egress bucket in the Egress Project |
Expected output:
Copying gs://EGRESS_DATAPREP_BUCKET/FILE_NAME to gs://EGRESS_BUCKET/FILE_NAME
  Completed files 1/1
Verify
gcloud storage ls gs://EGRESS_BUCKET/
Confirm the file appears before notifying the researcher.
Important
Notify the researcher that their file is ready to download and provide the bucket name. Remind them that the data must be deleted from the bucket within 3 days of download.
Download approved egress files#
Role: Researcher / Data Analyst · Data Engineer
Once a Data Engineer notifies you that your file is approved and ready, download it from the Egress Project bucket to your managed Endpoint.
Open the Egress Project bucket
Log in to the Google Cloud Console.
Switch to the Egress Project in the project dropdown.

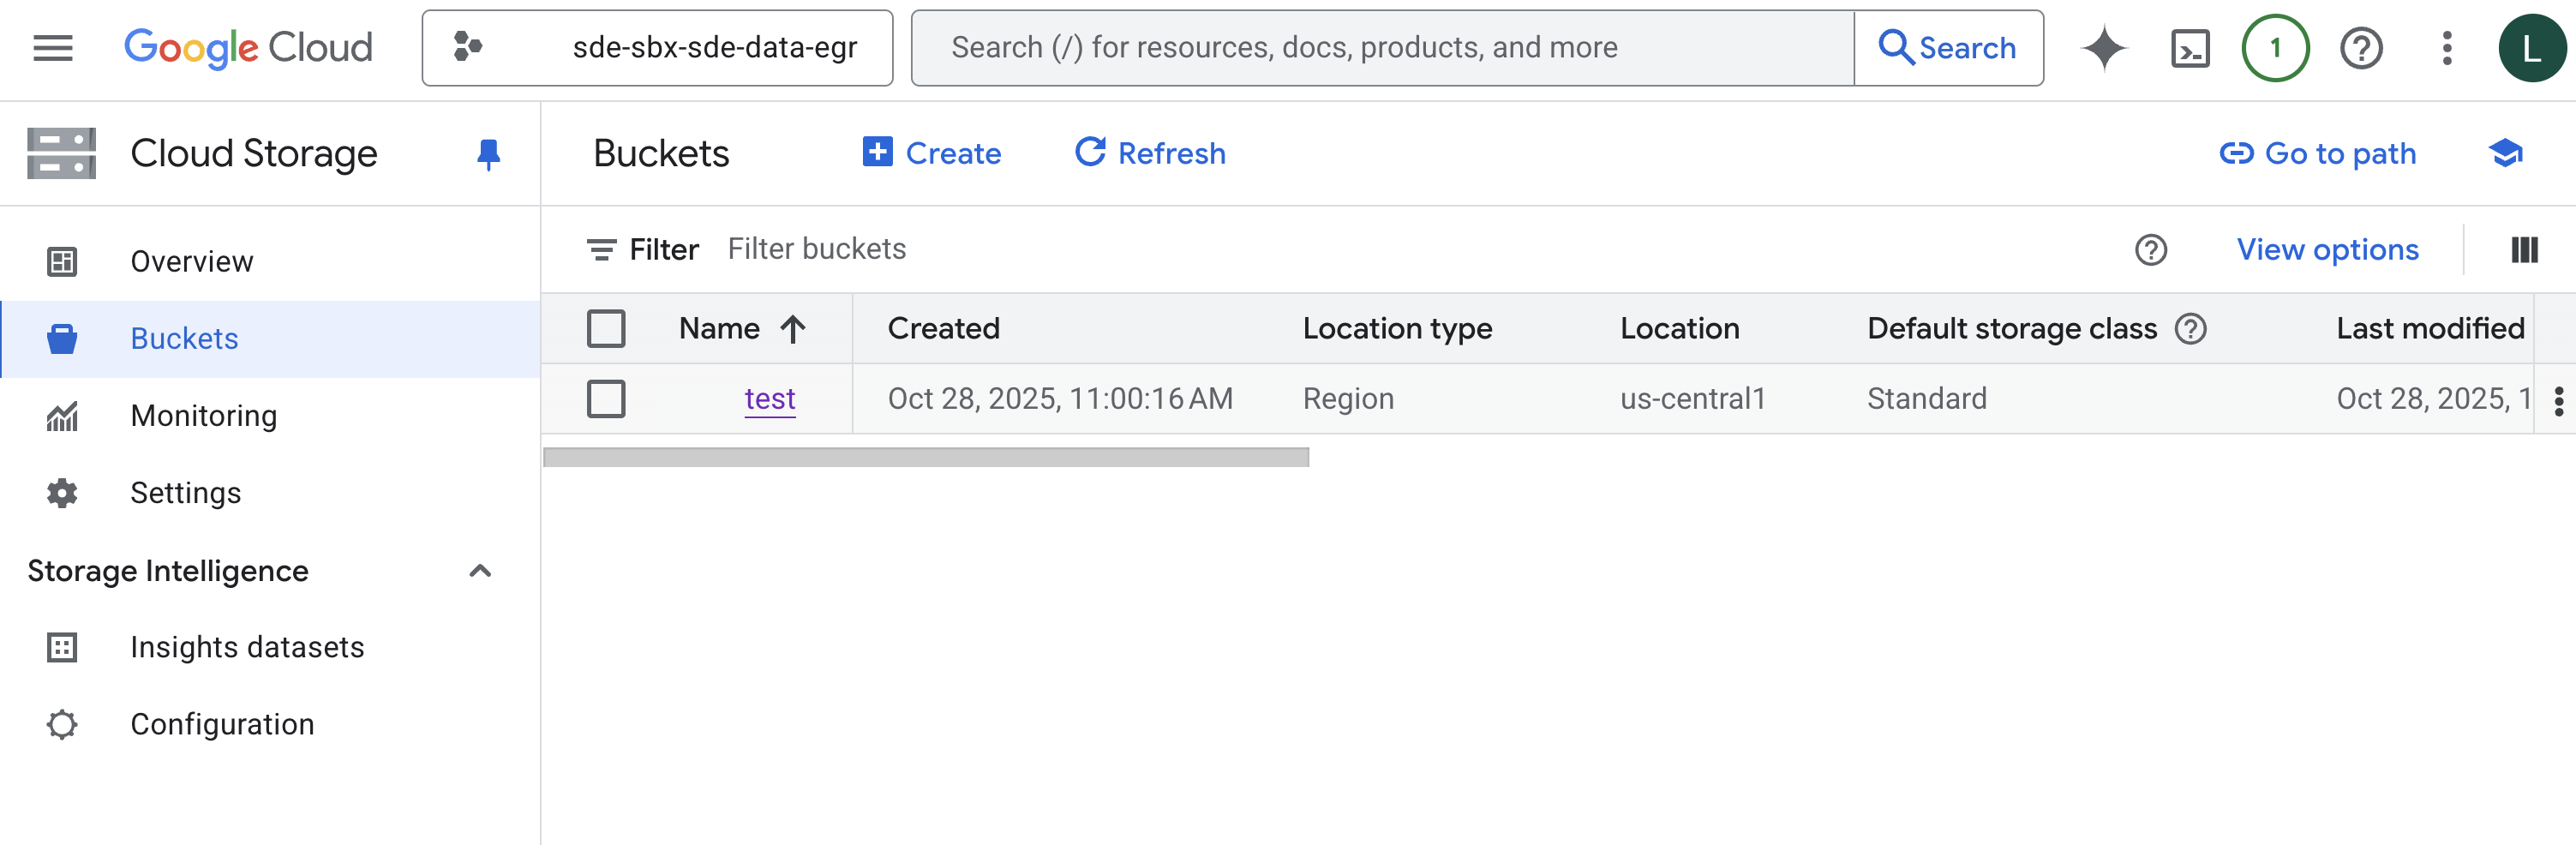
Go to Cloud Storage > Buckets and click the bucket name provided by your Data Engineer.
Download the files
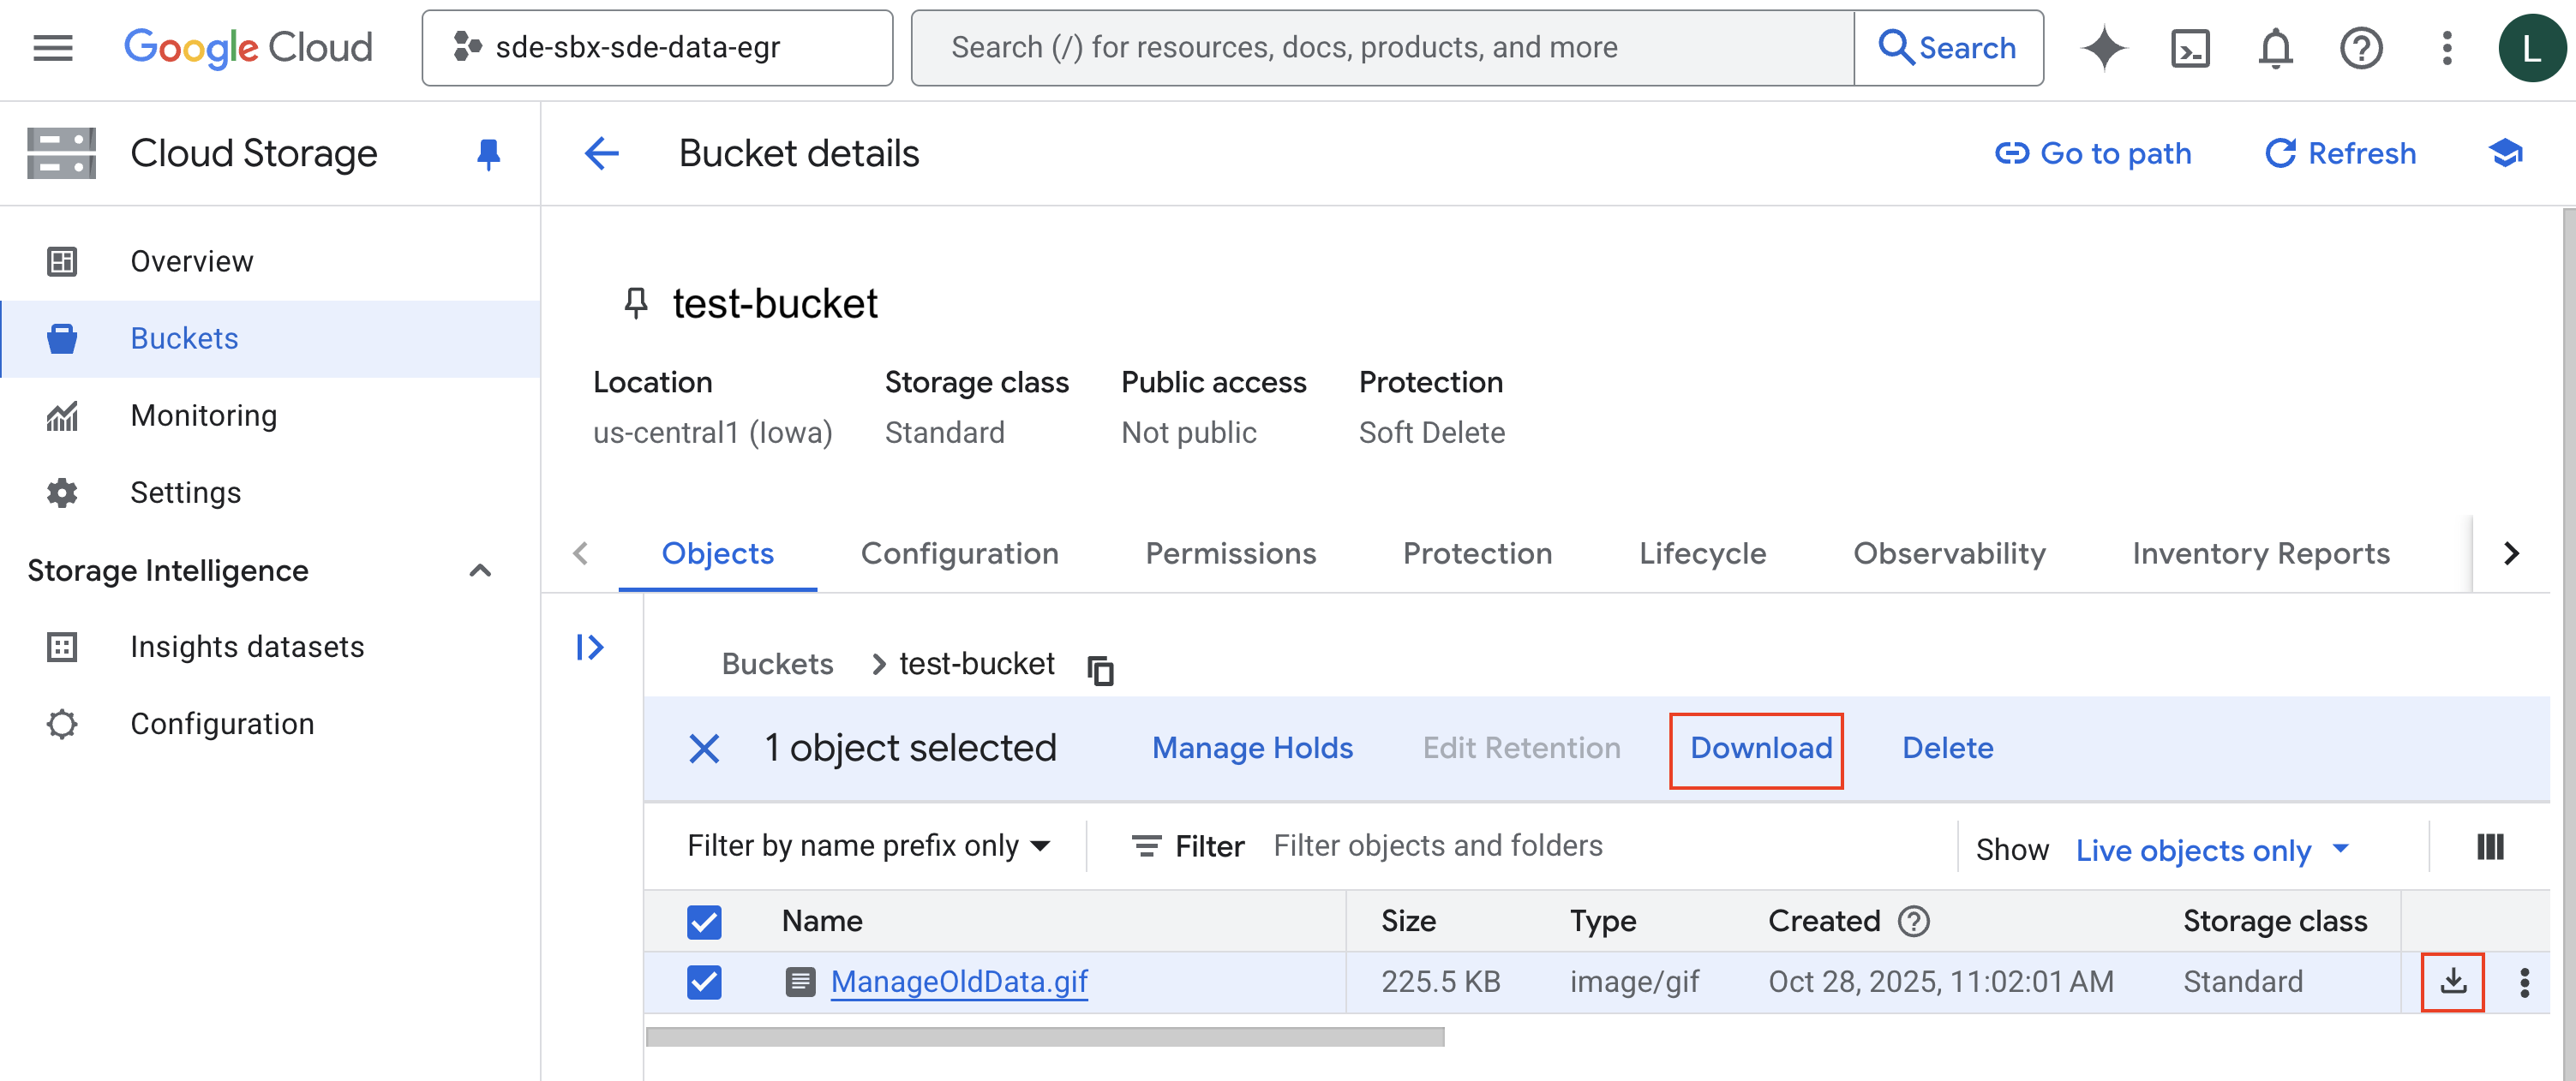
Browse the bucket to find your files.
Check the box next to the file(s) you want to download.
Click the Download button and save the files to your managed Endpoint.
Verify
Confirm the files are intact on your local machine. Notify your Data Engineer that the download is complete.
Attention
The data in the egress bucket must be deleted within 3 days of download. Anyone with access to the bucket can delete the files.
SFTP Egress Transfer#
Role: Data Engineer
SFTP egress allows you to push approved files from the Data Ops VM directly to a recipient’s SFTP server over an encrypted connection. As with ingress, SDE VMs have no general internet access — Northwestern IT must open a specific firewall port and allowlist the recipient’s server IP before any transfer can occur.
Note
SFTP egress is best suited for recipients who cannot receive files via Globus or a direct download, or where your DUA requires server-to-server transfer. The setup requires coordination between you, the recipient, and Northwestern IT.
What you need to collect from your recipient#
Before submitting a setup request to Northwestern IT, gather the following from your data recipient:
Information needed |
What to ask your recipient |
|---|---|
SFTP server hostname or IP address |
What is the hostname or static IP address of your SFTP server? |
SFTP port |
What port does your SFTP server use? |
SFTP username |
What username should we use to authenticate to your server? |
Authentication method |
Do you accept SSH key authentication or password authentication? |
Their public SSH key or password setup |
Can you create an account for our transfer and share the credentials securely, or shall we provide a public key for key-based auth? |
Expected transfer schedule |
Will this be a one-time transfer or recurring? |
Important
The recipient’s SFTP server must have a static IP address. Dynamic IPs cannot be allowlisted. If the recipient cannot provide a static IP, discuss an alternative method with IT.
Key-based authentication#
SSH key-based authentication is the preferred method for SFTP egress. In this model:
Data Engineer generates an SSH key pair on the Data Ops VM.
The public key is shared with your recipient, who installs it on their SFTP server to authorize the connection.
The private key remains on the VM and is never shared. Ask your recipient to accept a public key and install it on their server. IT will provide the public key when they configure the connection. Never transmit the private key.
Submitting the setup request#
Submit an egress setup request to Northwestern IT. Include:
All information from the table above
The name of your SDE environment
The files or dataset you are planning to transfer (for compliance review)
Northwestern IT will configure the firewall rules, open the necessary port. You will be notified when the connection is ready to test.
Transferring files#
Once IT confirms setup is complete, files must already be in an egress bucket in the Egress Project and reviewed before transfer. Use the Data Ops VM to push the files to the recipient’s server.
Note
These commands run on the VM in the Data Ops Project. Make sure your VM is running and you have a terminal open via SSH-in-browser before proceeding.
Copy the file from the egress bucket to the VM
gcloud storage cp gs://EGRESS_BUCKET/FILE_NAME /tmp/FILE_NAME
Placeholder |
What to substitute |
|---|---|
|
The egress bucket in the Egress Project |
|
The approved file name |
Push the file to the recipient’s SFTP server
sftp -i ~/.ssh/PRIVATE_KEY_FILE SFTP_USERNAME@SFTP_HOST
Placeholder |
What to substitute |
|---|---|
|
The private key file on the VM (IT will provide the filename) |
|
The username provided by your recipient |
|
The recipient’s SFTP server hostname or IP address |
Once connected, at the sftp> prompt:
put /tmp/FILE_NAME DESTINATION_PATH/
Placeholder |
What to substitute |
|---|---|
|
The file you copied to |
|
The destination directory on the recipient’s server |
Type exit to close the SFTP session.
Verify and clean up
Confirm with your recipient that the file arrived intact. Then remove the local copy from the VM:
rm /tmp/FILE_NAME
Common errors
Error |
Plain-English meaning |
What to do |
|---|---|---|
|
The firewall port is not open or the server IP is not allowlisted |
Confirm the recipient is using the correct IP and contact IT to verify firewall rules |
|
The public key is not installed on the recipient’s server or does not match |
Ask your recipient to re-verify the key installation and contact IT if needed |
|
The wrong hostname or port is being used |
Confirm the server details with your recipient and verify with IT |
Globus Egress Transfer#
Role: Data Engineer
Globus egress allows you to push approved files from the SDE to a recipient’s Globus collection, whether at Northwestern or an external institution. The SDE uses a separate Globus collection for egress, distinct from the ingress collection. Both must be requested and provisioned independently.
Note
The egress Globus collection is scoped to your SDE environment and authenticated via your Northwestern Google account. Only Data Engineers can transfer data out using this collection.
Requesting egress Globus setup#
If you have not already requested an egress Globus collection, submit an egress setup request to Northwestern IT. Include:
The name of your SDE environment
The destination collection you plan to transfer to (e.g., a collaborator’s institutional Globus endpoint)
Whether the transfer is one-time or recurring IT will provision your egress collection and notify you when it is ready.
Transferring files#
Files must be in the egress bucket in the Egress Project and reviewed before initiating a Globus transfer. The Globus transfer is then initiated from the Globus web application.
Note
Globus transfers are initiated through the Globus web application, not the Google Cloud Console. The Console is used only to confirm files are in the egress bucket before starting the transfer.
Create or confirm the egress bucket
If this is the first egress request for this researcher, create a new bucket in the Egress Project. Name it clearly so it is identifiable by researcher or workspace, for example:
test-egress-WORKSPACENAME.If the researcher already has a bucket from a previous request, you can reuse it — confirm it is empty before adding new files.
Grant access to the specific researcher
Add the researcher or data engineer to the bucket with Storage Object Viewer access. Use their Northwestern email address. Do not add any other users to this bucket.
Important
Access must be granted to the specific requesting researcher only. Each researcher should only have visibility into their own egress bucket. If multiple researchers in the same environment have egress requests, each must have their own separate bucket.
Confirm files are in the egress bucket
Log in to the Google Cloud Console and switch to the Egress Project.
Go to Cloud Storage > Buckets and confirm the approved files are present in the egress bucket.
Initiate the transfer in Globus
Go to app.globus.org and sign in with your Northwestern credentials.
In the File Manager, search for your SDE egress collection by name. Northwestern IT will provide the exact collection name.
In the left panel, navigate to the egress collection and select the files to transfer.
In the right panel, select the destination collection provided by your recipient.
Navigate to the destination folder and click Start.
Verify
Globus will send an email notification when the transfer completes. Confirm with your recipient that the files arrived intact.
Attention
Delete the data from the egress bucket within 3 days of the transfer completing.
Common errors
Error |
Plain-English meaning |
What to do |
|---|---|---|
Egress collection not found |
The collection has not been provisioned or the name is wrong |
Confirm with IT that setup is complete and get the exact collection name |
Permission denied on destination |
Your account is not authorized for the recipient’s collection |
Ask your recipient to grant your Northwestern Globus identity access to their collection |
Transfer failed or stalled |
A network or endpoint issue interrupted the transfer |
Globus will automatically retry; if it continues to fail, check the Globus troubleshooting guide |