Globus Collections#
To use Globus to transfer your data, the storage location must have an associated Globus collection.
There are three main types of Globus collections:
Personal collections provide access to files on your computer. Install Globus Connect Personal on your computer to set up a collection.
Mapped collections provide access to files on data storage systems using your existing permissions on the storage system. Northwestern IT manages the following collections for Northwestern storage systems:
Northwestern Quest to access the Quest High Performance Computing Cluster file system.
Northwestern RDSS: Resfiles to access files from the non-audited zone in RDSS
Northwestern RDSS: Resfilesaudit - High Assurance to access files from the audited zone in RDSS
Northwestern FSMResFiles - High Assurance to access files from FSMResFiles
Northwestern OneDrive/SharePoint - High Assurance to access files from OneDrive , SharePoint , and Teams . This collection has additional security features that accommodate the transfer of restricted data.
Northwestern Amazon S3 (Standard) to access files from Amazon S3 .
Guest Collections allow users to granularly share files and folders in a mapped collection with other Globus users. See How To Share Data Using Globus for instructions.
Accessing Research Data Storage Systems Outside Northwestern
Many data providers and supercomputing centers have their own Globus collections. Contact them to see if they use Globus. If Globus isn’t an option, email globus-help@northwestern.edu , and we can help you move your data by an alternate route.
High Assurance Collections#
High assurance collections facilitate data transfer from storage systems designed for handling sensitive and restricted (Level 3) data, as defined by Northwestern University’s data classification policy . Level 3 data includes personally identifiable information (PII), protected health information, and other data protected by legal or contractual agreements.
Security Features#
To keep this data safe, Northwestern High Assurance collections employ these additional security measures:
Encryption in transit is required on all transfers involving a high assurance collection.
Detailed activity logs, including who accessed what data when, are recorded.
Northwestern NetID login is required for access. Linked identities do not provide access.
Reauthentication is required every 4 hours and on each new device.
File uploads and downloads through the Globus web application are prohibited. Transfers to your computer must use Globus Connect Personal.
Guest Collections are generally not permitted on Northwestern high assurance collections. Data permissions should be managed through the storage system’s user permissions instead. Contact globus-help@northwestern.edu to discuss potential exceptions to this policy.
User Responsibility#
Using a high assurance collection to transfer your data is not sufficient to ensure that your files are protected. You are responsible for ensuring that you transfer data only to destinations that are authorized to store restricted information. Do not transfer sensitive or restricted data to unauthorized locations, as this could result in compliance violations. For guidance on appropriate storage options, refer to the Choosing Appropriate Storage section of Northwestern’s Research Data Management website .
Automation Using High Assurance Collections#
Users are required to reauthenticate to the underlying storage systems through the Globus web application every 4 hours on high assurance collections. This requirement limits the utility of features like Globus Timer because timed transfers will not start unless you have reauthenticated within the timeout period.
To avoid this issue, use the Globus API instead of the Globus web application to schedule transfers. Please contact globus-help@northwestern.edu to discuss options for scheduled transfers on high assurance collections.
Using Collections#
All collections have a similar workflow:
Prepare: Set up access to the underlying system and specific files
Find a collection: Search for the collection in Globus File Manager
Authenticate into the collection: Set up your user credentials to access the collection
Find files: Navigate the file system within a collection to identify files to transfer
These steps are covered below. Once you have a collection and files set up in the Globus web application , you can then transfer files.
Prepare#
Each collection requires different setup steps. Select the tab for the storage system you want to use to see what you need before you get started.
To use Globus to transfer data to/from your computer:
Install Globus Connect Personal .
Choose which files and directories you want to be accessible to Globus. By default, Globus will allow access to the home directory on your computer. See the following instructions for details on how to change this default.
(Optional) To transfer data between two Globus Connect Personal collections, request to join Northwestern’s Globus subscription . Otherwise you will be restricted to transferring from your computer to collections installed on storage servers.
After installation and configuration, data in the directories you specified during setup will be visible through your collection in the Globus web interface under the Your Collections tab. Globus Connect Personal must be running on your computer for the collection to show up as active in the Globus web application.
See Transferring Files for details.
To transfer data to or from Quest, you must have an active Quest account. Quest storage is only appropriate for data that will be processed on Quest.
To use the Northwestern RDSS: Resfiles collection you must have access to a resfiles share.
To use the Northwestern RDSS: Resfilesaudit - High Assurance collection you must have access to a resfilesaudit share.
See Managing access to RDSS Shares to find out how to request access to RDSS.
To use the Northwestern FSMResFiles - High Assurance collection you must have access to FSMResFiles.
See Feinberg IT’s page on Research Data Storage for more information.
No setup is necessary to access your OneDrive files and files that are shared with you.
To access the contents of SharePoint document libraries, you have to follow the site in SharePoint by:
Logging in to SharePoint
Navigating to the list of all sites you have access to
Clicking the star on the upper right hand corner of the box for that SharePoint site.
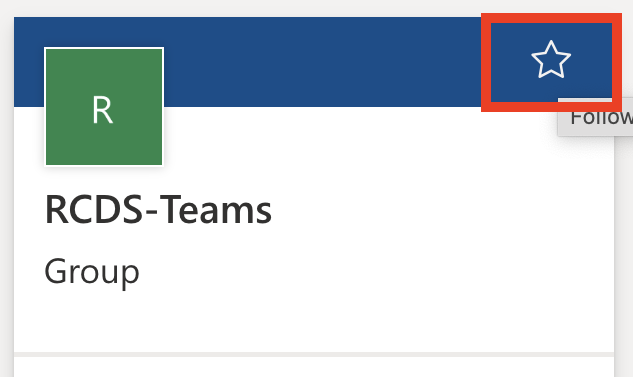
Once you have access and follow the SharePoint site, you will be able to access the files using Globus.
To use Globus with Amazon S3, you need to:
Create an Amazon S3 bucket if you don’t have one already.
Create an Access Key that grants access to the bucket
Follow the linked tutorials above to complete these steps.
To access data shared with you through a Guest collection, the collection owner must grant you permissions.
See How To Share Data Using Globus for instructions.
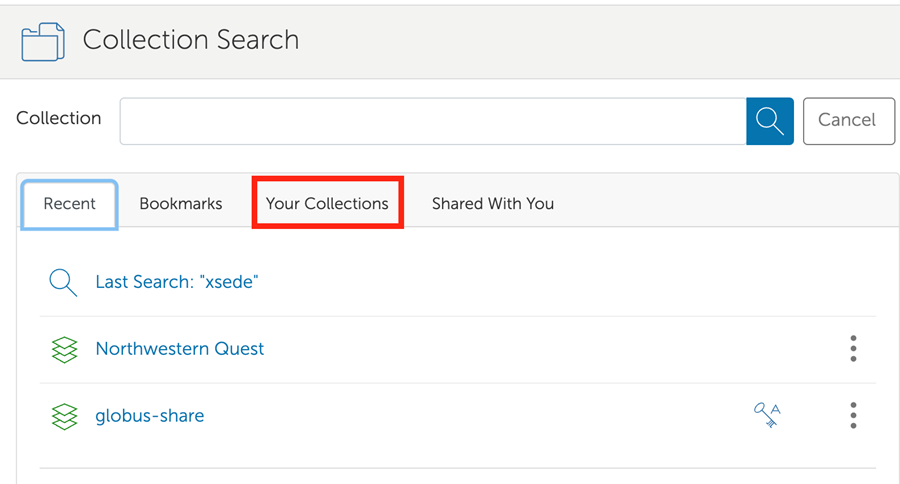
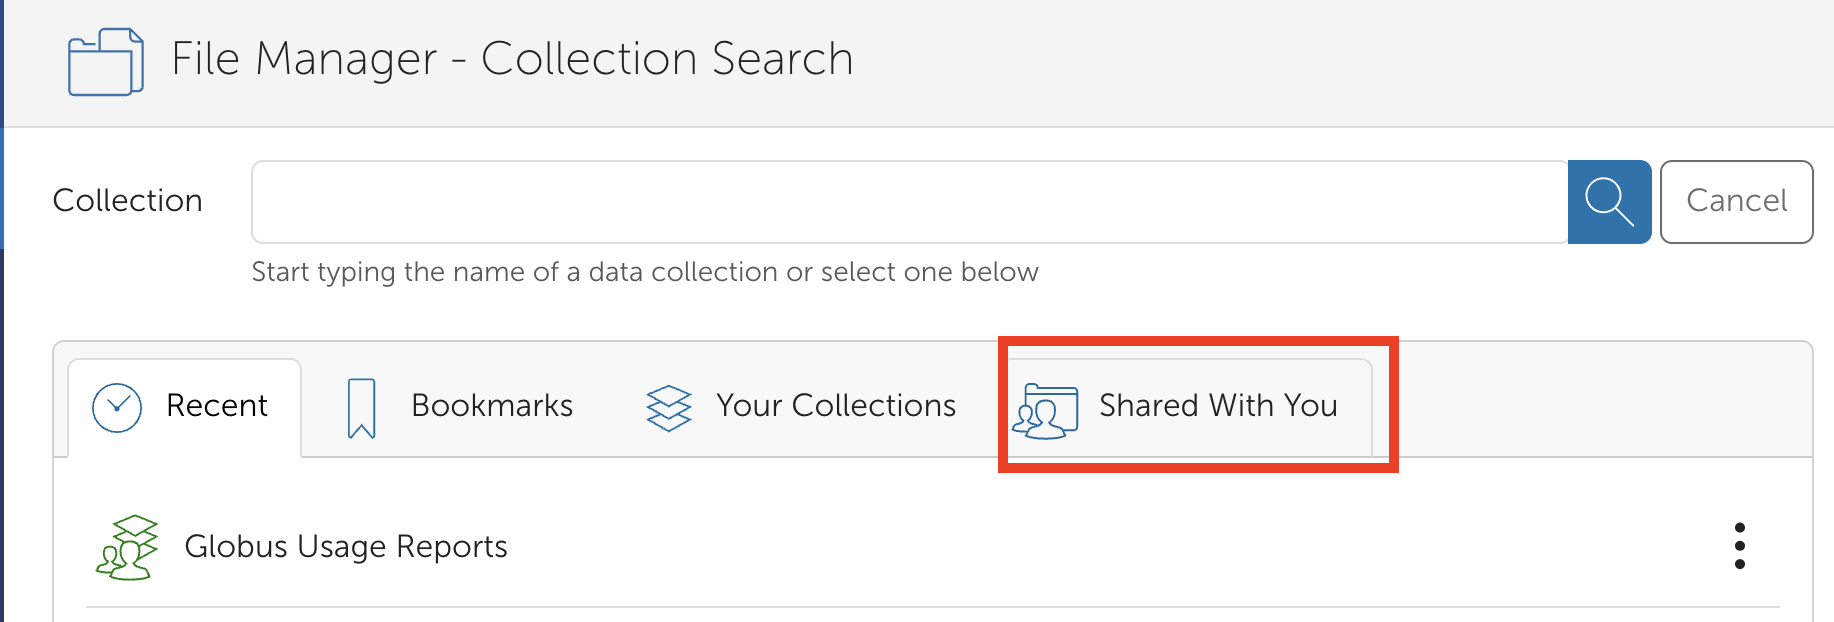
Find a Collection#
To find a collection, log in to the Globus web application with your Northwestern NetID and then search for the name of the collection in the File Manager pane.
For collections created using Globus Connect Personal, look under the Your Collections tab to find data stored on local computers.
If the collection shows as offline with a red icon next to it instead of a green icon, start the Globus Connect Personal application running on your computer.
Search for “Northwestern Quest” or use this direct link to the Northwestern Quest collection . Searching for “Northwestern Quest” may bring up multiple results; the Northwestern Quest collection is a “Subscribed Mapped Collection”.
For Resfiles: Search for “Northwestern RDSS: Resfiles” or use this direct link to the Northwestern RDSS: Resfiles collection .
For Resfiles audit: Search for “Northwestern RDSS: Resfilesaudit - High Assurance” or use this direct link to the Northwestern RDSS: Resfilesaudit - High Assurance collection .
If searching, make sure that the collection you choose is a “Subscribed Mapped Collection.”
Search for “Northwestern FSMResFiles - High Assurance” or use this direct link to the Northwestern FSMResFiles - High Assurance . If searching, make sure that the collection you choose is a “Subscribed Mapped Collection”.
Search for “Northwestern OneDrive/SharePoint - High Assurance” or use this direct link to the Northwestern OneDrive/SharePoint - High Assurance collection . If searching, make sure that the collection you choose is a “Subscribed Mapped Collection”.
Search for “Northwestern Amazon S3 (Standard)” or use this direct link to the Northwestern Amazon S3 (Standard) collection . If searching, make sure that the collection you choose is a “Subscribed Mapped Collection”.
For data shared with you via a Globus guest collection, look under the Shared With You tab.
Authenticate into the Collection#
Now that you’ve found your collection, Globus needs your consent to use your credentials and verify your access to the underlying storage system.
Note
These authentication instructions apply to the Northwestern Quest, Northwestern RDSS: Resfiles, Northwestern RDSS: Resfilesaudit - High Assurance, Northwestern FSMResFiles - High Assurance, and Northwestern OneDrive/SharePoint - High Assurance collections.
Personal and guest collections will not require additional authentication.
The Northwestern Amazon S3 (Standard) collection requires authentication using the key and secret that you generated in the Prepare section. See How to Access Your Files on AWS S3 with Globus for detailed instructions.
To authenticate into the collection:
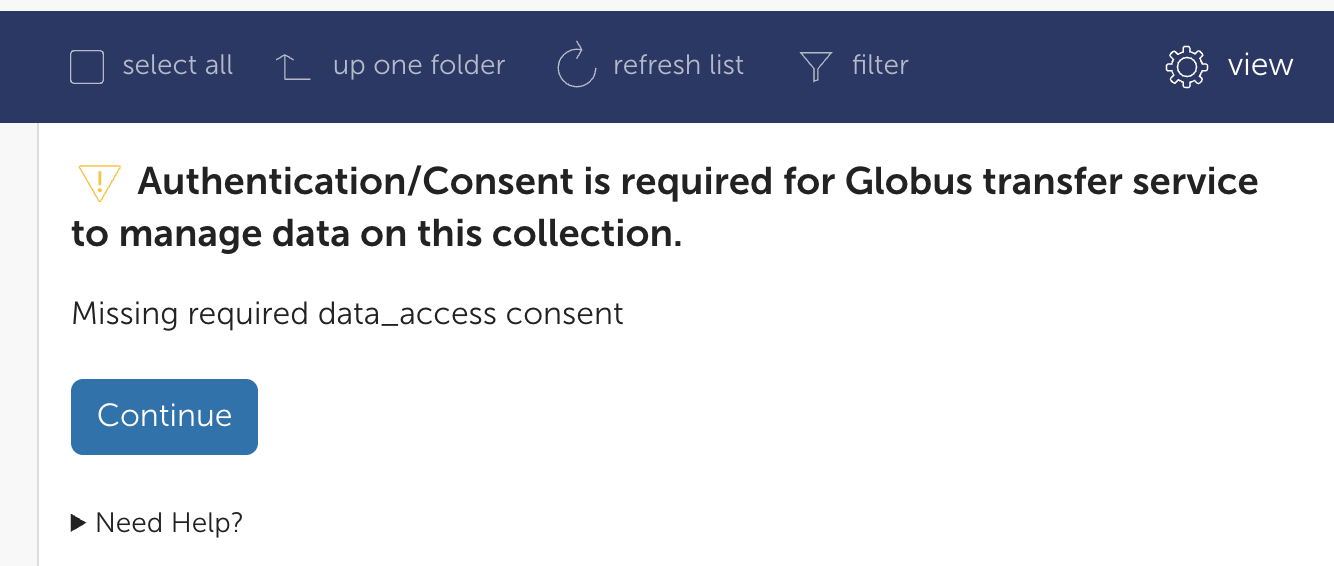
Once you’ve selected a collection, in the File Manager window, Globus will notify you that it requires your permission to authenticate into the storage system using your NetID and consent to access your data as part of the transfer process. Click Continue.
Then, Globus will ask you to select a Northwestern identity to use for authentication. Click netid@northwestern.edu where
netidis your Northwestern NetID. If you don’t see this option, make sure that you logged in to the Globus web application using your Northwestern credentials or have your Northwestern identity linked to your Globus account .
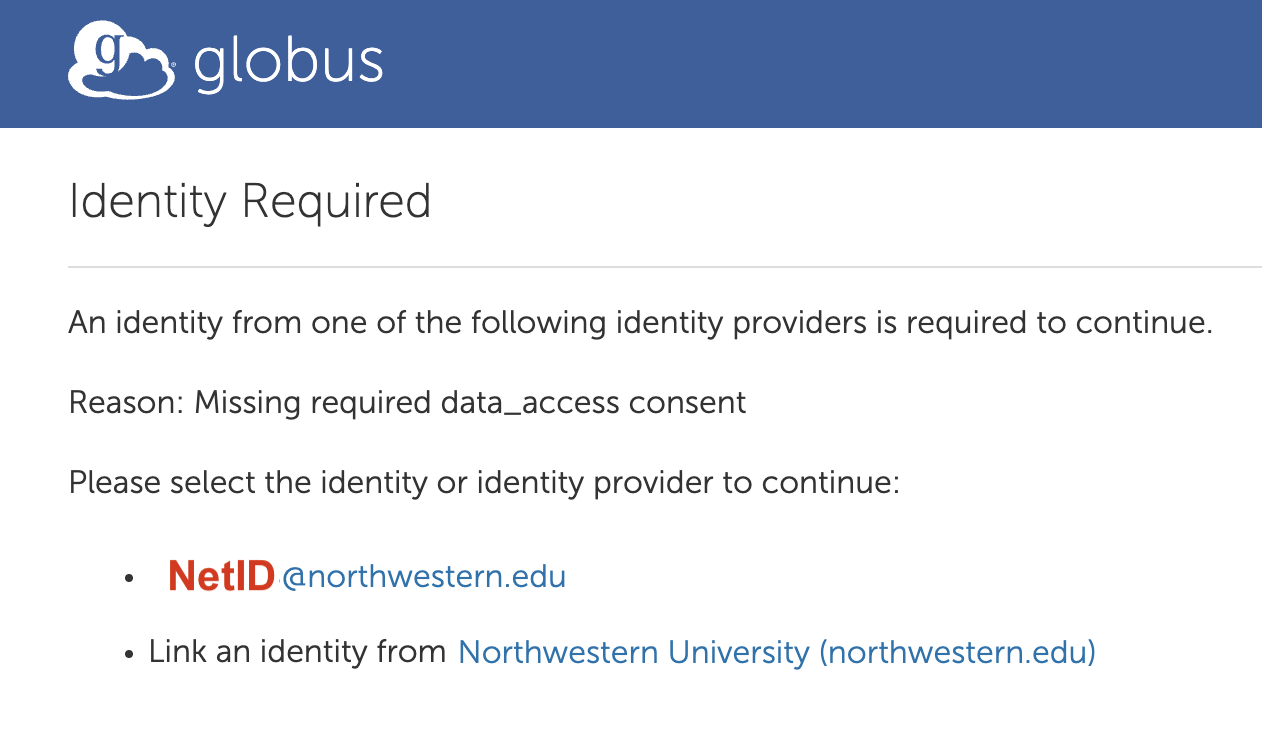
After selecting Northwestern, you will see the Northwestern NetID login screen. Use your NetID and password to log in. If you have already logged in with your NetID in your browser recently, you might skip this step.
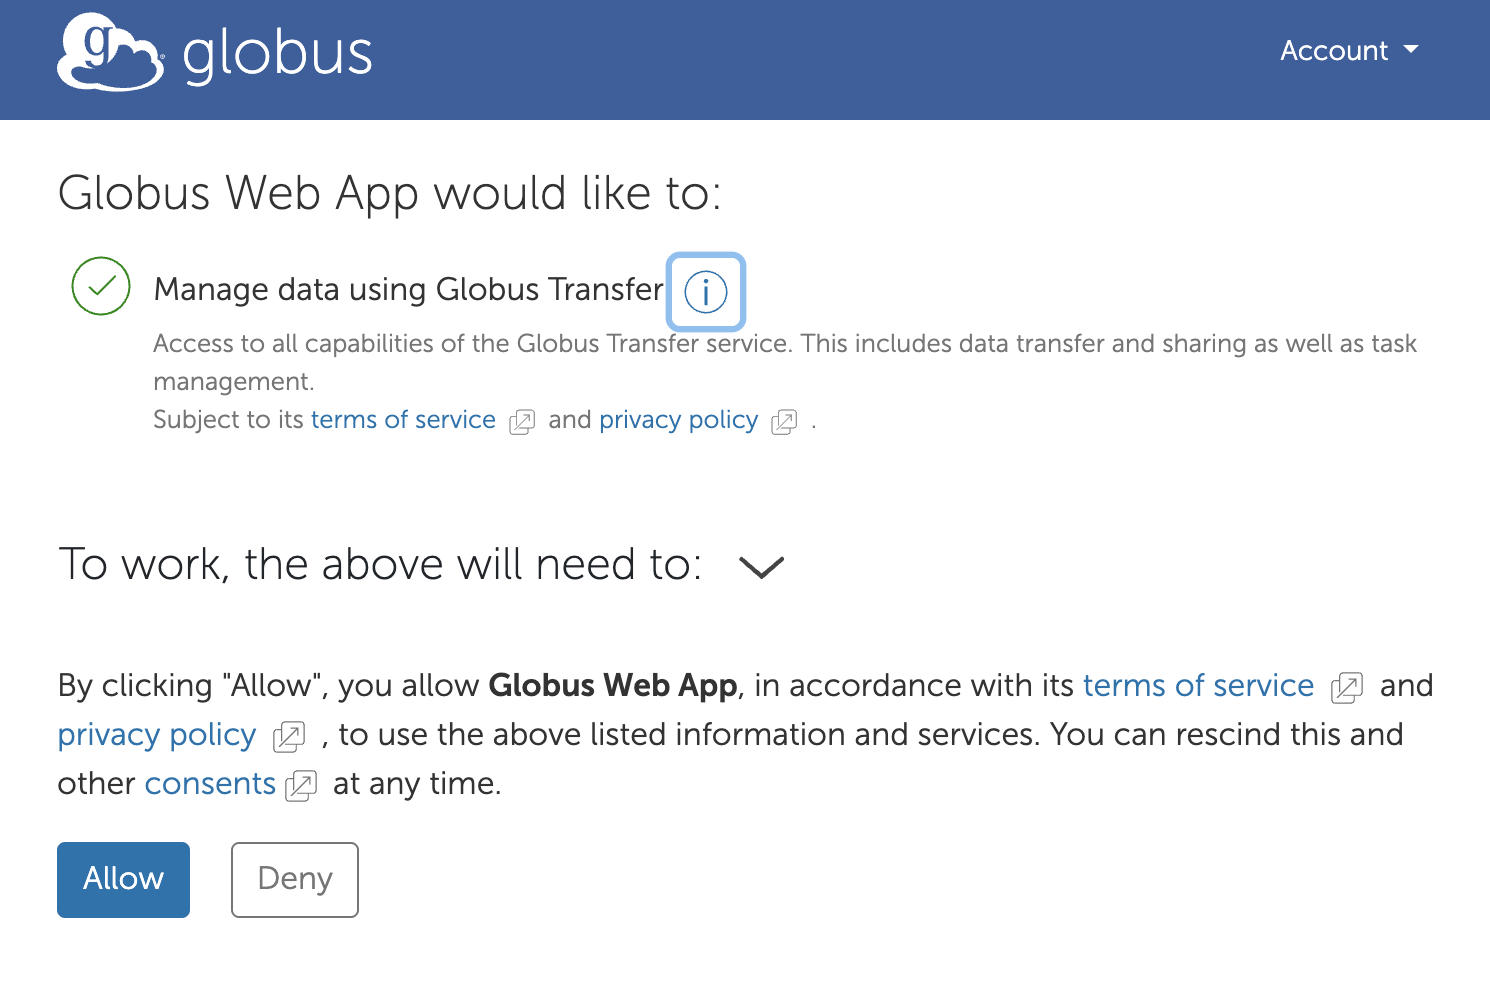
Globus will then prompt you to allow the service access to perform transfer, sharing, and task management functions. Click Allow.
You should now see the contents of the collection in the File Manager window. The frequency with which you have to reauthenticate varies by collection.
Collection |
Reauthentication Frequency |
|---|---|
Northwestern Quest |
Every 10 days |
Northwestern RDSS: Resfiles |
Every 12 hours |
Northwestern RDSS: Resfilesaudit - High Assurance |
Every 4 hours |
Northwestern FSMResFiles - High Assurance |
Every 4 hours |
Northwestern OneDrive/SharePoint - High Assurance |
Every 4 hours |
Northwestern Amazon S3 (Standard) |
Every 12 hours |
Find Your Files#
Once you have authenticated into the collection, you will be able to see your files in File Manager.
Click on tabs below for each collection for details on what you will see in file manager by default, how your files are organized within each type of collection, and tips on how to efficiently navigate the file structure.
The directory structure will match the computer Globus Connect Personal is installed on and will be limited to the directories that you granted access to during setup.
By default, Globus will navigate to the “home” directory for the user who installed the collection.
The directory structure is the same as the Quest file system, and you will have access to anything in Globus that you have access to on Quest.
By default, Globus navigates to your Quest
/homedirectory.To access projects or scratch directories, you must navigate to the file path (e.g.
/scratch/<netid>or/projects/<account_id>). The easiest way is to type the path in the Path field of the File Manager under the Collection. Using the “up one folder” button in the GUI interface of the file list will work, but it will take a long time to load, as the next level up will list all home directories on Quest. Note that while you can see all directories, you can only access directories you can access on Quest.
Tip: You can add a symbolic link (symlink) to your project or scratch directory into your home directory on Quest to make it easy to navigate to those folders. From a Quest Login Node, type a command like:
ln -s /projects/<account_id> ./my_projects_folder
This creates a symlink to /projects/<account_id> called my_projects_folder. my_projects_folder will appear when you list files in the directory, and you can navigate to it in file explorer windows and on the command line.
If you cannot access Quest files/folders that you think you should have access to in Globus, email globus-help@northwestern.edu for further assistance.
The file system on the Northwestern RDSS: Resfiles and Northwestern RDSS: Resfilesaudit - High Assurance collections will look different than it does when you mount an RDSS share.
By default, Globus navigates to the root folder in the resfiles/resfilesaudit zone your share is in.
Navigate into the folder for the Northwestern school or college of the share owner:
kellogg - Kellogg School of Management
law - Pritzker School of Law
mcc - McCormick School of Engineering
medill - Medill School of Journalism
sesp - School of Education and Social Policy
soc - School of Communications
wcas - Weinberg College of Arts and Sciences
other - For research cores, schools not listed above, or other organizations
Select the subfolder matching your share name. The content inside this subfolder will match what you see in RDSS.
The file system on the Northwestern FSMResFiles - High Assurance collection will look the same as it does when you mount FSMResFiles. You will have access to the same files and folders that you do on FSMResFiles.
By default, Globus navigates to the root directory (/) of the collection, which contains 3 folders:
/My Filescontains all files stored in OneDrive . The structure will look the same as it does in OneDrive./Shared Librarieswill have a subfolder for all SharePoint sites you follow. That subfolder will further have subfolders for all of the Document Libraries contained in that SharePoint site./Sharedcontains specific files/folders shared with you . You will see an alphabetical list of the individual files/folders that have been shared with you.
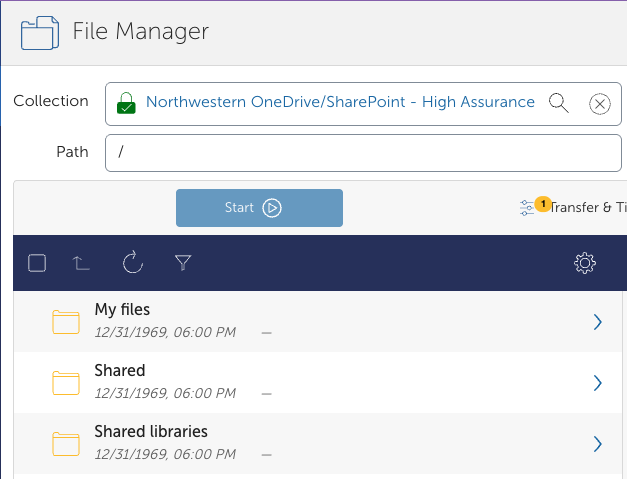
You can navigate to the files you would like to transfer from here by double-clicking on the folder.
By default, Globus navigates to the root directory (/) of the collection. You will see a folder for each S3 bucket that the AWS IAM identity associated with the key/secret you used to authenticate has list permissions for.
To see the contents of a bucket, double-click on the folder name. You will only be able to see the contents of the buckets the AWS IAM identity has read access to. The contents of the bucket will be the same as what you see in the S3 management console.
By default, Globus will navigate to the root directory set by the guest collection owner. You will only be able to see files and folders that they have granted you access to.
Bookmarks#
We recommend using bookmarks for commonly used folders and collections to streamline your workflow.
Create a Bookmark#
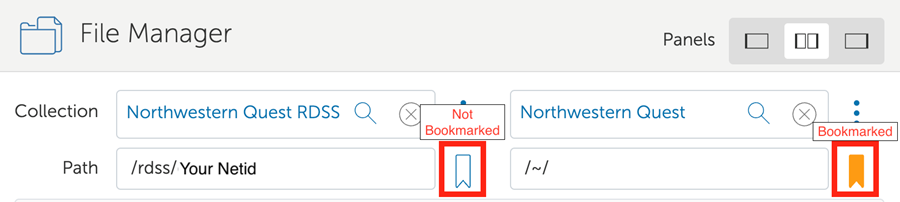
To create a bookmark,
Navigate to the collection and path you commonly use.
Select the bookmark icon to the right of the path you would like to bookmark.
The icon will appear yellow if the path is bookmarked.
Access Your Bookmarks#
To access your bookmarks:
Click on the Collection search bar in the File Manager window.
Click the Bookmarks tab below the search bar.
Click on the bookmark to open it in File Manager.
You can also edit or delete bookmarks from this window.
Note
Bookmarks in the Globus web application are not allowed on high assurance collections like Northwestern OneDrive/SharePoint - High Assurance because the metadata for these bookmarks is stored on Globus’s AWS servers that are not approved for sensitive data.
We recommend bookmarking the direct links to high assurance collections in your web browser for quick access.
Now that you have access to your files, see the transfer section to move your files between storage systems.