Getting Familiar with Microsoft Azure#
While Azure offers similar resources to other cloud services, the terminology is slightly different. This tutorial covers the basics of working in Azure, whether you’re new to using cloud resources overall or just new to Azure.
Azure Accounts and Subscriptions#
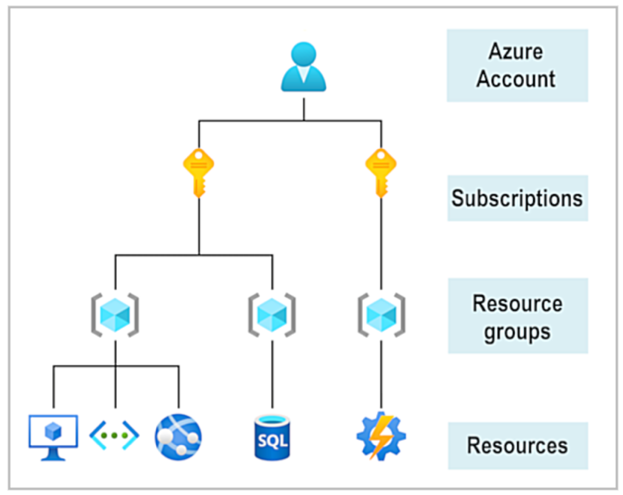
Each individual using Azure has an account. When using Azure through Northwestern, your account is tied to your Northwestern NetID and email, and you use your Northwestern credentials to log in.
To create and use resources, your account needs to be tied to a subscription with associated billing information.
Your account can be linked to multiple subscriptions where you may have permissions to allocate or use resources. You are not necessarily the owner of all subscriptions you can access. The data stored and tasks performed within one subscription are isolated from another.
If you do not yet have access to an Azure subscription, see the steps for Requesting an Azure Subscription.
Azure Portal#
Once you have access to an Azure subscription, log in to the Azure portal using your Northwestern NetID/email credentials at https://portal.azure.com/ .
Home#
When you log in to the Azure Portal with your @northwestern.edu account, you should encounter the Home page. If you ever get lost, click on the triple bar on the top left and select Home to get back here. The triple bar button opens the Portal Menu.
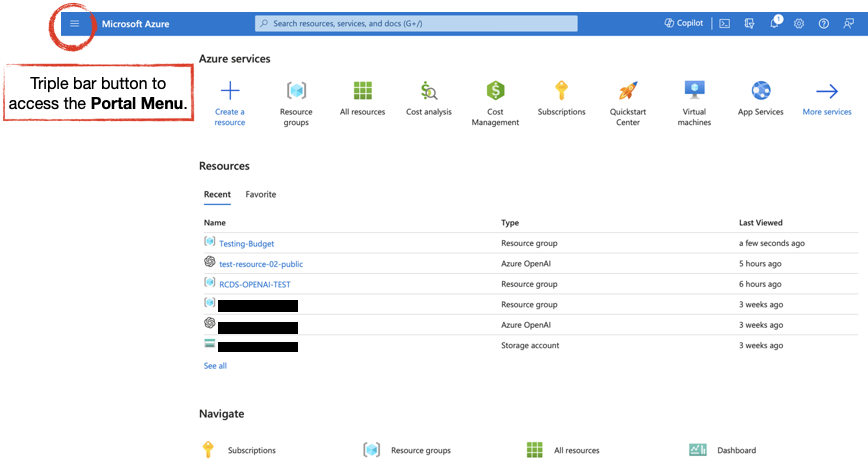
Home may look slightly different depending on whether you’ve used Azure before and what resources you use over time. The Resources section should be empty if you haven’t created any yet. See the Resource and Resource Group section below for more on Resources.
The Azure Home page is different than a Dashboard.
Dashboards#
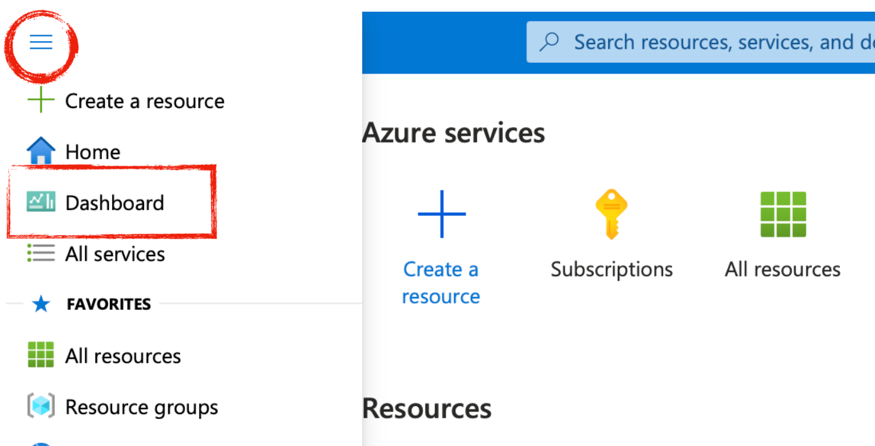
If you click on the triple bar menu on the top left, you will also see Dashboard as an option. The Dashboard is not your home. The Dashboard is a place to view your Azure resources and applications from different perspectives.
You can have multiple dashboards. At the beginning there is one default dashboard without much in it: a list of resources and of guides. However, you can create personalized dashboards summarizing different elements of your Azure subscription. Azure provides some handy pre-made dashboards: one showing an inventory of all resources accompanied with some statistics about them, one to track different applications, one to track SQL databases, etc.
Managing Subscription Access#
You can add users to your subscriptions by following this Azure documentation that provides instructions on how to assign users roles.
Users with access to your resources may not need direct access to your subscription, for example when calling an AI model or when connecting to a database. Instead, you can provide them with credentials to connect to and use resources that you allocate. Only users who need to create new resources or modify or delete existing resources are likely to need access to your subscription.
When providing access to your subscriptions to others, you must assign them a specific role or roles where they will have clearly defined permissions. Azure has an extensive list of prebuilt roles that you can use. Here is a list of common roles that fit some common resource use cases.
| Role | Can Do | Can’t Do |
|---|---|---|
| Azure AI Developer | Build and deploy AI models, call AI APIs (e.g., Cognitive Services), configure models, monitor performance | Cannot delete or manage the AI service itself, assign roles, or handle billing |
| AzureML Data Scientist | Create, train, and deploy models, run experiments, use datasets, manage compute resources for training, build ML | Cannot manage Azure resources (e.g., workspaces), assign roles, or handle billing |
| Storage Account Contributor | Create, delete, and manage storage accounts, upload or download datasets, manage storage account configurations | Cannot manage non-storage resources, assign roles, or handle machine learning or AI-specific resources |
| Billing Reader | Allows read access to billing data | Cannot manage or modify any resources inside the subscription |
Privileged administrator roles grant access to manage directory resources, change security settings, and view restricted data. Misuse can lead to security risks, so they should be assigned carefully.
| Role | Can Do | Can’t Do |
|---|---|---|
| Owner | Grants full access to manage all resources, including the ability to assign roles in Azure. | Nothing |
| Contributor | Grants full access to manage all resources but does not allow you to assign roles in Azure, manage assignments in Azure Blueprints, or share image galleries. | Assign roles to users / modify roles |
For example, if you have a lab manager who is not the owner of the Azure subscription, they could get the highly privileged "Contributor" role, granting them access to manage all resources. If you have a student, however, who will use Azure for machine learning projects, then starting them with the "AzureML Data Scientist" role may be a better fit than giving them full access to manage all resources in the subscription.
Start with minimal permissions and increase access if needed.
Creating Custom Roles#
After you have looked over the various built-in roles within Azure and cannot find a role that matches your unique needs there is the option to create custom roles . You can either modify one of the built-in roles or build from scratch. Since building a custom role within Identity Access Management is bit complex, we recommend taking this option only once you have confirmed none of the built-in roles or combinations of roles work for you.
Resources and Resource Groups#
The core of Azure are the resources. These are specific instances you create of Azure’s different services: AI implementations, databases, networks, virtual machines, etc. Resources must be organized into groups. These are called Resource Groups and serve as an organization device. You can, for example, set up different budgets for different resource groups.
From Azure’s learning materials :
Resources commonly used for research include:
AI and Machine Learning: Azure AI Services, Azure OpenAI Service, Azure Cognitive Services
Storage: Blob Storage
Compute: Virtual Machines (Compute Engine)
Databases: Azure SQL DB, Cosmos DB
Creating an Azure Resource Group#
Every Resource must be in a Resource Group. You can create a Resource Group before creating a Resource, or you can create a new Resource Group at the time you create a Resource. We recommend creating a Resource Group before creating a Resource so that you can name it and set it up in an intentional way.
You can create a Resource Group by following these steps:
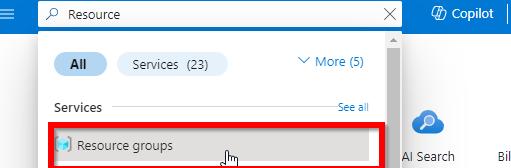
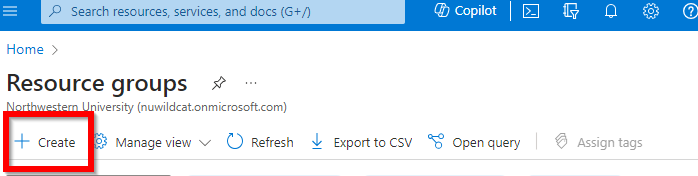
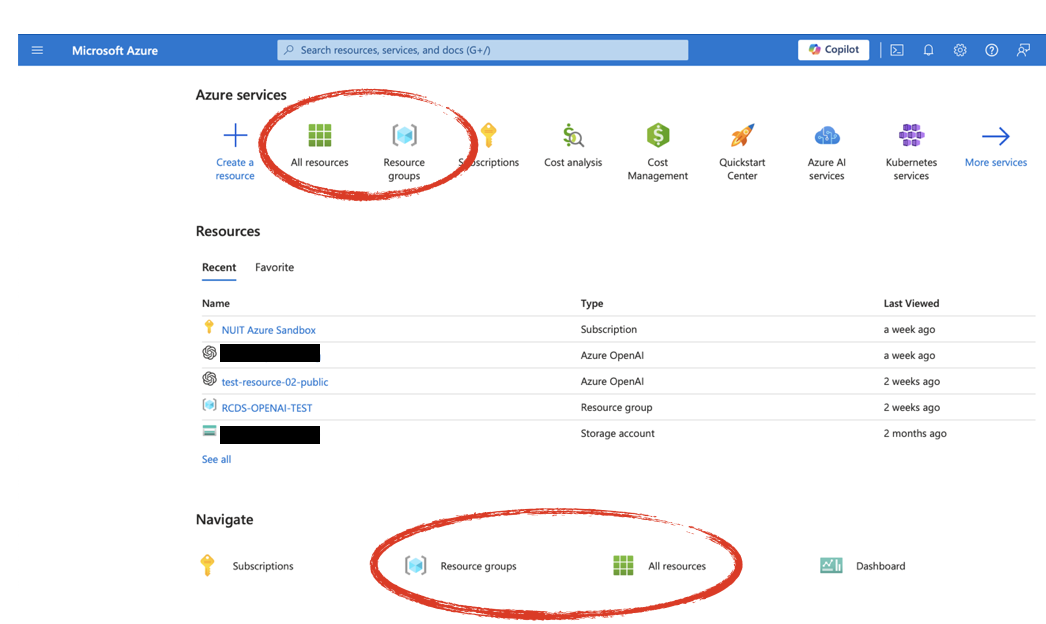
Step 1 - Go to the Resource Groups page. Starting at the Azure portal, either type “resource groups” in the search bar, or click on the resource groups icon in the Azure Services section. Then open Resource Groups.
Step 2 - Once you’re on the Resource Groups page click “+ Create”
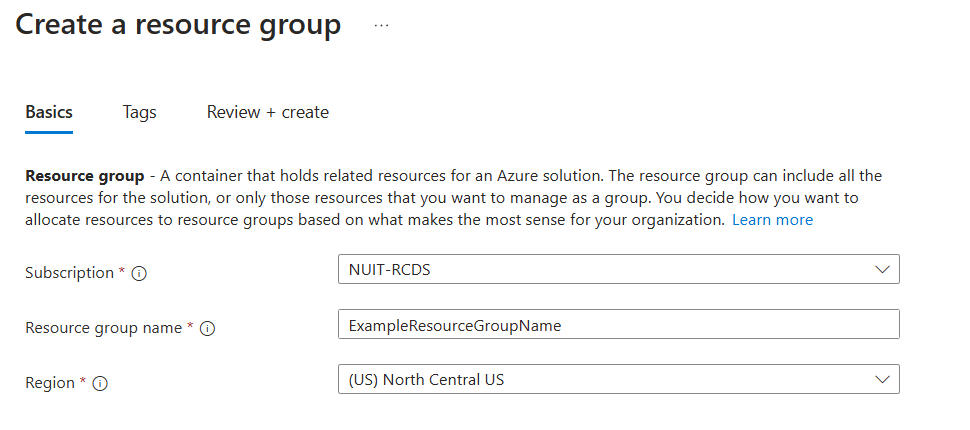
Step 3 - Enter project details. It will ask you for subscription, resource group name, and region. Below is a description of these.
Subscription: The subscription in which you want to build the resource group. This sets which subscription gets billed.
Resource Group: Create a name for this resource group.
Region: is a geographical area where Azure data centers are located. Select a region where you want this resource group to be placed. Not all regions have access to all services, so if you want a particular service, you’ll need to ensure it is offered in your closest region, and if not, switch to the closest one that offers it. For example, if you are looking into specific OpenAI models, consult this table . Northwestern users should use as a default the North Central US region, since it is located in Illinois. If you are in the Qatar campus, or need to use a region outside of the US, contact Northwestern IT Cloud Operations at azurecloudops@northwestern.edu for approval, since Northwestern automatically restricts regions outside the US.
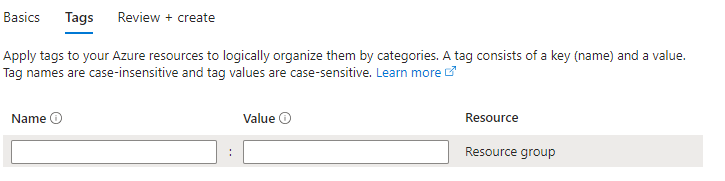
Step 4 - (Optional) Add tag/s to help with Organization. You might tag things by project, owner, or indicators for whether resources are production (and thus should not be deleted without review), development (delete with caution), or test (can be deleted at any time).
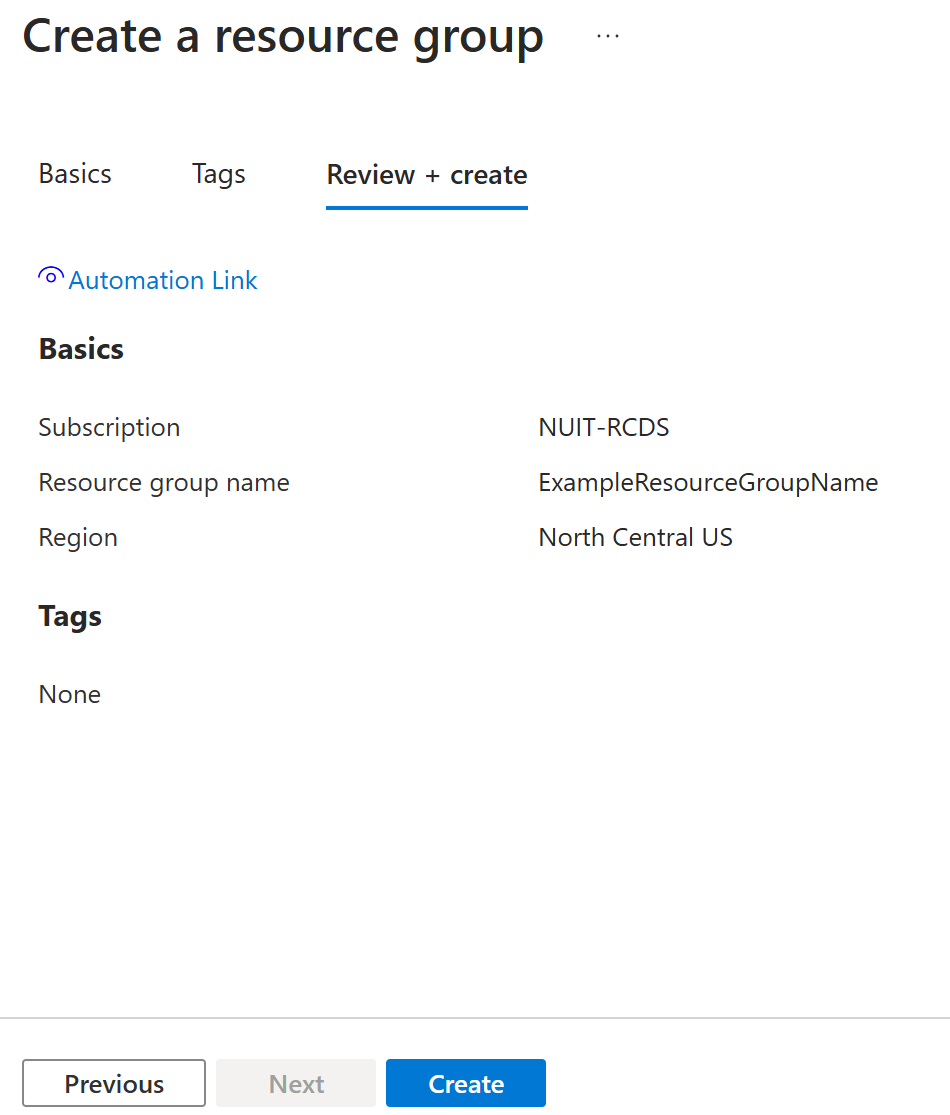
Step 5 - Review your resource group creation and click “Create”.
Then, when you create a specific resource, you can select this resource group during the creation process.
You can move resources from one resource group to another. For details on how to do that see the Azure documentation .
Multi-Resource Services#
Be aware that if you create a resource by selecting a pre-built Azure service, it may create several supporting resources. For example, when creating an AI system that will access your data and extract information for it, you may need storage, search, and AI resources, some of which can be expensive if not configured properly or deleted when no longer in use.
Deleting Resource Groups and Resources#
Some resources can be stopped when not in use to stop accruing costs, but others need to be deleted.
If you delete a resource group, it will delete all resources in that group as well.
To delete a resource group and all resources in the group:
Step 1 - Go to the Resource Group page in the Azure portal.
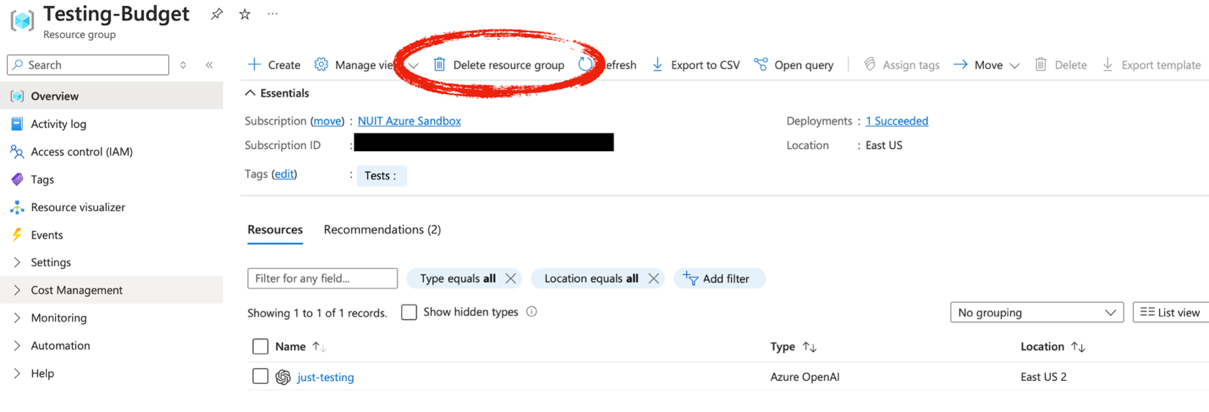
Step 2 - On the Resource Group page, click on the name of the group you want to delete to open a detailed view page.
Step 3 - On the top bar of the detailed page, you will see the option “Delete Resource Group”. Click on it.
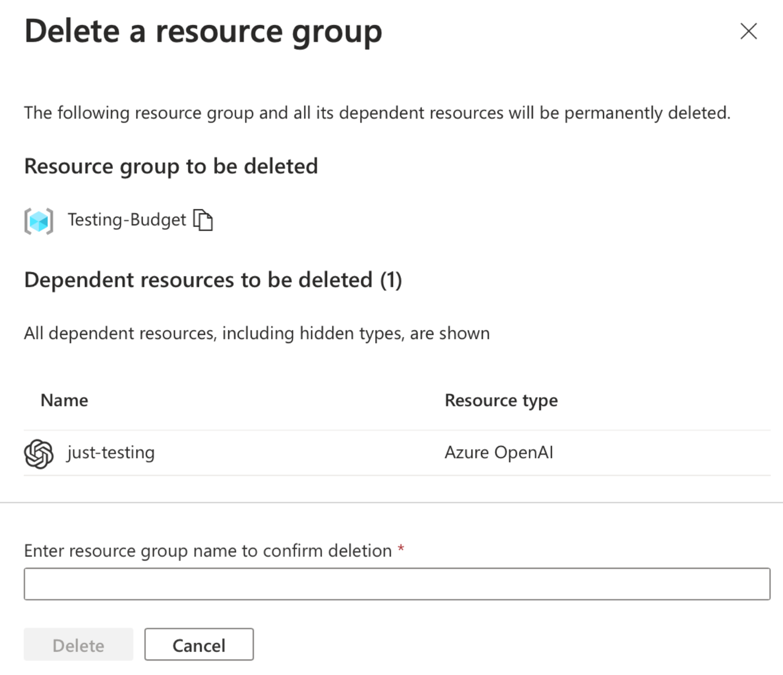
Step 4 - The resulting page will show you which resources will be deleted with the resource group. You will have to confirm deletion by typing the resource group’s name before it actually deletes it. Once you confirm deletion it may take several minutes to complete.
To delete a single resource:
Step 1 - From the Azure portal Home page click on the “All resources” option.
Step 2 - On the page listing all resources, check the box next to the resource you want to delete. Click the “Delete” button, not the “Delete Resource Group” button.

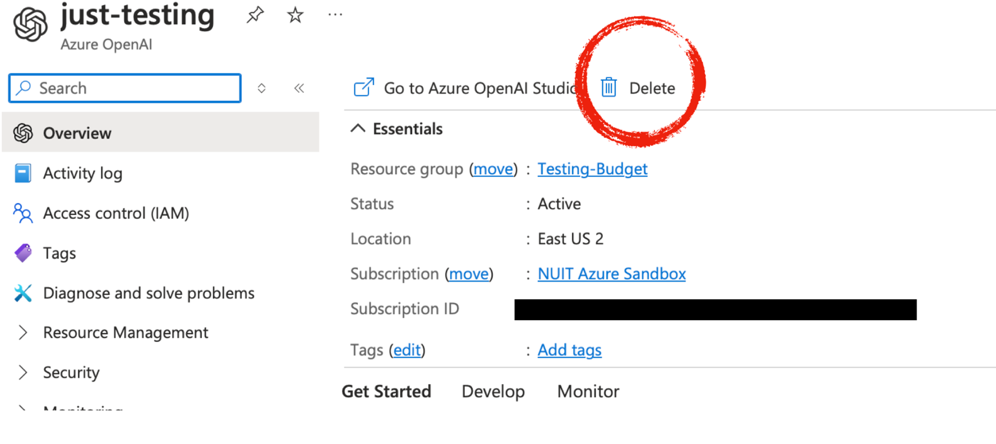
You can also delete a resource if you click on it directly and you find yourself on its information page. If that is the case, just click on the Delete button.
Managing Costs#
It is extremely important when using cloud services to keep an eye on incurred charges and to set up a budget. There are some resources in Azure that will keep charging you even if you are not actively using them, which may result in unexpected costs. Therefore, we recommend you delete any resources that are easily replaceable as soon as you finish using them.
The decision to delete resources differs from resource to resource. For example, for data storage, you need to keep storing your data even if you are not actively using it, so it should not be deleted unless you have a backup and truly won’t need this data anymore. In contrast, if you deploy a service like Azure AI Search, you may only need it once. Delete it when you are done using it to avoid ongoing costs.
Cost Analysis#
Azure has a built-in tool, Cost Analysis and Budgets, to help you monitor costs. Open the detailed page for a Resource Group and then find the Cost Management subsection in the left menu. It has a Cost Analysis option, which will show you incurred charges.
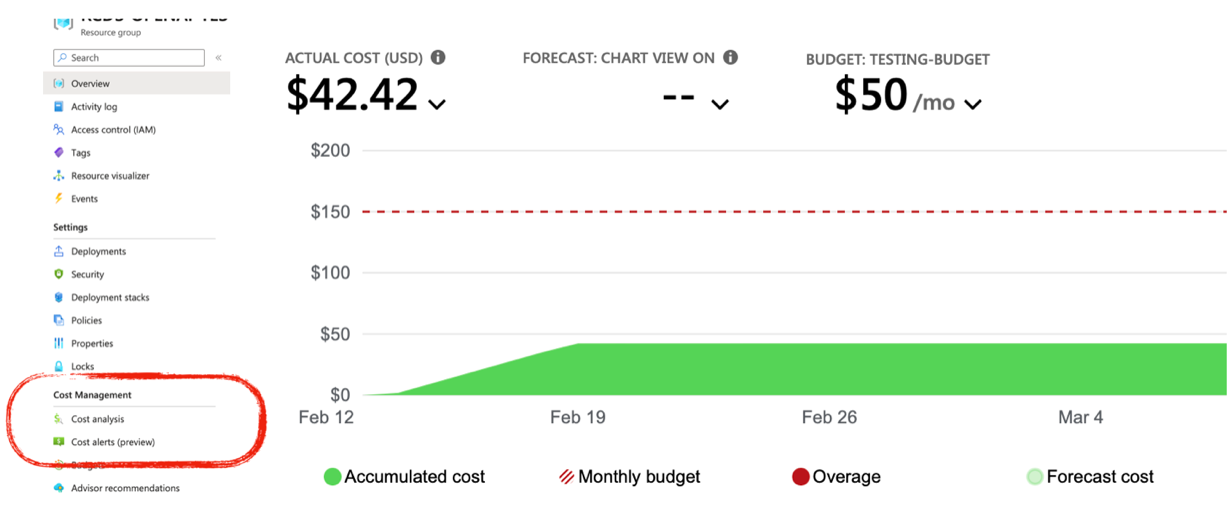
The main graph shows costs over time. You can change the period view in the options bar just above the graph. Below the graph you will also see costs split by services, location, and specific resources. Check this section to make sure you are still using any resources that are incurring costs.
We highly recommend you check Cost Analysis on a regular basis. In particular, after you have created a new resource you are not familiar with, check it every day to make sure there are no unexpected charges.
Budget#
You can create budgets to help you track and manage costs. There is a “Budget” option in the “Cost Management” section in the left menu when you have a resource group page open.
By default, you won’t have any budgets. You can create one by clicking on the Add button on the Budget page and fill out the details. A budget helps you get notifications via email and manage costs more effectively, however, it won’t stop the services automatically and it does not enforce spending limits. You can still go over budget.
Additional Budget Monitoring Tool: KION#
As part of the Northwestern cloud account onboarding process, the owner of the Azure subscription has access to KION, a cost and budget tool that helps track expenses. KION is not part of Azure, but Northwestern University provides free access to it: KION login (Chrome required). The account owner can give other users permission to KION through the Cayosoft group management tool.
Pricing#
Prices for Azure services are listed on the Azure website . Prices may vary by the region the resources are deployed in. Note that you will not be able to access most free Azure resources once you have a paid Northwestern subscription set up.
Many resources are billed based on the number of hours a resource is allocated, whether or not it is actively used. If you create a resource that uses data storage or has reserved computational capacity, you will be charged for the time that resource is provisioned, even if it’s not being actively used. Azure AI Search is an example of such a resource.
Other resources, such as those that listen for specific events or API calls, may charge based on actual use or by allocation time – it varies by resource.
Azure has a pricing calculator with examples. Note that you may need a combination of resources to support your workflow. For example, if you’re creating a database, you will also likely want to store backup snapshots of the database, and the cost of those backups is not part of the pricing for the database itself. If you need help figuring out pricing, don’t hesitate to contact us at researchdata@northwestern.edu .
Network Security#
This guide explains how to manage access to Azure resources using network security settings. Some settings are chosen when you create the resource, while others use default values that you can update later.
To change these settings, open the resource and go to Networking under Resource Management.
Recommendation:
If you plan to configure firewall rules, it’s best to apply them after the resource has been deployed. Adding firewall rules during deployment can sometimes fail or behave unexpectedly, while updating them afterward is more reliable.
Network Access Options#
Azure provides three network access options that control how your resource is accessed. In most cases, you will use Selected networks to restrict public access and only allowing access from approved networks such as the Northwestern GlobalProtect VPN, Evanston campus, or Chicago campus.
These settings determine who can access your resource from outside Azure, with each option providing a different level of restriction.
Option |
What it does |
How restrictive |
Use Case |
|---|---|---|---|
All networks |
Allows access from any location on the internet. |
Least restrictive; generally not recommended for sensitive or research data. |
Used when the resource must be publicly accessible to anyone. Resource owners, not users, are billed for usage. |
Selected networks (recommended) |
Restricts access to specific virtual networks and IP address ranges. |
Moderate / balanced; balances security and usability. |
Working with non-public research data. This is the minimum recommended security setting. |
Disabled |
Blocks all public access. |
Most restrictive; connections only possible through private endpoints. |
Working with highly sensitive data or strict data use agreements. Coordinate with IT to ensure all security and compliance requirements are met. |
Configure Selected Networks (Recommended)#
Since Selected networks is the recommended option, you can use it to control which networks and IP address ranges can access your resource, such as the Northwestern GlobalProtect VPN, Evanston campus, or Chicago campus networks.
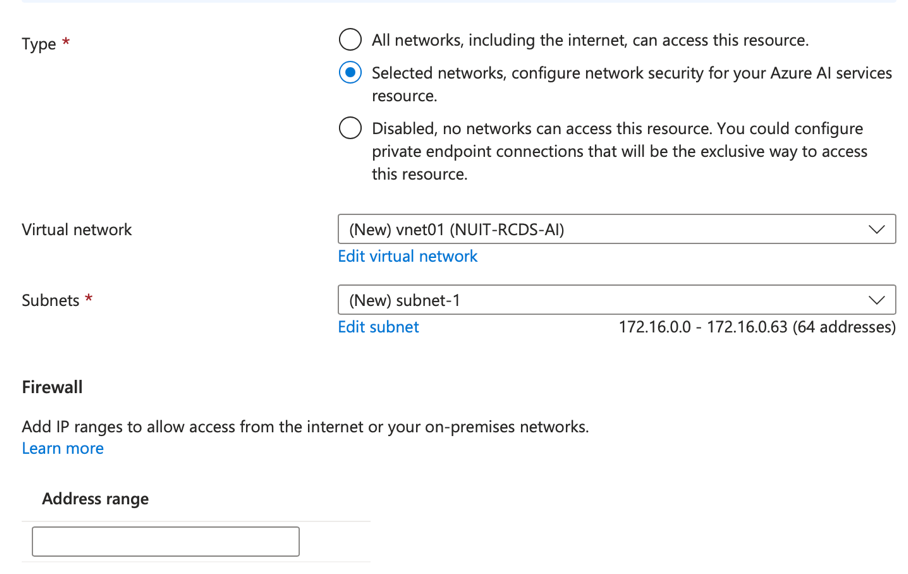
During resource creation after you choose Selected networks, you may need to configure three components:
A Virtual Network (VNet), which controls internal access in Azure
A subnet, which defines a smaller segment of the network
Firewall rules, which control access from outside Azure
For most users, you only need to configure firewall rules. The Virtual Network and subnet are created automatically.
Note: Firewall rules cannot be configured during the initial deployment. These settings must be configured after the resource has been successfully created.
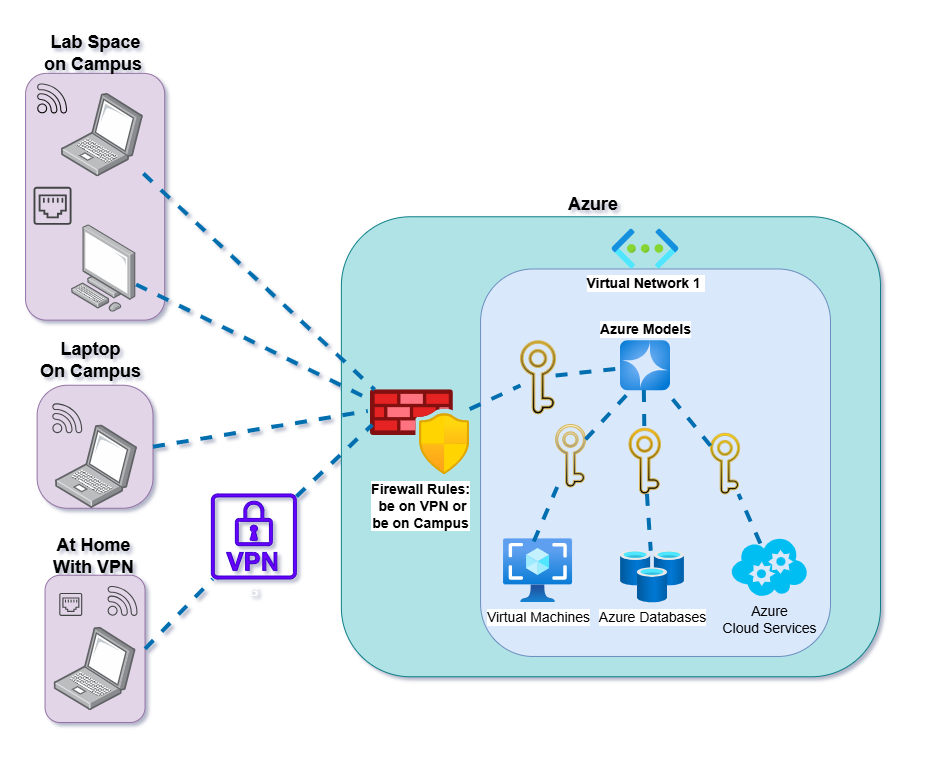
By default, only Azure resources in the same Virtual Network can access your resource. This means you will not be able to access it from your laptop until you configure firewall rules. The Firewall section allows you to grant access to networks outside of Azure, such as the Northwestern GlobalProtect VPN or Northwestern campus networks, by specifying IP address ranges.
The diagram below shows how access works when using Selected networks. Firewall rules allow internet connections from the GlobalProtect VPN and or Campus Network to a Virtual Network that contains your Azure resources.
Firewall Configuration#
Firewall rules control which external networks can access your resource. Use them to allow connections from environments such as the Northwestern GlobalProtect VPN, Evanston campus, or Chicago campus.
To add firewall rules, open your resource and go to the Networking tab under Resource Management. In the example below, the OpenAI resource includes firewall rules that allow specific IP addresses and ranges to access it.
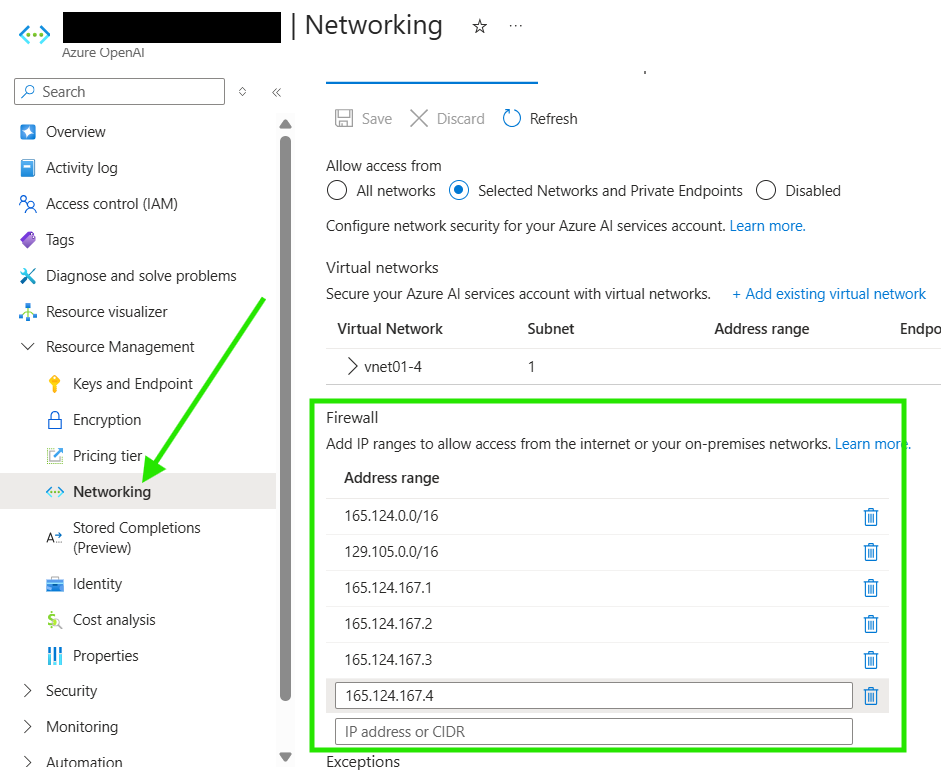
To access your resource from outside Azure, such as from your laptop or a lab machine, you must configure firewall rules that allow connections from specific IP addresses or ranges. Use the following IP ranges to allow access from trusted Northwestern networks
| Network | IP Address |
|---|---|
| Northwestern GlobalProtect VPN | 165.124.167.1 |
| 165.124.167.2 | |
| 165.124.167.3 | |
| 165.124.167.4 | |
| Evanston campus Wired/Wireless | 129.105.0.0/16 |
| Chicago campus Wired/Wireless | 165.124.0.0/16 |
Enter one or more IP ranges for each location that needs access, such as VPN, Evanston campus, or Chicago campus. When adding firewall rules, use the format shown in the table above or reference the example in the previous section.
Important: If using Northwestern GlobalProtect VPN, you must include all required IP addresses. (165.124.167.1, 165.124.167.2, 165.124.167.3, 165.124.167.4).
Northwestern GlobalProtect VPN: Connections from devices on the VPN.
Evanston campus wired/wireless: Connections from the Evanston campus network (eduroam). This also covers Quest systems, as those IPs fall within the Evanston range.
Chicago campus wired/wireless: Connections from the Chicago campus wired or wireless network (eduroam).
Using firewall rules allows you to restrict access to trusted networks only while still enabling access from approved environments.
Protection against leaked keys: If your access keys or credentials are leaked, they cannot be used outside the Northwestern network.
Access control for departed users: If you limit access to the Northwestern GlobalProtect VPN, users will lose access when their NetID is deactivated. They will no longer be able to connect.