Using Azure AI and OpenAI Resources#
Microsoft Azure includes a range of AI resources. Models from OpenAI are available, as well as models and services from other providers. This tutorial covers some background information about Azure AI resources and then provides instructions for deploying them. If you’re new to Azure, you may also want to review Getting Familiar with Microsoft Azure.
Working with Azure AI Resources#
Getting Familiar with Microsoft Azure covers many of the basics of using Azure that are common to different resource types. This section covers some of the particulars of working with AI resources specifically.
OpenAI Models in Azure#
Azure includes a variety of OpenAI models that provide different functionalities. The GPT family of models allows you to create chatbots and assistants, the Ada model allows you to compute word embeddings, Whisper converts speech to text, etc. To learn more about each of these models, see the Azure documentation .
Note that while the underlying models are the same as those available through online interfaces like chatgpt.com, the online platforms include additional utilities and data processing steps that run before data is sent to the model. For example, if you reference “today” using chatgpt.com, it will know what the date is. However, if you send a prompt including “today” to a GPT model through an API, whether directly through OpenAI or through Azure, it will not know the current date.
The GPT models available through Azure OpenAI are not hosted by OpenAI itself, but by Azure. That is, the information you send to Azure is not sent to, processed, or collected by OpenAI. See the Azure OpenAI documentation for details. This is true as of December 2025, it may change in the future. Always consult the Northwestern Guidance on the Use of Generative AI before starting a project.
Azure also includes a large variety of other AI models that are not from OpenAI. Be careful using models outside of OpenAI models, as some of these are provided by third parties and may not have the same data protections as available for the OpenAI models hosted directly by Azure. Reach out to researchdata@northwestern.edu with questions about what models and resources are appropriate for use with research data, particularly non-public research data that may contain sensitive data.
Regions#
Azure resources have to be deployed in a specific region, which indicates the physical location of the Azure infrastructure. Closer regions imply faster response time. You can choose the region where you want to create your resource. As a default, use the North Central US region, since it is based in Illinois.
However when working with AI resources specifically, you may need to use a different region, as not all AI models are available in every region. To see which models are available in which regions, check the Azure documentation .
Unless there’s a specific reason, always use a US region. If you have questions about regions, feel free to contact us .
Microsoft Foundry#
While the Azure Portal can be used to create any resource, the Microsoft Foundry is specifically designed for working with AI resources. The Microsoft Foundry is used to manage AI resources, and it can be used to create AI resources. Microsoft Foundry is both a section of the Azure portal (https://ai.azure.com ) and an Azure resource.
Azure AI Resources Change Frequently
Azure frequently rebrands and reorganizes its AI resources. The Microsoft Foundry may also be referred to as the Azure AI Foundry or just the AI Foundry. Previous AI resources and services, such as “Azure OpenAI,” have also been integrated into Microsoft Foundry. The general functionality remains the same.
In addition to name changes, there are often multiple resources or services that do the same or similar things. The organization of resources and terminology can be confusing, which is why we recommend starting with one of the example workflows below.
Models vs. Resources#
There is a difference between an Azure “resource” and a model. A model in Azure is any specific AI/machine learning model, such as GPT, DALL-E, Ada, etc. However, to access these models in Azure, you first need to create a generic AI resource to contain the model.
Currently, to work with AI models in Azure, it is best to have a “Microsoft Foundry” resource as a high-level containing resource. The Foundry resource will have project resources within it, and it may have additional resources including an “Azure AI hub” and supporting resources such as storage and a key vault, which securely stores and manages sensitive information, such as API keys and access credentials.
You usually do not need to do anything with these supporting resources directly, and they do not have significant costs if you don’t use them. When you’re done with your project, delete the entire resource group containing the Foundry resource, which will also delete these additional resources.
Foundry Projects#
Within a research group or lab, you may only need one Microsoft Foundry resource, as a Microsoft Foundry resource can have multiple projects within it. The idea is that a shared Foundry resource will work for and help organize all your AI needs, while a project will house specific model deployments or products. For example, you may be a PI with two students, one engaged in a language related project and another in a vision related project. The Foundry resource would contain the resources for the entire lab, while the projects would be specific for each student.
When you create a Microsoft Foundry resource, it will create an initial project inside it; you can add additional projects to the same Foundry resource later.
AI Hub Resource#
The Foundry approach to managing AI projects in Azure is new, and a previous approach using AI Hub resources still exists and is needed to access some AI services.
As of January 2026, when you create a new resource from the Microsoft Foundry page, https://ai.azure.com , you are presented with a choice between creating a Microsoft Foundry resource or an AI Hub resource. Choose “AI hub resource”. Azure recommends “Microsoft Foundry resource” but this resource will not allow you to fine-tune models or easily upload your own data to use with a model. Creating an AI hub resource will also create an associated Foundry resource.
Quotas#
For each AI model, there is a usage limit or quota per region and per subscription. See the Azure documentation for examples of these limits.
How this limit, or quota, is defined depends on the model. For example, if you use GPT 3.5 turbo, the limit is in terms of “tokens per minute” that the model will process per subscription. For DALL-E the limit is in terms of the number of concurrent requests.
When you deploy a model, you select how much of the quota is assigned to that deployment. If you are only working with one model deployment, you can assign all the quota to that model deployment. If you have multiple deployments of the same model in the same region, you will need to divide the overall quota between the model deployments.
For example, the overall quota for GPT 3.5 Turbo models in the North Central US region might be 240K tokens per minute. If you deploy a single instance of that model through a single resource, all 240K tokens can be allocated to that deployment. But if you create another resource in the same region (North Central US) and deploy the same model (GPT 3.5 Turbo), you would need to lower the quota assignment on the first model deployment to allocate some of the limit to the second model deployment.
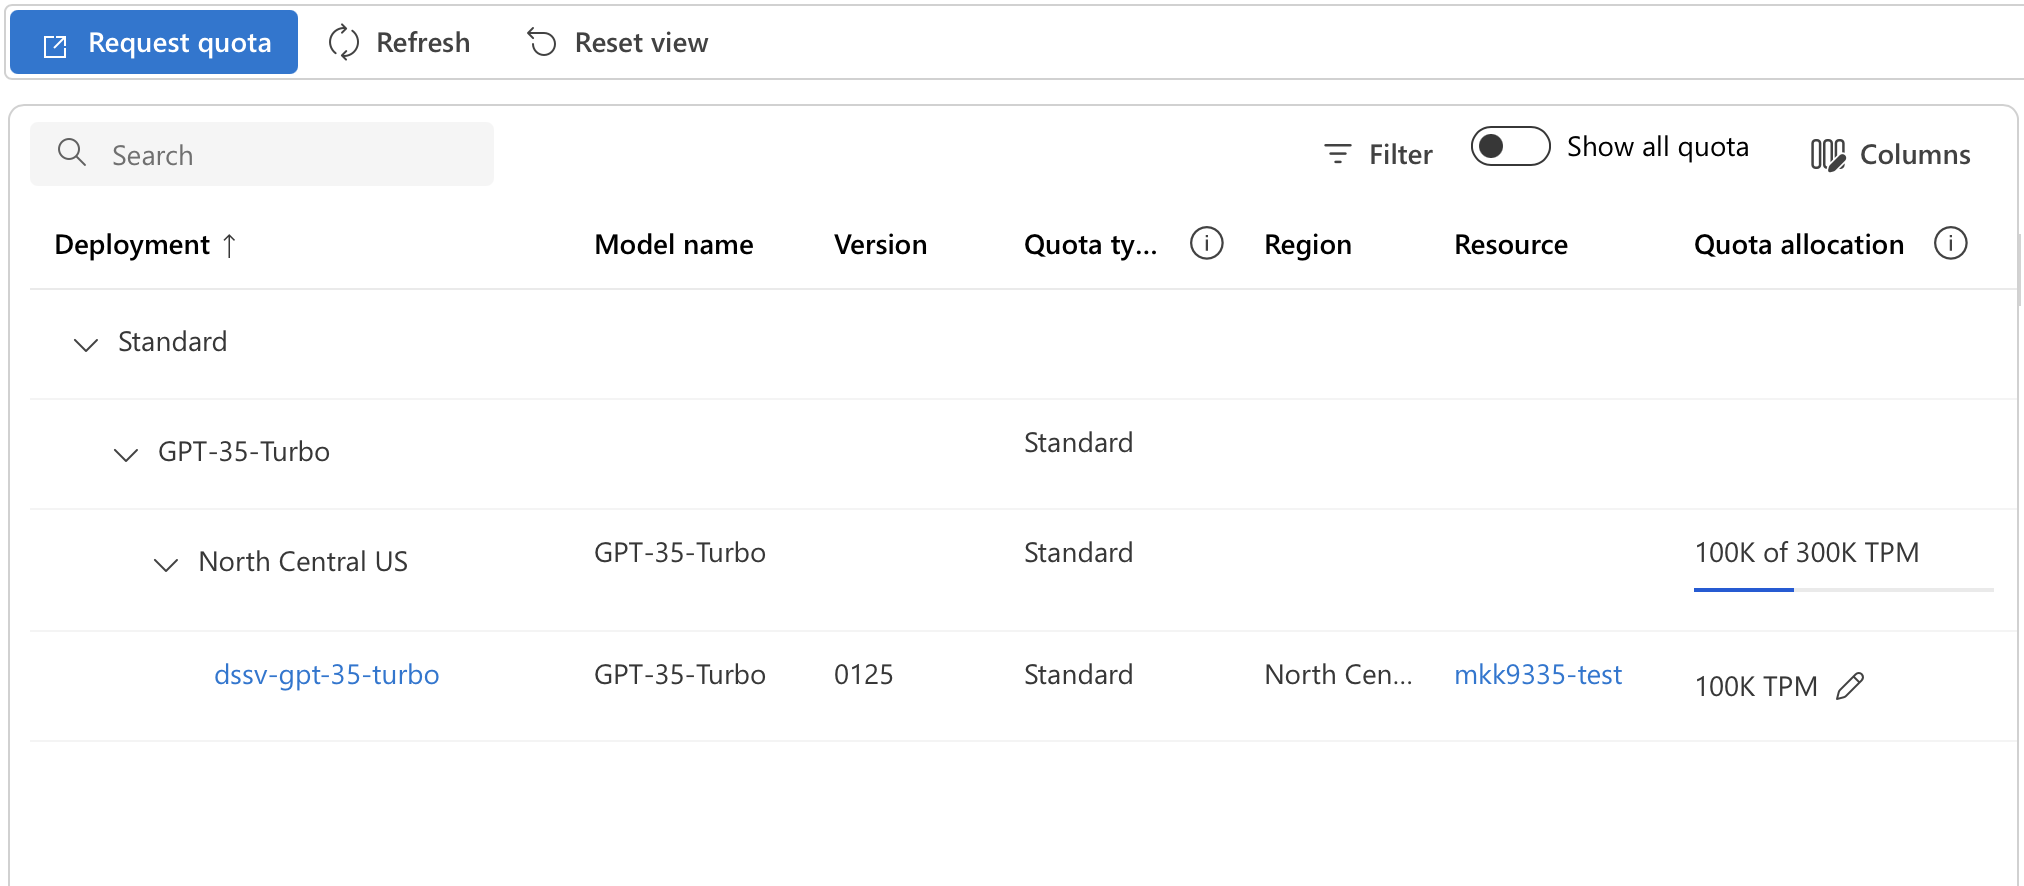
You can see and modify the allocated quotas for your resources from the Quotas page in the Microsoft Foundry . When you have a project or resource open, the left-side menu should have a “Quota” option. On the Quota page, you should see a table with Deployment as its first column, showing a list of expandable deployment types. You’ll need to find your model in this table by expanding the entries. Select the particular model, and then the region it is deployed in. There you will see a list of all deployments of that model in that region. Under the Quota Allocation column, click on the pencil icon to edit the quota for each deployment.
Creating a Chat Model#
This section walks you through the steps for creating a basic chat model and working with it through the Microsoft Foundry.
Create an AI hub resource through Microsoft Foundry
Deploy a model
Interact with the model through the Chat Playground
Delete the resource group containing the hub, project, and model when you are finished testing
Tutorial will deploy resources with a cost
This tutorial involves deploying resources with a cost. The total cost to deploy the resources, test them with a few messages, and then delete them will be a few dollars or less. If you leave resources active longer without deleting them, choose a more advanced model than the one used here, or use the resources extensively during the testing phase, the cost will increase.
Create a Foundry Resource#
Go to the Microsoft Foundry page, https://ai.azure.com .
When you go to this URL, Azure tends to redirect you to the most recently visited project or resource if you’ve previously created one. So what you see will depend on what you’ve previously created in Azure.
Foundry start page (you want to be here):

Foundry resource page:
You want to be on the Foundry start page, where there is a "+ Create New" button or link. If you are on a Foundry resource page instead, click on "Microsoft Foundry" in the upper left corner to go to the Foundry start page.
From the Foundry start page, click on “+ Create New.” You will be given a choice between a Microsoft Foundry resource and an AI hub resource. Choose the AI hub resource.
You will be prompted to specify a project name and a Hub. For the Hub, use the drop down menu to find the “Create a new hub” option and choose that.
Expand the “Advanced options” section to choose the region for the project, and to name the resource group and Foundry resource that will be created.
The Advanced options section will show that Public network access is Enabled, without an option to change this during the resource creation process. You can change the network settings through the Azure portal after the resources are created. To do this, open the Foundry resource in the Azure portal. Open the “Resource Management” menu on the left, and choose the “Networking” option. This will give you the option to select between the three network security levels; you can limit access to the Northwestern network if desired.
It will take a few moments for the resources to be created.
If you look at the newly created resource group through the Azure portal, you will see several resources, likely including a Foundry resource, Azure AI hub, Azure AI project, key vault, and storage account.
Deploy a Model#
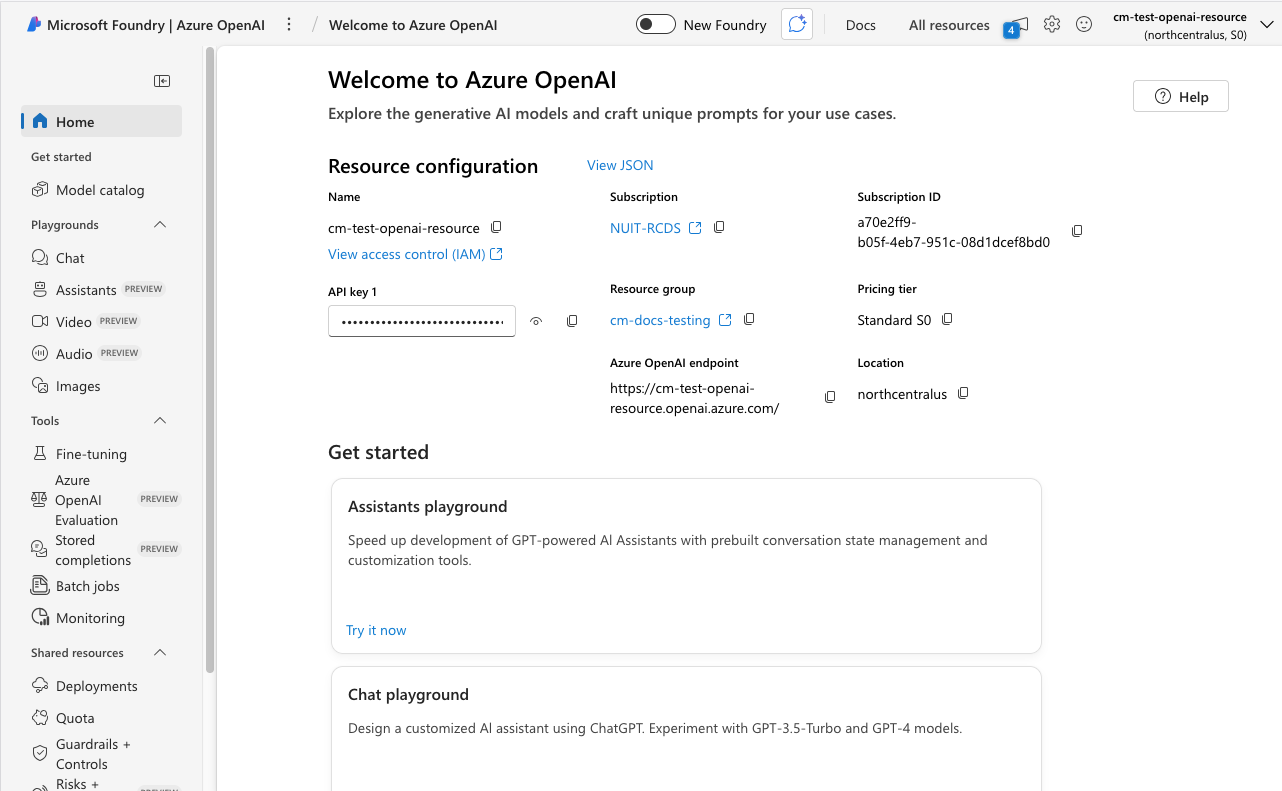
Once the project and related resources are created, you should be on the overview page for the new project within Microsoft Foundry. The project name should be listed at the top of the page, and you should see a menu similar to this on the left:
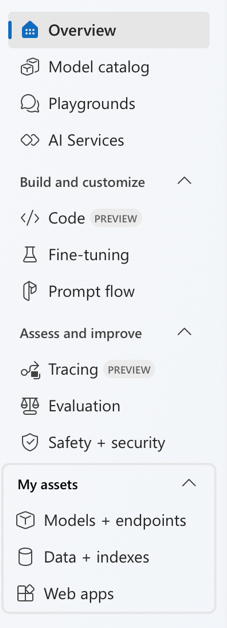
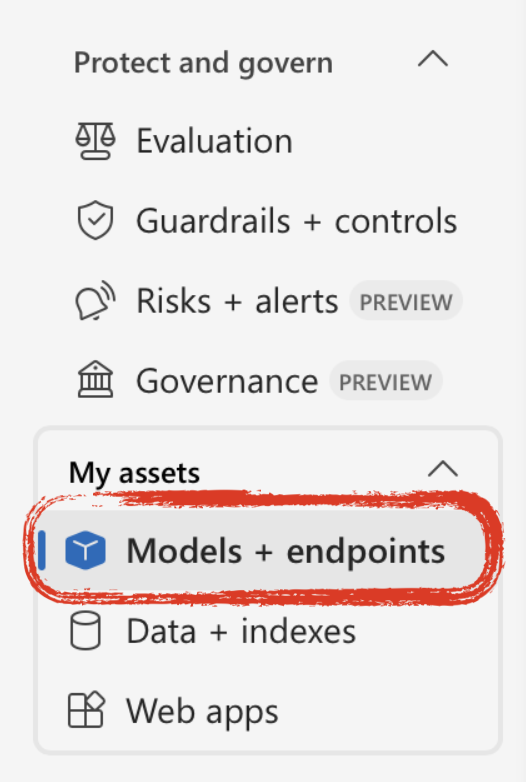
In the left-side menu, near the bottom, look for a section called “My assets”; click on “Models + Endpoints” to list which models you have deployed. At this point it should be empty.
Click on the “Deploy Model” button. Choose Deploy Base Model. Choose a model that does not have a lock icon on it, such as gpt-4.1-mini.
When you choose the model, you will be given some options. For “Deployment Type”, choose Standard so that you will be billed per call to the model that you make. Do NOT choose anything “provisioned”, as those charge hourly.
You will also see options related to your quota for the model. The defaults will be fine for testing.
Deploy the model.
The Chat Playground#
Once the model is deployed, on the model view page, click on the “Open in playground” button. You can also get to this through the Playgrounds menu on the left. When the Chat Playground is open, the screen will look similar to:
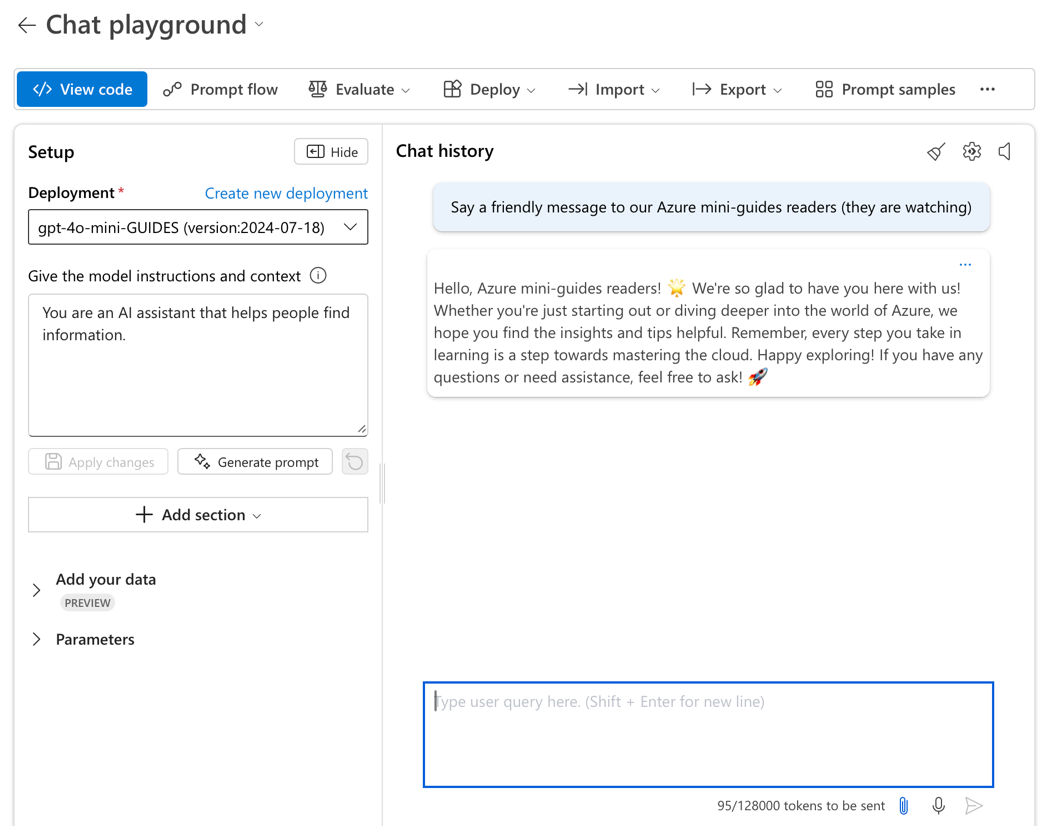
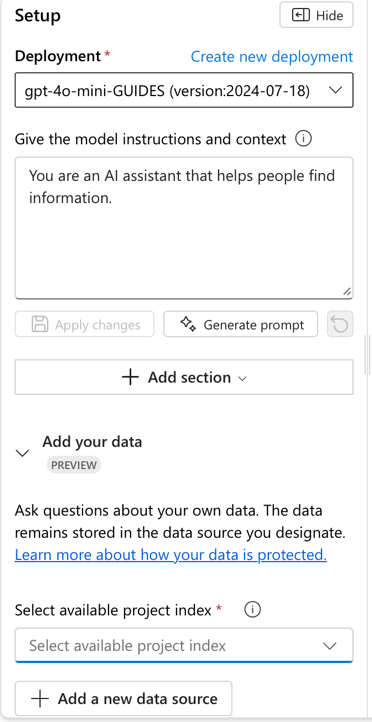
The playground is divided in two main sections, “Setup” and “Chat History”. You can chat with your model in the Chat History section to test it out.
You can modify the model instructions and context from the Setup section. You can change the pre-written instructions. The “+ Add section” has options to add system safety messages or examples of how you want the model to respond. Safety messages allow you to control possibly harmful behavior from the model, for example, disclosing private instructions you have given it, or generating biased or inappropriate output.
Delete Resources#
If you want to continue with the following RAG tutorial, keep your created resources and model deployment active.
If you are done testing, delete the resources used for this tutorial to avoid any further costs.
To delete all of the tutorial resources at once, go to the Azure Portal , then to the resource group’s overview page. Select and delete the resource group associated with the Foundry resource. The resource group should list at least a Foundry resource and a Foundry project.
Retrieval-Augmented Generation#
If you want to supply your own data for an LLM to incorporate in its answers, you’ll want to use a retrieval-augmented generation (RAG) system. This section shows you how to set one up and then explains some of the key components in a RAG system.
Tutorial will deploy resources with a cost
This tutorial involves deploying resources with a cost. The total cost to deploy the resources, test them with a few messages, and then delete them will be a few dollars or less. If you leave resources active longer without deleting them, choose a more advanced model than the one used here, or use the resources extensively during the testing phase, the cost will increase.
Retrieval-Augmented Generation (RAG) is the process through which external data sources can be used to inform the context of a generative AI model. For example, if you have a chatbot, you can add a series of websites through RAG and the chatbot will be able to answer questions about those websites. The same can be done with a collection of academic papers, reports, interviews, etc. The key aspect of RAG is that it does not retrain the large language model (LLM) you are using. Instead, it searches for important information in your data and appends it to the prompt submitted to the LLM.
To set up RAG, you need additional Azure resources beyond those created above. These resources can have a significant cost if used long term. If you are creating a RAG system for long-term use, want to incorporate a lot of documents, or want to customize how information from the documents is integrated into a conversation, it may be worth investigating other options for creating RAG systems. We’re happy to help you through a Data Science, Statistics, and Visualization consultation .
RAG Setup Steps#
Step 1 – Deploy a LLM
Follow the steps in the section above, Creating a Chat Model, and open the Chat Playground for your model.
Step 2 – Upload your documents
In the “setup” panel of the Chat Playground, find the section “Add your data.” Click on “Add a new data source.” A new window will appear. In the first option “Data Source” select “Upload files.” Click the “Upload” button to choose files or folders from your computer to add. Upload a couple of test documents (choose .doc, .docx, or .txt documents for now) and click Next.
Step 3 – Index configuration: create an AI Search resource
As a part of adding your data, on the “Index configuration” step, Azure will ask you to select an existing or create a new “Azure AI Search” service. Create a new one.
Azure will open a new browser tab to create the new search service. We recommend naming the resource with a suffix like “xxxxx-for-testing-delete-me-later” as a reminder to delete later. Put the search service in the same resource group and region you’re using for the other resources for this tutorial. Change the default “pricing tier” to the free basic version for testing.
Leave the Scale options to their defaults; no additional replicas or partitions are needed for testing or development. Tags are optional. The networking option will default to public; this can be changed later through the Azure portal.
On the “Review + create” tab, make sure that the estimated cost per month is listed at $0.
After you click “Create,” it may take a few moments for the resource to be set up and accessible back in the tab/window where you were adding your data. Wait for the search resource page to indicate that it is successfully deployed before returning to the “Add your data” tab and workflow. Deploying the new search resource should not take more than 5 minutes. If you see any errors or the resource is not successfully deploying, you can cancel the deployment and do it again.
Once the search resource is deployed, back in the “Add your data” workflow, under “Select Azure AI Search service” select “Connect other Azure AI Search resource” to open a view that should list your newly created resource; choose “Add connection” to connect the search resource with your model deployment. Then, the search resource will show up under the “Select Azure AI Search service” menu; select it. You can choose a name for the “Vector index” or use the default name. For the virtual machine, choose “Auto select”.
Step 4 – Search settings: add vector search
On the “Search settings” step, keep the default options to add a vector search resource with an embedding model. Use the defaults for the purposes of this tutorial.
Step 5 - Review and finish
Finish the last steps of the “Add your data” workflow and click the “Create vector index” button. When complete, it will return you back to the Chat playground.
In the “Add your data” section of the “Setup” pane in the Chat playground, there will be messages about the system ingesting your data. The resources you created are processing and indexing the documents you uploaded. When this process is complete, you will see the index you created listed in this section.
Step 6 – Test it out!
Now your chatbot will have access to your uploaded documents. Ask questions related to your documents and see how it responds. You can ask it to give you sources also and it will link to the specific documents from which it gathered the information necessary to respond to your query.
Step 7 – Delete resources
When you are done testing your system, remember to delete any resources you created and no longer need. Specifically, make sure you delete your Azure AI search resource and any virtual machines, as these are resources that incur significant ongoing costs. These resources should be part of the resource group that also contains the Foundry resource and related resources. You can delete everything together by deleting the entire resource group.
How Azure AI Search Works#
Large language models can only hold a limited amount of information “in context” before generating an answer. You can think of this as the working memory capacity of your chatbot. This information is counted in “tokens”, which roughly correspond to individual words and special symbols. During RAG, the objective is for the LLM to interact with your data, but your data can be much, much larger than the limit of tokens the LLM can handle. To solve this issue, an intermediary search process is used. This process accesses your data, finds the relevant information, and then adds only the relevant information as part of the prompt given to your LLM. Finding the relevant data from your documents is what “Azure AI Search” does.
Azure AI Search is secure in the sense that your data will remain inside the Azure ecosystem and will not be shared with third parties (unless you desire).
AI Search is composed of two stages: indexing and querying (image from the Azure documentation .

Indexing. Indexing refers to the process of converting raw text data into one structured and easily searchable collection called an index. For example, you may have a collection of scientific papers and Azure AI Search would make one index for that collection so it is easy to find data within it. If you have another collection, say of answers to a given economic survey, you can create another index for that collection.
Querying. Querying extracts “relevant” information from the indexes and sends it to other resources (in the example above, to your OpenAI resource). For example, a query like “experiments involving mass spectrometry” on the scientific papers index example above would return only the papers (or subsections of those papers) in your collection that are relevant for that query. A query like “what did respondents say was their main challenge paying back their debts?” on the economic survey index example above would return the most relevant text from the survey responses that addresses this question. The more specific the query, the fewer (and possibly more relevant) the results will be.
Determining Search Relevance#
There are different ways in which search can match a query to results, but by far the most relevant in the generative AI era is vector search. The documents you upload are divided into chunks and then an embedding model is used to transform those chunks into vectors representing the information in the documents. The embedding model is also used to transform the input provided to the chatbot into vectors. The vectors from the chatbot input are compared to the vectors from the reference documents; vectors that are close together indicate relevant chunks of the documents, which are then pulled and provided to the chatbot/LLM model for context in responding to the prompts.
There are different embedding models that can be used for this process. In the steps above, you selected the default embedding model as part of setting up the vector index, but this can be changed if needed.
Once relevant information is obtained as a search result, that information can be used for a variety of applications. In a RAG system, the relevant information is appended to the generative AI prompt, and then your chatbot can answer using natural language and the relevant information extracted from your documents.
Skills and Semantic Search#
Azure allows you to “enrich” the base indexing with extra functions: for example, language translation and optical character recognition (if your documents need it). These extra functionalities are called “skills” and you can learn about them in the Azure documentation .
You can also enhance the querying process. Semantic ranking adds an extra step when considering what a “relevant” result is, to make sure context is accounted for; for example, “capital” has a different meaning in geography than in finance. Adding these extra features for querying and indexing to Azure AI Search will incur an extra cost.
Using the Python API#
While you can work with the model you’ve deployed through the Azure website, in most cases you’ll want to use the model from another script or application. This part of the tutorial will show you how to interact with the model from a Python script using the API. You can connect to the API using other languages as well.
This section assumes that you have completed the steps in Creating a Chat Model.
If you added data sources to the model in the Retrieval-Augmented Generation section, this information will be not be automatically accessible when you interact with the model deployment using the API. See the Azure documentation for an example of accessing the Azure search resource to incorporate your uploaded documents.
Requirements#
To access an Azure OpenAI model deployment from your computer, you will need three basic elements:
An API key
The OpenAI API endpoint (a URL)
The model deployment name
All of this information is available from the model detail page. Go to the “Models + endpoints” section (towards the bottom of the left-side menu) in the Microsoft Foundry.
Then select the model you want to use. This will open a page with details on that model deployment.
API Key#
The API key is a series of characters that authorizes your script to access the API. The API key is like the secret word to get into a private club – you can share it with others who should be allowed into the club but posting it publicly will cause problems. It is OK to share the API key with others you want to have access – there’s a single set of keys per deployment, not one per person.
There are instructions below on how to create a .env file you can use to store your key and access it from your Python script. This is a more secure method than hardcoding the API key directly into your script. Do not upload the .env file to GitHub or other code sharing sites (use a .gitignore file for this purpose).
The API key is listed in the “Endpoint” section of the model deployment details page.
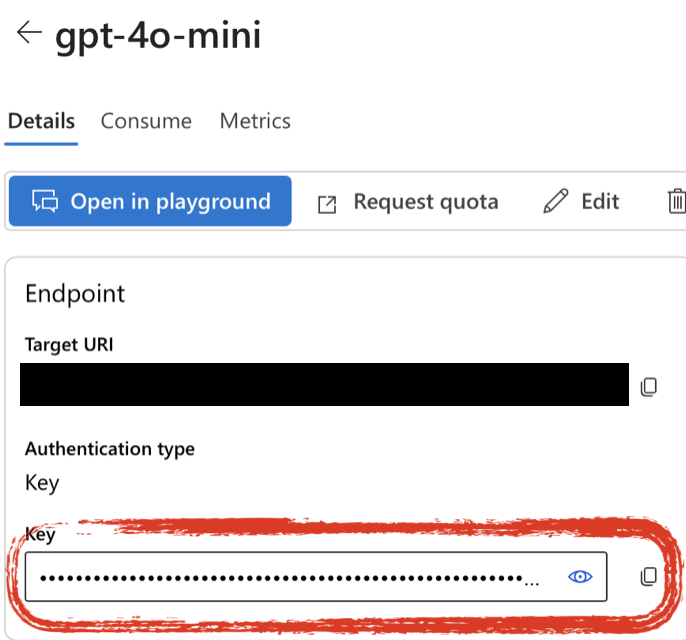
Endpoint#
The endpoint is a URL that points to your model. Copy the “Target URI” listed in the “Endpoint” section of the model deployment details page. Delete everything after “.com/” and replace it with “openai/v1” so that your endpoint URL looks like:
https://your-resource-name.openai.azure.com/openai/v1
Model Deployment Name#
The “Deployment info” section has the deployment name (labeled as just “Name”); if you kept the defaults when creating the deployment, this may be the same as the model name (ex. “gpt-4.1-mini”).
The OpenAI Python library#
You will need to install the openai Python library in order to use the API. We recommend using a virtual environment through an environment manager such as conda or venv. Install the openai library along with python-dotenv to manage environment variables.
The library implements the official OpenAI API , and it also adds a few Azure-specific elements. See the openai-python GitHub repo for details. Unless you are using other Azure resources such as an AI search index, you can use the standard OpenAI methods. To access Azure elements like a search index, you will need to use the AzureOpenAI client instead of the standard OpenAI client.
Using the API#
The model deployment detail page from which you got the API endpoint and key has an example of calling the API from Python (and other languages); however note that the example provided here is slightly out of date. See below for an updated example that also uses an .env file to keep the API key secure.
from openai import OpenAI
import os
from dotenv import load_dotenv

# 1. SET UP THE MODEL

# Load API info from a .env file into the environment
load_dotenv()

# Initialize the OpenAI client
client = OpenAI(
	api_key = os.getenv("AZURE_OPENAI_API_KEY"),
	base_url = os.getenv("ENDPOINT")
)

# 2. START THE CONVERSATION

# Create system instructions and indicate user input
conversation = [
	{"role": "system", "content": "You are a helpful assistant"},
	{"role": "user", "content": "Tell me something interesting about cats."}
]

# Get response from the client
response = client.chat.completions.create(
	model = os.getenv("DEPLOYMENT_NAME"),
	messages = conversation
)

# 3. CONTINUE THE CONVERSATION
# see the response
print(response.choices[0].message.content)

# append model response to the conversation
conversation.append({"role": "assistant", "content": response.choices[0].message.content})

# add a new user response to the conversation
conversation.append({"role": "user", "content": "That's an interesting response.  Tell me more."})

# get another response
response = client.chat.completions.create(
	model = os.getenv("DEPLOYMENT_NAME"),
	messages = conversation
)
print(response.choices[0].message.content)
Step 1: Setup#
It is important to keep the API key secure. Avoid typing it directly in any Python scripts. Instead, store it in a file called .env (no file name, just the extension). This should be a plain text file with contents similar to:
.env File
AZURE_OPENAI_API_KEY = 'xxxxxxxxxxxxx'
ENDPOINT = 'https://some-resource-name.openai.azure.com/openai/v1'
DEPLOYMENT_NAME = 'gpt-4.1-mini'
The variable names in the .env file need to match those in your script exactly, including case. Note that the names are in all capitals both in the .env file and the Python script.
You should save this .env file wherever you save your script. Note that files starting with a dot are invisible by default in your file explorer, so if you can’t find it remember to make hidden files visible.
If you upload your code to a repository like GitHub, make sure to add “.env” to the .gitignore file in your repository to prevent this file from being uploaded to GitHub.
The load_dotenv() function knows how to search your path for your .env
file and load the contents into the environment. The os library knows how to retrieve the values from the environment.
Step 2: Starting the Conversation#
Some generative language models, like the GPT family, support different “modalities” to interact with the model: chat, assistants, and completions. This means the models have been tailored to act better as chatbots (more conversational, short back and forth responses), as task-specific assistants (for example math tutors), and as completion models (longer, more involved, non-conversational answers).
Each of these modalities must be called with a different method in the openai library:
Chat:
chat.completions.create(model, messages)Completions:
completions.create(model, prompt)Assistant:
beta.assistants.create(name, instructions, tools, model)
For the chat modality, each time you want a response from the model, you need to provide the full conversation history in the messages argument. messages is a list of dictionaries. Each dictionary has at least two keys: the “role” and the “content”. Currently there are only three allowed roles: “system”, “user”, and “assistant”:
“system”: Instructions as to how your bot should behave. This can include instructions about its personality (serious, funny, etc.), the task it should perform (assist doing research reviews, summarize texts, etc.), safety measures, etc.
“user”: This is any input or prompt you give as a user, akin to what you would input in the ChatGPT website.
“assistant”: These are messages that the model thinks are its own output. This helps to keep track of the conversation and differentiate model output from human input and responses.
Start with “system” and “user” conversation elements.
Step 3: Continuing the Conversation#
As the conversation progresses, capture the output from the model and add it to the conversation list, denoting the item “role” as “assistant”. The model does not keep track of its output; you must capture it and supply it if you want it to have the context of its previous output to generate the next response.
Generally, you will want to review the model’s output and then decide what the next user input should be, rather than having it predetermined as in the example above.
To start a brand new conversation, start with a new conversation object with different inputs.